Tuesday, March 10, 2009

On Mainstream Sock Yarns

One poster commented on yesterday's post about "mainstream" yarn companies making sock yarns that she'd also seen Lion Brand and Paton's Sock Yarn.

I've got a ball of the Lion Brand sock yarn, which was introduced on the market last year, in my stash waiting to be knit (thanks to E. who visited their studio in NYC over the Christmas break). No comments on it as yet, but the colour is great, and it looks like a good quality blend.

For both Lion Brand and Red Heart, sock yarn is a new product, and clearly a testament to the new popularity of sock knitting.

Paton's sock yarn is a different story entirely. Paton's has been in the business of sock yarn since the dawn of time (or at least since the 1940s, as far as I can tell). Kroy. And I love it to bits. Many of my oldest socks are in good old Kroy. They used to make a 3-ply variant, with a gauge of about 32 sts, but now they only have a 4-ply version, with a gauge around 28 sts.

This is the Kroy 4-ply in "Paintbox".


And these are about 15 years old, in the 3-ply variant.


I love that yarn. It breaks my heart that it quietly disappeared from the market when I wasn't paying attention. I would have bought as much as I could get my hands on. It was high quality, well-priced, hardwearing plain and simple sock yarn.

(Anyone got any in their stash they'd be willing to part with?)

Monday, March 09, 2009

You Know It's Gone Mainstream When..

For reasons that aren't relevant or interesting, I had to make a quick trip to Buffalo at the end of last week.

I didn't find a yarn store, but I did spent a few minutes in a Michael's. They had the usual selection of brands: Lion Brand, Bernat, a bit of Paton's and lots of Red Heart.

I'm very fortunate in a couple of ways: that I live nearby some really terrific yarn stores, and so have access to all sorts of great products, and also that I can afford to spend more on the yarns that I buy. Not everyone has that luxury. Sometimes, Michael's is the only option a knitter has.

I have no experience with Bernat - other than what I can tell by looking at the ball band and the product itself.

I am fairly familiar with the Lion Brand yarns. They're reasonably priced, reasonably good quality yarns. They're great for newer knitters, knitters who can't or don't want to spend a lot of money on a project, and knitters who are concerned about durability and machine-washability. I don't hesitate to recommend Wool-Ease in particular to knitters who need to think about price and durability. And some of the Paton's lines are very good. Their Classic Wool is an underappreciated wonder: a reasonably priced high quality 100% merino wool worsted weight that is great to work with, and felts like a dream. Both companies are guilty of producing some rubbish novelty yarns, but both have decently priced, good quality basics.

But then there's Red Heart. I've used a couple of Red Heart products. They are definitely at the lower end of the scale in both price and quality. They are very representative of the sorts of things you get when price becomes the only consideration... They come from the same corporate thinking that produces boxed, dried mashed potatoes: it's all about price and convenience, quality be damned. And in colours and types of yarns, they focus very much on the mainstream - yarns for granny square afghans, quick-knit kid's sweaters, the sorts of winter accessories than can be knitted every fall and lost or ruined or grown-out-of by the time winter ends. These aren't about lace knitting, or fashionable adult garments, or heirloom-quality baby christening robes.

And so there I was, scanning the shelves to see what was new in the land of low-price mainstream crafting... and I nearly fell over.

Red Heart Sock Yarn.

Thursday, March 05, 2009

New Designs: Baby sets - free patterns for download


Back in the fall I worked on a design commission for Estelle Yarns to create some baby items with their Young Touch Cotton.

The are three sets -- vintage-inspired designs for a boy, for a girl, and a nice and modern non-gender specific design. The cable and seed stitch set on the home page is mine. (And how cute are those babies???)

Pattern sheets and downloadable versions are to follow -- I'll add links when they are available.

Wednesday, March 04, 2009

New Book Contribution; Socks for Norman


I'm pleased to announce that two of my designs have been featured in the new book "Tops and Toes"

I've got a nice simple pair of socks in a self-striping yarn, and then a pair of men's socks in what I think is rather a clever design.

I knit a lot of socks, and I have lot of leftover sock yarn. And I tend to end up with lots of bits of self-patterning yarn. They're hard to use up, but my "Fancy Fair Isle" design uses (what I think is) a nifty trick to allow you to play with them...

who says you have to work Fair Isle with solid colours?

As seen on Norman's feet, my Fancy Fair Isle socks... I worked the leg in stranded Fair Isle using the plain grey yarn and a self-patterning yarn. The resulting effect hits that sweet spot of coloured-not-too-much, interesting-but-not-too-much, and different-but-not-too-much that makes them fun but entirely wearable for even the most colour-adverse of men. (Because 90% of socks knitters agree that their male partners seem to only like plain dark socks....)

Monday, March 02, 2009

New Sock Design: The April Showers Sock


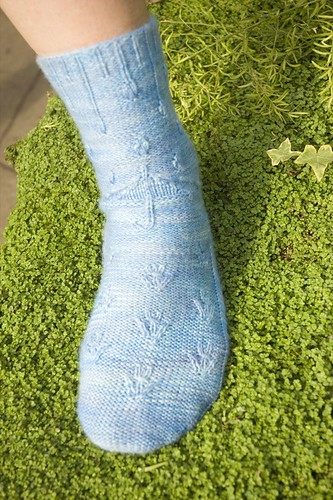
I'm thrilled to announce the release of a new sock design - the April Showers sock. Ravelry page here.


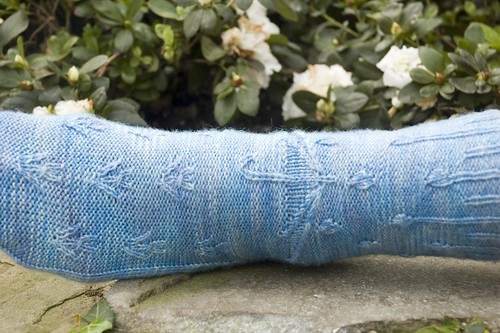
I was inspired by the gorgeous sky blue "Tidal" colourway of Tanis Fiber Art's sock yarn. Being hopeful that this long winter would eventually end, I designed a sock based on my favourite season -- early spring.

The raindrops run down the leg to the heel, stopped by an umbrella, which is sheltering the flowers that decorate the foot...


It's a fun design with a little bit of clever cabling - suitable for intermediate/experienced knitters.

The pattern is available exclusively for sale from The Naked Sheep's new online store.

Thanks to Sarah and her very patient sister for the amazing photography.

Friday, February 27, 2009

A Sleeve Too Far...

Look! It's a sweater! With sleeves and everything.

I made a few modifications from the original design: it's a couple of inches longer in the body, I made the sleeves full length, and I worked the front edging in the same cable pattern as the body and sleeve edgings, and without a buttonhole.


The sleeves turned out to be a huge challenge, but not because of the pattern. It was all about the yarn. (Well, and my lack of time. Busy at the moment.)

The yarn is, shall we say... inconsistently spun, and I found partway through a new ball that it was significantly thicker than the previous ball, and I had a sleeve that suddenly got much wider, even though the number of stitches hadn't changed.

So I pulled back, started a different ball, and then 4 inches later, I realized I'd pulled back so far I was short a decrease.

Sigh.

So again I started, and although it was slow going due to various other things grabbing my attention, it ran smoothly enough, and I finished it Wednesday night.

It's just dry, after a quick dunk in the sink.

(Very runny, the dye on this yarn. The water looked incredibly muddy.)

But yes, a quick dunk in the way of a casual block, and 24 hours lying flat to dry, and it's good to go. (Yeah, ok, there's a whole whack of ends to weave in. More so than you'd expect, because there were knots in the balls, and the yarn broke a couple of times, too.)

I do really appreciate that it was done once the second sleeve was complete, no finishing required at all, other than the ends to weave in.

I'm not thrilled with the fit of the sleeves below the elbow -- a smidge too loose -- but that would be easily modified, and it's got nothing to do with the essential nature of the raglan construction.

The design is definitely a success, and it's the sort of thing I'll wear often.

Not sure I'd use the yarn again, though.

Friday, February 20, 2009

Coraline Sweater Pattern


LOVE this. A pattern for the Coraline sweater has been published. Available for download from the movie website.

Little blurb about it on the EW site.

I think what I love most of all is that the stars aren't worked in intarsia as I feared -- they're cut out of fabric and stuck to the finished garment!

Thursday, February 19, 2009

Body Done

Ok, so the main portion is done. I do like that I was able to adjust the length on the fly -- I went a bit longer than the pattern called for, based on what I want to wear this with.


What next -- sleeves or edging? I think I'll try for the edging first, as my reading on top-down raglans make me think that the sleeve might need some adjusting to fit me well.

I'm going to use the same accidental modification that Jen did for the edging, and work it in the same cable-and-rib pattern (rather than plain old ribbing), without a buttonhole.

My last posts have spurred a fair bit of discussion... TracyKM agrees with me that although short-row shaping can often be a solution to the fit problem, they are not easy to add to a top-down one-piece raglan. And Kirsten remarks that although she's confident making them work when sewing, she's less confident about how they work in sweaters.

TracyKM also made me laugh by commenting that things were much easier in the 1980s, when all sweaters were big boxes with sleeves that started somewhere around your elbow.

Me, I've started researching and noodling on a top-down set-in sleeve. Short row shoulder shaping! Easily modified armhole depth! Excited about the possibilities...

Monday, February 16, 2009

Progress on the Top-Down Raglan/As I Was Saying

See -- fits beautifully around the shoulders.

The front? Not so much.


Now, this is a cardigan with a deep v, so it's not supposed to meet above the bust-line, but it *is* supposed to meet at the bust level, where the original design has a button.

I plan to skip the buttonhole entirely and use my trusty kilt pin to fasten it lower, if at all. I use a kilt pin to fasten pretty much anything that needs fastening. Not that I have a kilt, it's just that I like the giant safety pin nature of it.

The original design calls for it to be about 12 inches long from the armholes -- I might work it longer, we'll see. I do love how the cable and rib combo are providing waist shaping without requiring decreases and increases. Clever.

When I started on this little tirade about the fit of the one-piece raglan, the observant/mathematically inclined/experienced designers in the crowd may have thought to themselves... "but hey, if your main complaint is that you need some bust shaping in the garment, can't you just do some short row shaping or something?"

Yes, absolutely, this is also an answer. But show me a one-piece raglan pattern that explains this, and provides specific instructions.

My issue isn't with the design itself; my biggest issue is with those knitters and designers and yarn shop staff who proclaim this particular design to best place for a beginner to start, and the magical solution for all your sweater needs.

Friday, February 13, 2009

Adventures in One-Piece Raglans & Contrariness

Any knitter who knows me well, or has attended one of my project classes knows that I have very mixed feelings about raglan designs, particularly those constructed in one piece, whether top-down or bottom-up.

I appreciate the cleverness of the construction, absolutely. But the fit just plain doesn't work for me. I've said this before, but a standard raglan fit absolutely doesn't work for me. Either they fit around my shoulders, or around my bustline, but never both.

And, if truth be told, I think I'm coming to resent the propagation of this construction as the One True Way, the panacea, the Grand Unified Theory of sweater construction.

Yes, it's nice to not to have to do much (or indeed any) sewing. And yes, it's a fun and satisfying way to see a sweater emerge from your needles. And yes, I like that you can make modifications on the fly, especially if you're working top-down. Running out of yarn? Just make it shorter! Making it for a taller person? Make it longer! And so forth.

But (gasp!) one-piece raglans do have their drawbacks.

The standard raglan fit does not work for everyone. Let me say this again: THE FIT DOES NOT WORK FOR EVERYONE. I have a narrow-shouldered curvy figure, and to get a standard raglan to fit me nicely around the shoulders means that it's stretched across my bustline like something Jayne Mansfield would wear. Or if it fits me comfortably around the bust, it droops horribly around my shoulders. And they often don't work for the broad-shouldered but thin - tall skinny men in particular. Me, I care about fit and tailoring of my sweaters. If I'm going to the trouble of knitting something, it damn well better look good on me.

And if you're using a particularly heavy (weighty, as in lots of mass) sort of yarn, then having a seam where the sleeve joins the body is actually helpful, to stabilize the garment, and reduce stretching.

(Update: take a look at this design... in particular, the picture of the back, where the model's arm is bent. Seems to me that the seam where the sleeve meets the back would serve this design better with a bit of reinforcement. If it was reinforced, you wouldn't see the sagging. Not a criticism of the designer or the concept -- it's terrific overall.)

And, I've found, that one-piece raglans aren't necessarily the best project for a newer knitter, either. This isn't necessarily due to the construction, but due to the way the patterns are written.

A one-piece raglan pattern is very customizable, in many ways. You can tweak the lengths of the body and sleeves. You can add shaping to the body and sleeves. You can adjust the raglan length. You can change the position of the increases to change the fit of the sleeves, or to adjust the style of the yoke (viz old-style circular Lopi Fair Isle sweaters vs. a simpler "rectangular" yoke with 4 distinct increase points).

And the patterns are often written fairly generally, to allow a confident knitter to make these adjustments. And this is where a newer knitter runs into problems.

I encountered an example this week, a woman working a top down one piece raglan for her swimmer son -- tall, mostly skinny, but with broad shoulders. A helpful LYS employee had made a couple of adjustments and some notes on the pattern, and said that when she gets to the sleeve division, she should have her son try it on to check the raglan length. All well and good, but she confessed to me that she had no idea how to know if the raglan length was good -- and worse, what to do if it wasn't.

So, in the spirit of being a better teacher and pattern-writer myself -- and more to the point, hoping to be better able to guide a knitter who is struggling with such a pattern -- I decided to get more educated about this design.

So with the help of Barbara Walker's "Knitting from the Top" book, and loosely inspired by Amy's "Mr. Greenjeans", I cast on.


I'm using that SWTC Karaoke that I decided not to use for my Must-Have Cardigan. The first modification I made was changing the yarn over increases to EZ's backwards loop make 1. It might just be me, but I find that yarnover increases are rather at odds with the rest of a design for a dark-coloured cabled design.

I like the deep v of Amy's design, since I really don't have to worry about fit around the bustline. I'll likely not do a buttonhole, but rather use a pin.

It's going well so far. I've just divided for the sleeves, and it does fit. So that's nice. Updates as they become available...

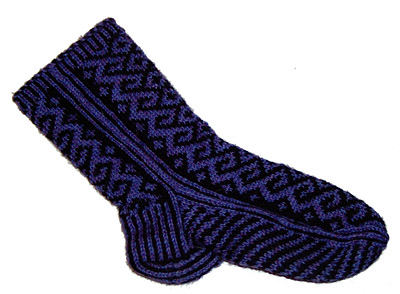
Tuesday, February 10, 2009

New Design: Midnight Sky Socks

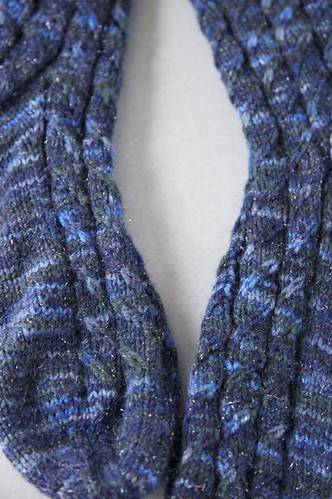
Late last year I fell instantly and unaccountably in love with a skein of sock yarn. Not just any sock yarn. This one was in what my style columnist friend calls "Prada blue" -- known to the rest of us as a very dark midnight blue -- with a delicate strand of silver running through it. Yes, that's right, actual sterling silver thread.

Look how beautiful it was, just in the skein.

I knew it wanted to be something special, something out of the ordinary.

I spent ages combing my stitch pattern books to find just the right thing. I wanted it to have both some knits and purls on the right side, to break up any stripes, and I wanted there to be some texture, so that the silver would catch the light and sparkle from various angles.

I found something called "Twilled Stripe" in one of the Barbara Walker books. It's a nifty slipped-stitch mock-cabley sort of thing.

And then because I have a sick sense of humour, for the second sock I decided to reverse the direction of the cable.

And here's what resulted.


I'm pretty happy with them.

The patterning looks good with plain yarns, too!

The pattern is available on Patternfish, Ravelry , and also at The Purple Purl.

(Thanks to Melinda for the great photography!)

Sunday, February 08, 2009

Further on Socks & Reinforcement

TracyKM makes a couple of excellent points in a comment on a recent post.... she suggests that the real way to inhibit wearing out of your hand-knit socks is to have a drawer sufficiently well stocked so that you don't have to wear any given pair too often... an admirable goal!

She also says that based on her reading of vintage sock pattern books, she thinks nylon first appeared in blends for sock knitting in the 1950s. That makes sense to me, based on what I've seen, and the age of the knitter with whom I had the original conversation.

And here's a question for my readers out there... does a separate nylon thread actually help, or does the wool wear down at the usual rate and just leave the nylon there? And is that comfy? Does the nylon thread rub against the wool thread and cause it to wear down faster? Interesting questions, that I don't know the answer to.

Perhaps a science experiment is in order!

Yeah, that's just what I need. An excuse for buying more sock yarn.

Friday, February 06, 2009

Reader Mail: On Nylon Reinforcement for Socks

Ella Kelly asks a great follow up question to my last post...

She describes herself as a yarn snob - she works with all natural fibres, all the time. She's just bought some 100% wool yarn for socks. The yarn shop recommended that she add nylon reinforcing thread to the socks, and she asks if I do that myself when I'm working with 100% wool yarn for socks.

The answer is a definitive "sometimes". It depends entirely on how I'm going to use the socks. Are they for boots? Will you wear them a lot, in active situations? Or are they for mostly wearing around the house in slippers, or while resting on the couch, or in your work shoes while your feet rest quietly under your desk?

In short, if they're going to take a lot of wear, yes, do reinforce. Reinforce both the heel flap and the heel turn itself, and I also suggest reinforcing the toe and the last inch or so of the foot before the toe.

Thursday, February 05, 2009

Sock Yarn & Nylon: Things We Take for Granted

I had a brief conversation with another knitter a few days ago. She's an experienced and skilled knitter in her 60s. She remarked to me -- in the nicest possible way -- that although she found my sock designs nice, she thinks it's absurd to go to so much work for something that will wear out so quickly.

A few hours later I was thinking about what she had said, and a light bulb went on...

In my sock classes, I talk about the merits of using a sock yarn that's got some nylon in it, for better wear. I've always treated the 100% wool sock yarns as more of a luxury item - to be treated with more care, to preserve them.

So when did they start adding nylon to sock yarn?? Certainly, all those socks knitted as part of the war efforts during World Wars I and II would have been 100% wool. And I'm quite certain that very few people had as well-stocked a sock drawer as most people do now. And soldiers would have had only a very few pairs. Any hand-knitted socks must worn out in a matter of weeks. No wonder the oldest sock patterns often insist on a reinforced heel...

Monday, February 02, 2009

Pick Up Artist

As I mentioned before, I taught two classes this weekend at the DKC Winter Workshop. I had a great time, met some terrific new people, and spent some serious hours talking about knitting - an excellent way to spend the weekend.

The same topic came up in both of my classes - picking up stitches. It often does. It's one of those techniques that is not well understood, and many knitters simply don't feel confident about it. Like "block", it's a word that's often used in a pattern with no explanation, and it's not something you learn until you need it -- until you run straight into it, usually near the end of the first sweater project.

To confuse further, there are a couple of different ways of achieving the objective... Teresa gives an excellent tutorial on my method of choice here... In short, this method involves sticking a needle through the edge of the fabric, wrapping the yarn around the needle, and pulling it through to form a new stitch. Some knitters just grab a loop of the existing fabric, without requiring a working yarn. I don't generally recommend this second one, but I do know knitters who use it and produce satisfactory results.

Here's the problem: the terminology. Some designers and pattern writers - myself included - simply use the term "pick up" to describe the technique Teresa demonstrates. Others use the term "pick up and knit". I'd always treated them as synonyms. Some knitters don't.

We ran headlong into that in the Entrelac class. After all, Entrelac is all about picking up stitches. My written instructions say only "pick up". If you pick up using the second method, your working yarn doesn't travel with you. And the way I'd written out my instructions assumed that it did. Much lively discussion ensued.

(And of course, you could also interpret "pick up and knit" to mean a two step process: pick up the stitches using the second method, then knit across, which gets you to the same place, but rather oddly... )

I was left with the sense that using either version of the term wasn't clear enough.... I need to think about how to best explain and represent this in a pattern.

Tuesday, January 27, 2009

Instant Gratification Hat & Wristwarmers

It happens to everyone in this climate. Eventually, no matter how much you enjoy winter sports and hot drinks and snuggling up by the fire, you get tired of winter.

For me, it's that I get tired of all the gear required to simply step outside.

2 pairs of socks. Parka. Boots. Scarf. Gloves if it's above about -5 degrees, big mitts if it's colder than that. And of course, a hat. And if it's really cold, the hood snaps on the parka, and goes on over the hat.

But I've been wearing the same parka with the same hat and mitts since the middle of December, and I'm bored with them.

Being a knitter, of course, I have an easy way to solve this problem...

Introducing the Instant Gratification Hat & Wristwarmers.


Worked in Noro Silk Garden Chunky... they knit up like the wind, the colours are wonderful and just perfect for cheering up my black parka.. The yarn is 45% silk/45% mohair/10% lambswool blend, making it much softer than many of the Noro yarns, and very warm and insulating.

In particular, I love how the colour lengths are just long enough to make perfect stripes, and how the wristwarmers don't match each other, but they do both match the hat.

The pattern is for sale on my Ravelry store and at Patternfish.

DKC Workshops this Weekend: A Few Spots Still Available

I'm teaching two workshops at the DKC Winter Workshop this weekend at Metro Hall in Toronto.

I'm teaching Pattern Reading 11am-1pm on Saturday and Entrelac 10am-1pm on Sunday.

There are a couple of spots still available in both sessions. See the DKC flyer for more information.

I hope to see you there!

Monday, January 26, 2009

Carry that Weight

I've finally invested in a digital scale. It's been on my wish list for a while, and it was J. that pushed me over the edge. She brought her scale to class recently, and we had a wild time weighing socks and leftover yarn.

Back when I worked in an actual office for the day job (rather than at home as I do now), I used to sneak socks and balls of yarn into the mailroom, to weigh them on the postage scale. It's a simple problem, really. When I've finished knitting a pair of socks, there's invariably yarn left over. And often, a fair bit. The question is how much yarn -- and would it be enough for another pair of socks?

So I found myself this rather attractive and shiny digital scale. Super accurate! Reads in increments of a gram up to 5kg!

I can now definitively answer the question. I can weigh the socks, and the leftover yarn. Look at this one - it's 25gm. As is its mate. Which means that I've got just about 50gm left of the 100gm skein -- just enough for another pair.

And for those partial skeins that aren't quite enough for a full pair -- well, I've got lots of leftovers. How about contrasting colour heels and toes? Stripes?

Once upon a time I estimated how many pairs of socks-to-be I had in my stash... More than 20, if truth be told. That was just for full skeins. Now that I can accurately weigh and measure the partial balls, that number has gone up significantly... I see a whole range of striped and multi-coloured leftover-using-up sock designs on the horizon... Recession-friendly stash-diving sock knitting -- there's a thought!

Thursday, January 22, 2009

Looking For Errata

Wow. In one of my classes, I'm helping someone with a sweater project. It's from a popular book, and one of the great features of this particular design is that it's easily and cleverly custom-fit. The body is constructed in panels - the central panels are the same for all sizes, and customization is done through the use of variable width side panels.

All it needs is a couple of measurements and a bit of arithmetic.

My students know about my secret past as a mathematician, so anything like this gets handed off to me. I'm happy to do it, it helps my students, and it teaches me more about garment construction.

I spent a few minutes looking at the calculations and the pattern, and couldn't for the life of me figure it out. And then I Googled for errata.

Yeah. It turns out that through what must have been a terrible typesetting mistake, all of the minus signs in the formulas had been changed to division symbols. All of them. About 15, in total. No wonder my numbers weren't working.

So: VERY IMPORTANT NOTE to self, and everyone else: before you start any pattern, Google for errata. If I'd gone with the calculations as printed in the book, the sweater would have been significantly too small.

Tuesday, January 20, 2009

Reader Mail: To Becca, who asked about Kureyon Sock

I promised a while ago that I'd be giving the Kureyon socks a good wear test. I've been wearing them a couple of times a week since I finished them in December, and the results so far are good.

I hand wash them and let them air dry - which is how I can wear them that often without running the washing machine.

They're softening up somewhat, and felting a little tiny bit -- it's just sort of filling out the fabric a bit, making it a bit denser. No signs of shrinking, and no visible wear or pilling or thinning.

Will keep wearing them at the same rate, and will report back in another month or so.

I've been told that the felting effect is more pronounced if you machine wash them, but again, no reports of much shrinkage.

Sunday, January 18, 2009

Notes on a Project: February Lady Sweater


The February Lady Sweater. Done. Yes, as predicted, I picked up speed once the yoke was complete.

I used exactly 3 skeins of Dream in Color Classy in "Spring Tickle". I like the yarn very much - the colours are great, it's got a nice hand, and it washes very well. It also doesn't feel so soft that it will be wildly pilly.

As to the garment itself: it's interesting.

In this context, the raglan shape isn't an issue because it's supposed to be worn open, so I was able to choose a size that fits me around my smaller shoulders and not worry about the fact that it doesn't really close over my somewhat disproportionate bust... (It's not that I'm huge-busted, but let's just say that I've got more of a 1950s figure than a 21st century figure. A good old-fashioned hourglass.)

Although buttons haven't yet been added (Denny, over to you!), I would only really be able to comfortably button the top one. But again, it works for this style.

Other knitters have expressed concern about the final set of decreases. Unlike most top-down raglans, where all decreases are done at the sleeve seams, there is a final set worked as yarn-overs near the bottom of the yoke. You can see them clearly in the back view.

I am unconvinced. I think it looks sorta weird. Lots of knitters have worked them as m1 increases rather than yarnovers, so they're not visible.


I agree with this modification.

But even if the increase was invisible rather than visible, the big concern for me is the increases on the sleeves. You get a nice a-line with the increases on the body sections - again, good for accommodating the bust -- but you just don't need them on the sleeves. With the increases, the sleeves are poochy.... there is simply too much fabric around the upper arm. (Y'know, poochy. Like poofy, but less so.)

The 3/4 sleeves are good. I don't know whether it was motivated by the need to save yarn, or whether it was a design decision, but it works.

As mentioned, this isn't for me - despite the fact that I love the colour. It's a sample for a class I'm teaching. I really wasn't sure I'd like the finished object. I like it more than I thought I would, I'll be honest. It fits pretty well, and is suprisingly flattering.

I might even do one for myself... with a few modifications, of course.

Saturday, January 17, 2009

Much Better

It looks like a sweater, for one.

And it really is going much faster now...

This are definite pros to a top-down raglan like this: once the long haul of the yoke is done, you pick up speed considerably. And it's great to be able to try the sweater on as you go to determine length. And the lack of seaming is a definite plus.

As to the cons: let's see the thing on and then we'll talk.

Wednesday, January 14, 2009

February Lady Sweater: Hmmm....

The project I should be focusing on is the February Lady Sweater. I'm working it for a class I'm teaching in, oddly enough, February.


This is the third EZ design I've worked in the past year or so. (I know, it's not strictly an EZ design, but since it was inspired by her, and adheres pretty closely to her style, for this discussion I consider it part of her oeuvre.)

I've avoided her designs in the past because she relies heavily on the raglan, and my size and shape aren't flattered by the raglan.

I also discovered, in the process of working the Baby Surprise Jacket, that her use of garter stitch does not thrill me. There are large areas of garter stitch, but it's not entirely brainless because there are increases to work be worked and counted. Love how it looks, no question, but I find that it's neither interesting enough to engage my attention, nor boring enough to be an entirely autopilot project. A straight square of garter stitch I could work while asleep, but having to keep track of increases really slows me down.

And because I'm not a raglan knitter, I'm not used to the effort that goes into working the yoke. By the time the increases are done, you've got a heck of a lot of stitches on the needle (more than 250 for even the smallest size), and because garter stitch compresses vertically, you've got a lot of rows per inch. It's felt like it's taken forever.

But I've just divided off for the sleeves, and started into the lace pattern, and I think I'm going to pick up some serious speed.

The yarn is Dream in Color Classy in Spring Tickle. Very nice yarn, great to work with.

This is destined to be a shop sample, but I'm dying to try it on. Based on some feedback about the Karaoke, I've decided it's not right for the Must Have Cardi, a bit too slubby and fuzzy. I need a really crisp yarn to really show off the cables. But it might be kind of wonderful for my own February Lady Sweater.

It's nice to have the luxury of trying something on before I make it for myself. I can really examine and tweak the style and fit. Assuming I can stand to work another raglan garter yoke in the short term...

Monday, January 12, 2009

Update: Gauge Got

Ok, so I've got gauge with the Karoke. Next question - how pilly is it? I'm going to spend some time today playing with the swatch to see how it responds to wear.

Sunday, January 11, 2009

A Taste of My Own Medicine: Swatching

It's been a while since I've working something from someone else's pattern... It's been all about my own designs (or lace) for months. I'm pretty cavalier about gauge for lace, as long as I like how the fabric looks -- since fit doesn't matter for a rectangle. And when it's my own design, I just measure the gauge I'm working at, and let everyone else match that.

And I've got an actual pattern-based project in mind. (Well, two. One for a knit-along class, and the other just for plain old me.)

And damn it, I had to swatch.

I've been eyeing the Must-Have Cardi for ages, since the Harlot finished hers. I do love a good traditional design, and I like the modern (i.e. tailored) fit of this particular version very much. And it comes in a decent small size (34" bust finished) to fit my little frame.

I've had some SWTC Karaoke sitting in my stash for ages and ages -- got it in a swap. Although I've read mixed reviews on Ravelry, I'm going to give it a go. I rather like the slightly slubby nature of the yarn, I think it will add texture to the cables.

The good news is that I'm getting gauge before washing. And while the swatch dries, I will finish up a sock I'm working on.

Of course, there is the matter of the other project for the knit-along (to be named later), and a gansey sock design I'm cooking, and a Fair Isle sock design, and a wacky cabled sock.... and another design commission for the spring... So I'm not honestly sure how quickly I'll make progress with this, but it's a design I definitely do want to work.

Friday, January 09, 2009

On Learning Something New

As a teacher, I try not to be too prescriptive about knitting. There are lots of different ways of doing things - casting on, holding your needles, holding your yarn, increasing, and so forth. And in my opinion, if the thing looks good and doesn't fall apart, then whatever technique you used to make it is good.

I will recommend a technique if the difference if visible or structural. Finishing, for example. I'm a big proponent of mattress stitch over backstitch for seaming, because it looks so much better.

I used to be fairly relaxed about casting on, but I'm starting to get more insistent. I'm a long-tailed cast on snob. There are situations in which other cast ons work better, but for most situations, the long-tailed cast on is terrific. It's quick, creates a very attractive and stable low-profile edge, and the first row of stitches are easy to work. And, big bonus for sock knitters, it's stretchy.

I'm getting tired of watching knitters struggle with the backwards loop cast on -- incredibly quick and easy, yes, but it makes a very unstable edge, and the first row is a real challenge to knit. And the knitted cast on -- which I've been known to teach myself -- has some serious weaknesses, too. The stitches are easier to work, but it's slow and the edge is fairly loopy. And to make it reasonably loose, you have to cast on over two needles, which makes it very loopy. I'm really not happy with how it looks.

I used to only teach the long-tailed cast on in my sock and mitten knitting classes, but if time permits, I tend to give a quick tutorial in all my classes. A lot of students admit to me that they tried to learn it from books or vidoes, but weren't able to get the hang of it. I'm happy to admit I had the same problem -- couldn't figure it out for the life of me from books, and it was only when Kirsten showed it to me years ago that I really got it. (Thanks, Kirsten, BTW! You have no idea how much you improved my knitting.)

It is a bit tricky, no question, and it often takes a bit of practice, but the students get it. And for the most part, they see the advantages immediately and tell me that they'll keep using it. And I go home feeling faintly smug that I've shown more knitters the one true path.

This week, I had an interesting conversation. C. attended a class of mine years ago on mitten knitting, and I had shown her the long tailed cast on. She started the project in this week's class with a knitted cast on. I asked her about the long-tailed method. She told me she thought it was "weird" and was happy with the method she'd been using all along.

Weird, I get. No argument with that. But happy with the knitted cast on? I was taken aback.

But it's much better, I said. It's faster and looks nicer.

Faster for me, sure. C. said that she found it cumbersome. She's not wrong, I had to admit.

And looks better? Actually fairly subjective. She likes the edge, particularly how it looks in ribbing.

C. had made a genuine effort to learn something new, and had decided it wasn't for her. And me, I learnt something new - that just because I think it's better for me and my knitting doesn't mean it actually is for everyone.

I'm going to keep teaching it, and explaining why think it's best, but I think I'll be more careful about feeling smug...

Wednesday, January 07, 2009

Now Available: The Spider Hat

Number two in a continuing series of hats inspired by some of the wonderful cable patterns in the Barbara Walker Treasuries...


buy now at Ravelry and Patternfish. Also available for purchase at The Purple Purl.

Thanks to Adam for being a good sport and modeling the hat.

Sunday, January 04, 2009

Circular Shawl - Finished!

The "Opening Night" circular shawl that I started on Election night is done. Wasn't that much knitting, it's just that I got distracted...


It's a big circle - and I mean big, the diameter is 33 inches (84 cm) - worked in segments, with two armholes created by casting off two of the segments on one round, and then immediately casting back on again over them on the following round.

It's one of those "why didn't I think of this myself" designs... very simple, and elegantly clever.

It wears rather like a vest, and also forms a high collar which handily mitigates the requirement for a scarf under my coat.

It was a reasonably quick knit, except for the last few rounds which took forever, and used up startling amounts of yarn, as is always the way with a shawl.

I used about 1 and a quarter of the giant Eco Wool + skeins, about 500 yds of yarn in total.

I'm very pleased with it -- it turned out exactly the way I wanted it to, and looks even better than I imagined it would. It was very simple to work - a nice palate cleanser between more challenging projects.

Speaking of which... I think I've figured out a design for the sparkly sock yarn...

Thursday, January 01, 2009

Entrelac Scarf


Because you can always use more Noro projects.

The pattern calls for 3 balls of Noro Silk Garden or Kureyon. It's like this yarn was made for the Entrelac technique - the long lengths of colour work out brilliantly. I recommend the Silk Garden since it drapes nicely and (newsflash!) stands up very well to a delicate machine wash. You could use Taiyo, too. Any Noro yarn, really.

In addition to a variation for a wider shawl verison, the pattern includes detailed notes to help you to learn how to work Entrelac - and once you get going, it's easy and fun. Suitable for knitters who are confident with increasing and decreasing.

Pattern available on Patternfish and Ravelry.

Monday, December 29, 2008

Ravelry Pattern Store Open for Business

My Ravelry Pattern store is now open for business!

I have lots of my patterns available for sale...

the Peace Hat

the Exploded Ribbing Sock

the One Skein Luxury Kerchief

and lots more!

If you don't have a Ravelry account, email me and I can sell you patterns through PayPal.

Sunday, December 28, 2008

Meet Earnest

This is Earnest the bear. He is rather serious looking, but that's because he knows he has an important job. He's my demo bear.

I've been wanting to design and knit a bear for a long time now, and finally gave myself the kick in the pants I needed - I decided to teach a class on the topic.

Earnest is knitted with a little less than 100m of plain and simple worsted weight wool, and he's about 6 inches tall when seated. His sweater is made from a scrap of DK (leftovers from the Peace Hat, actually). I embroidered his features rather than using button as it's safer for young children. He's thread-jointed, which means he's posable.

Bear knitting (whether in my class or from a pattern) is quick and fun. It's a good project for adventurous beginner or intermediate knitters. As long as you're comfortable with increasing and decreasing, and reading patterns, you'll do fine.

In the case of Earnest, the body and head are made in one piece, and the legs and arms knit up in a matter of minutes. The biggest challenge is the finishing, as the pieces have to be sewn up and carefully assembled.

In the class, we'll work through the bear pattern -- with any yarn you like! Fingering weight makes a terrific pocket pal - and a chunky weight would make a great bedtime companion. (Earnest is the perfect size to sit on a shelf, watching over the action at the shop.) We'll also create a customized sweater. Stripes, cables, even lace if you're making a girl bear. You can change his expression with the use of buttons for eyes, or different embroidery.

I'll teach you everything you need to know -- how to read and follow the pattern, how to sew up and assemble your bear, and how to add the finishing touches of face and sweater.

More details about the class here.

Tuesday, December 23, 2008

Noro socks: done! On the question of softness


At long last.

I've worn them a couple of times already, and I can report no ill-effects or untimely wearings-out.

I am going to keep wearing them as often as possible (allowing for washing, of course), to see what's up with this damn yarn. The wear is the big concern for me -- it's a single, and rather fine in parts, and I'm honestly not sure how long it will last when exposed to the abuse of my winter boots. I've heard that it "fills out" and felts a bit with washing, to make a better, denser fabric. I will post regular reports.

Another complaint I hear about this yarn is that it's not very soft. I get a little cranky about this, I'll be honest. Yes, softness is great, but the softer the yarn the more it pills, and pilling means wear, and wear means wearing out.

We're not talking about itchiness, we're talking about softness. I will happily concede the point if you tell me that you find the yarn itchy. Fine.

But softness? I mean, come on. Your feet just ain't that delicate. Who doesn't wear shoes or sandals without socks at least a few times in the summer? I don't know about your sandals, but mine are certainly less soft on the inside than Noro sock yarn. Anyone who's ever given themselves a blister from a pair of ill-fitting or uncomfortable shoes and then proceeded to wear them again is, IMHO, immediately disqualified from claiming that sock yarn might not be soft enough.

Harumph.

Saturday, December 20, 2008

I Dream of Noro

I had a dream about knitting last night.

Specifically, about Noro. But not the sort of dream I would have expected to have about Noro yarns....

I've picked the long abandoned Noro sock yarn, and am committed to finishing the second one in the very near future. Like others, I am unsure about the wearability of the yarn -- not the softness, more on that later -- but how well it will wear.

Last night, I had a very disturbing dream. I dreamt that the gusset separated from heel -- that the picked up stitches had all broken. I checked them this morning, they're all ok.


Phew.

(Amateur psychoanalysts: have at it.)

Wednesday, December 17, 2008

A Needle Pulling Thread


I'm thrilled to announce that two of my sock designs and a profile appear in the new issues of the Canadian magazine "A Needle Pulling Thread".

Click here for a preview...

There's a lot of terrific stuff in this magazine, and it covers a variety of different needlecrafts. There's some wonderful designs -- including an absolutely stunning quilt design called "Frosted Midnight" that may well actually cause me to dig out that quilting-for-beginners kit I got last year.

Look for it at your favourite Canadian crafting store.

Monday, December 15, 2008

For a Good Cause


Because I only take my clothes off for a good cause...

I'm Miss November in the 2009 Purple Purl "Naturally" calendar. I am modelling some of my socks. Several pairs of socks. In strategic locations.

For sale at The Purple Purl, $20 each, and all proceeds go directly to Princess Margaret Hospital. Someone close to me was treated there for cancer this year. He had nothing but good things to say about his experience, and thanks to their work he will live many more years.

I'm thankful for that, and they deserve all the support we can give them.

Rest assured there's a little something for everyone in the calendar -- there are fabulous knitters, crocheters and spinners, there are lovely ladies, handsome men, and a gaggle of adorable babies. I think my personal favourite is Tom's handsome rescue dog snuggling in a heap of Noro....

Saturday, December 13, 2008

The Power of the Internets

Thanks to a reader (and commenter) on my blog, I now have two balls of the longed-for Regia Nation Colour in red and white.

Thank you Mrs. G!

Thursday, December 11, 2008

In Which I Reveal My Proclivities To All The World

To Graft or Not to Graft... my Knitty Winter 08 article.

Have already had one comment from a knitter who enjoys grafting. That makes three of you.

;-)

Tuesday, December 09, 2008

DKC Winter Workshop

I'm thrilled to announce I'm going to be teaching at the Toronto Downtown Knit Collective Winter Workshop, January 31 and February 1st 2009.

January 31st, 11am-1pm, I'll be running my Pattern Reading Workshop. This is designed for newer knitters who are confident with their needles, but less confident with pattern instructions. Over the years, as I've taught many different knitters, it's become very clear that being a good knitter is one thing -- being able to decipher the diagrams and tables and codes and strange abbreviations in a pattern is something else entirely. I've been collecting all the weird and wonderful things I've seen in patterns, and I'll explain every last one of them. If nothing else, this session is worth it to figure out how to handle the very unhelpful "reversing shapings".

Sunday February 1st, 10am-1pm, I'll be revealing the secret of Entrelac!


See flyer for more details.

Hope to see you there!

Sunday, December 07, 2008

Peace Out!

Just finished!

Peace hat, also known as "hey, have you seen some of the wacky cables in the Barbara Walker books, I should do something with those... "


Update: Available at Patternfish and Ravelry.

My project for over the Christmas break is to get set up for pattern sales on Ravelry, BTW.

Saturday, December 06, 2008

Two Quick Mitten Related Things

To answer a question I've been asked: the yarn for the mitered mitt is Kureyon colour #188. And no, I didn't plan it so that the colour change would happen at the end of the ribbing -- it just worked out that way. So for the second one, I could either throw caution to the wind and let the colours fall where they may -- or I could engineer it to match the first. Either is a valid technique with Noro, I feel.

(And in a related, very annoying point, the mitt uses 26gm of yarn. Which means that a single ball will almost but not quite be enough for two mitts. Argh.)

And on the other topic, it's cold today and snizzling today. Snizzle is like drizzle, but with snow. It's cold enough that the snowflakes are small, light and dry and pretty constant. Snizzling.

So I broke out the Latvian mittens for the streetcar ride. And I discovered a serious design flaw... the colour work is all over the hand of the mitt, making a lovely layered and warm fabric. Except for the thumb.


It's a single colour. Which means it's a single thread of yarn. So it's not nearly as wind-proof. Harumph. This may well be enough to inspire me to design my own, with stranded thumbs.

Wednesday, December 03, 2008

Look! A Mitten! Yay!

My own variation of EZ's mitered mitten, tweaked in several ways.

I added a ribbed cuff for better fit - a mitered k2 p2 - and reduced the number of sts so that it actually fit me.

Click on the picture to see the ribbing.

The original calls for 48 sts in this gauge yarn, which would be a good size for a man or a larger woman, but significantly too big for my little girly hands. I suspect that EZ was a big, strapping farm girl with big, strapping farm girl hands...

And of course, worked in Noro Kureyon because it's the best yarn in the world for this sort of thing -- warm and wooly, yes, and great colour effects for the mitering.

I'm teaching a class on the Mitered Mitt and its variations at the Naked Sheep. Click here for more info.

Sunday, November 30, 2008

Improving on Perfection; And Lessons Learned

At Lisa's request, I've been playing with some Noro Kureyon, and the Mitered Mittens pattern in EZ's Knitter's Almanac.

Love love love how the stripes work in the miters -- this is, after all, what makes the Jaywalker sock so great.

Two things have become obvious during this process.

The first is that you really should read the pattern. Really. I seemed to have missed the "Knit one round" instruction. During first and second attempts, I thought to myself that it seemed odd that there wasn't an even round between pattern rounds... but by the time I got to the fourth attempt, I'd thrown caution to the wind and was proceeding on blind faith that our Great Mistress of all thing Knit, EZ herself, must have had her reasons.

Nope. Turned out I had simply missed that line in the book.

(Thing the First and a Half is that, as a pattern writer and technical editor, spacing can make a huge difference in the readability of the pattern. The "K 1 rnd." is immediately after the instruction for the second half of the first round, with no line breaks. And I missed it. I know why. The round is worked in two halves, with the patterning exactly the same on the second half as on the first. And as I read the instruction for the first half of the round in detail, noticed the litte note that said that the second half is the same as the first, and then ignored the rest of the line.

(Which I suppose means that Thing the First and Three Quarters is that Experience breeds Arrogance. I figured I knew what to do so I didn't bother reading any more.))

Anyway, Thing the Second is that you shouldn't -- and really can't -- mess with the genius that is an EZ pattern.

It turns out that it's impossible to improve on perfection. I've been working on them for a week, and all I've got are two bits -- both of which are going to be ripped out.

I don't like the cuffless nature of the basic Mitered Mitt, so I've been playing with a ribbed cuff, in the same mitered style, and it's just plain awful.


As is my usual strategy with mitts, I worked the cuff on fewer sts than the body. So on its own, the mitered cuff looks cool, but there are two big issues... the first is that mitering the ribs significantly reduces the stretchiness. And the second is that I really couldn't figure out how to make the increase flow smoothly into the hand. If I simply worked a couple of rounds of miters with only the increases and not the decreases, the pattern is retained, but it bunches oddly where the decreases should havebeen.

My original, middle-of-the-night idea was to offset the miters, so that I'd get a flat bottom to the cuff, rather than the angle that the pattern normally produces. But that didn't do what I needed it to do, for reasons I have not yet figured out.

Eventually, I gave up on the cuff and went back to the original design. 5 rounds of k1 p1 rib and then launch straight into the miters. Still riding on my high horse, I only worked 2 rounds of k1 p1 rib -- this seems to actually be ok. But because I've got tiny girly hands, I decided that the 48 sts that the pattern calls for, and that I'd been playing with on attempts numbers 1 through 4 was too damn big, so I cast on 40 sts. And of course, it's just too damn small.


Still cruising down that river in Egypt, I forged ahead for a while last night, and got far enough that I thought it might be time for the thumb. So I went back to the book to figure out what she says about thumb placement, and there it was... "K 1 rnd."

So. Back to the beginning. Again.

The eagle-eyed will also notice that I changed around the decreases... that might or might not stay.

Argh.

And so all of this leads to Thing the Second and a Quarter... if you're going to significantly alter a pattern, it's probably helpful to have worked it according to the instructions at least once before...

Wednesday, November 26, 2008

Found one!

Found: one ball of Regia Nation Color sock yarn in red and white. Sadly, there was only one ball, in a bargain bin, labelless.

Even if the hand-written label hadn't been there, I would have bought it. It's unmistakable.

I reckon I'll do black ribbing, heels and toes, and I'll still be able to reverse the stripes - but it won't be quite as amusing as the all-over striped version.

Next up -- seeking the red, white and blue, and the blue and white... Santa?

Monday, November 24, 2008

Finishing

I was teaching the other day, and a woman dashed into the shop. "I see you offer classes... " She seemed somewhat relieved.

"Do you have one on... you know... putting things together?" "Of course!"

More relief on her face.

"Is there one before Christmas?"

Yes Virginia, there is a finishing class before Christmas... And it's in the first half of the month, so there will be plenty of time to do whatever needs to be done for gift-giving.

On that note - some finishing of my own to report...


The second exploded ribbing sock is done, as is the fatigue-inducing mystery project - the edge of which can be seen in the photo.

The exploded sock pattern (I really need a better name for it) will be done by the end of the weekend, I promise. I have a bit of a queue of knitters waiting for it at this point...

Saturday, November 22, 2008

Knitting MacGyver Tip of the Year

No cable needle handy?

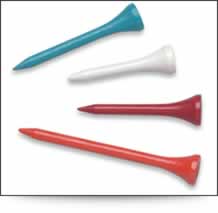
Use a golf tee!

Big thanks to N. for the tip!

Now, if only Norman played golf...

Thursday, November 20, 2008

Sock Knitting: Practical Yet Insane

At the risk of whining about the weather, it's unseasonably cold and snowy here. Winter has arrived early. Too early for my tastes.

So it's back to my double-sock routine... a pair of thin cotton socks under a pair of hand-knit socks. I get really cold feet, and I need the extra layer.

I got caught out last night -- the snow started pretty seriously only after I'd left to teach a class. The good news was that it was a sock class, so I had a bag full of pairs to choose from for my extra layer.

I love teaching sock classes. Socks are my favourite form of knitting, no question. I had a student in my class last night, B., who has attended other of my classes. She's a great knitter, but she confessed to me a while ago that she wasn't a sock knitter... I got a sense that she was hesitant about the whole thing, that she really didn't understand the deal. It seemed pretty clear to me that she only really attended the class so she could see what the fuss was all about, and so she could help out her Mum, who has just started her first sock project.

I hear this reasonably often... puzzlement about what the big deal is. Sock knitting may well be the least efficient way of spending of your knitting time and money... I just spent nearly $40CDN (yes, forty dollars) on sock yarn with sterling silver thread in it. This is for something that goes on my SMELLY HORRIBLE FEET, to be HIDDEN inside my boots. And I'll probably spend between ten and twenty hours knitting a pair with this yarn (am noodling on a design idea, something fussy and interesting).

Socks can be complicated and challenging, and they require special equipment - insane teeny tiny needles, double points at that, which makes them more difficult to work with. And it's slow going, the tiny gauge.

It's not necessarily a rational thing, sock knitting.

Midway through my class last night, just after we'd turned the heel, B. looked up, smiled, and said... "hey, I get it now!" I think I've just converted another disbeliever...