Thursday, June 26, 2014

New blocking tool: Signature Blocking Cloth

My friends at Signature have recently released a new product: a blocking cloth. It's got grid-lines woven in, at one inch intervals.

I love this thing. I don't know about you, but I struggle with straight lines. Especially when pinning out pieces for blocking.

This week, I blocked a tank top for a friend of mine. It has a lovely lace edge, and I offered to block it so that the points of the scallops were nicely shaped. (She doesn't have the pins and mats that I do.)

I carefully pinned it out by hand, eyeing the edge to make it straight.

I unpinned it, and got an edge that I thought looked pretty good, until I laid it on the blocking cloth. Holy curvy edge, Batman!


So I repinned it, using the 1 inch gridlines as a guide.


Look, Ma! A straight edge. In addition, the grid provided me a very easy way to make sure I had pinned the piece out to the right width, too.

Brilliant.

The cloth is colorfast and washable, and sits nicely on top of your blocking mats (or floor, or bed, or whatever you're using for a blocking surface).


My blocking surface?

Yup, that's the dog's crate.

This is the sort of thing you do when you live in an apartment. (And yes, we do move the mat when the dog is actually in the crate.)


Monday, June 23, 2014

Not socks: the return of the Pi shawl

I've just wrapped up a pretty major project: a book about Custom Fit socks. I've shipped off the box of samples for photography, and mailed the manuscript to the editor, and so now it's time to work on something else for a while. (The publication date is the middle of next year, so I'll thank you in advance for your patience...) Between my book and some other design projects, I've knitted nothing but socks since November, and I was desperate to cast on something that wasn't socks.

So, firmly not socks... a Pi shawl design.


I've designed a couple of circular Pi shawls over the years... one using Shetland stitch patterns, and the epic Snowflower project, published in the now-defunct Yarn Forward Magazine in 2010 or so. Both samples have been lost, sadly. (The Snowflower was cashmere, too, damn it.)


I learned some important lessons with those two designs. I learned that the piece needs to be pretty big. Although Shetland Skies is pretty, it's a bit too small to be easily worn.


And I learned that if you're going to knit a big piece, if you use a laceweight yarn, you'll be at it for a while... the Snowflower sample took about three weeks of very dedicated knitting, and about 1200 yds of yarn.

But I also learned that I love the concept.

It's all based on the mathematical relationship between the radius and the circumference of the circle... hence "Pi".

Now, as Ms. Zimmermann says, you barely need a pattern for this thing... you start at the centre with 9 stitches, and there are only six shaping rounds. Every so often, you simple double the stitch count, with a round of (yo, k1). You can make a plain one, or a very simply patterned one. Or you can go to town, as I have done, and apply your own patterns.

This new version is an update... rethinking... extension... expansion... of the Snowflower concept. Although in a heavier yarn this time - indigodragonfly's earth-shatteringly delicious UberMerGoat merino cashmere DK weight, in Cumberbacchanal -- so hopefully it won't take quite as long.

Very happy with it so far.


As soon as the pattern is ready, I'll let you know.

And if you're interested in designing your own, I'm teaching a class on this at KnitCity in Vancouver this October.

Thursday, June 12, 2014

Camping. My Way.

I am not a fan of camping. Intellectually, I get the appeal of "the great outdoors", but I just can't do it. No running water? Sleeping on rocks? Bears?

And so when Julie of the Needle Emporium asked me to go to Camp with her, I was a bit worried. I have a terrible poker face, and I might have spluttered a little bit.

"But Julie knows me well", I thought. "She knows me well enough to have bought a kettle especially for me when I'm teaching at her shop. Why on earth would she be asking me to go somewhere where there wasn't a kettle?...."

Before I could start coming up with excuses, Julie explained.

Needle Emporium Knitting Camp ain't camp Camp. There are no tents. There's proper beds and plumbing and drinks of both the hot and cold variety. And she explicitly promised no bears.

Knitting Camp sounds actually rather fantastic: a weekend of knitting and workshops and eating and drinking and games and silliness and fun. It's at the Bayview Wildwood resort, a little north of Toronto, which is entirely civilized.

I was already in, and then Julie told me that Sally Melville would be there, too. I can't wait to meet her.

Come and join us, September 18-21st. It's a fun weekend away from home - there's a view of the lake, and the food is great, and apparently they don't make you make your bed. Add knitting, and it makes it absolutely perfect.

I'll be teaching a variety of classes and workshops: Toe Up Socks, Sizing and Fit, Fixing Mistakes, and my Expert Tips workshop. Sally is teaching some fantastic classes, too. More info here. Come and play!

Saturday, May 31, 2014

WWKIP: Shenanigans in Waterloo, June 7th

I love the ladies of Shall We Knit (and not just because they feel the way I do about chocolate ice cream). They know how to throw a party.

The last few years Kim and Ron of indigodragonfly and I have been joining them for World Wide Knit in Public Day, in early June. We wear silly costumes, we knit, we raise funds, and generally amuse ourselves our our visitors.

This year's theme is Superheroes.

There will be yarn! There will be vendors with other goodies, including the Body Blessed's lovely skin care products, Erin of Robot A Day, and more indigodragonfly yarns you can shake a stick at, and Marit's rather clever hand-dyed gradient 'Gobstopper' yarns.

There will be a photo booth - superhero-themed, naturally. There will be games. Prizes. And assorted other shenanigans.

As last year, indigodragonfly is auctioning off naming and design rights for a custom colorway. Details here.

And I'll be available for rent. That is, I'll be providing knitting help and consultations for a small fee. (If the past years are anything to go by, I'll likely be wearing a silly outfit.)

Funds raised will go to the Canadian Breast Cancer Support Fund, a group doing important work. Their mission is to support women (and the families of those women) who are going through breast cancer treatment.They provide short-term financial support to help with daily expenses - mortgage, rent, food, utilities, transport, etc. - during treatment and recovery. They also provide educational workshops that promote breast health and raise awareness about the impact of the environmental factors affecting breast cancer.

More details in the Shall We Knit newsletter.


And on the Sunday, I'm teaching a class: Knitter's Toolkit.
This three-hour workshop focuses on  the key skills to take your knitting to the next level. You know how to knit and purl and increase and decrease and even read a pattern - but to really make your knitting great, we talk about all the other skills you need. I'll show you how to confidently diagnose and fix mistakes. I'll actually explain in a helpful way what the big fuss is about gauge. I'll talk about how to join a new ball of yarn; and how to weave in ends. I'll explain the key finishing skills - and why they are so important. I'll demystify blocking. Along the way I'll share some of my favourite tips, tricks and techniques for casting on, for binding off, for increasing and decreasing. Bring your questions!


Thursday, May 29, 2014

On Blocking Socks & Sock Blockers

Great question from a knitter on Twitter last night:


I get asked this fairly regularly.

My answer, in 140 characters or less:


In slightly more than 140 characters: Nope.

But, you ask, what about those sock blocker things they are always trying to sell me?


If so many companies make them, I must need them, right? And the knitters of the olden-times used them, so they must be IMPORTANT. You can find sock blockers at antique shops all the time. Witness this post on a blog about antiques. And a quick search on eBay provides a fair number of different versions, of different vintages.

Still nope.

Here's the thing: sock blockers date back to times when knitters weren't likely to be using superwash wool. That is, they were making socks from wools that would felt with wear and washing. And so blockers were used. They were, in the words of the antiques blogger whose post I linked to above
"the best way of keeping socks and stockings the right size and shape after laundering".
Yup. Size. Blockers were used to help keep the felting process at bay.

So, unless you're knitting socks out of non washable wool, it's a big old nope. Simply not necessary.

Now: if I'm photographing the socks, or sending them off to be photographed, or presenting them as a gift, I will wash them. But even then, I just hang them over a laundry rack or towel rail, once they've been wrung out.

The only time I'll actually stretch them out, on an actual blocker, is if they are made of lace. Lace looks best stretched, and so I like to stretch it before I wear it so they look nice when I put them on.

But honestly: the best sock blockers in the world? Look down. They're at the end of your legs.


Tuesday, May 27, 2014

"Go Your Own Way"

(You might have noticed that many things in my life are named after songs.)

The 2014 issue of Knitscene Accessories has just hit the newsstand, and I'm absolutely thrilled to announce I'm in it. Not only am I in it, but my article is mentioned on the cover, and in the editor's letter.
The article is about converting a sock pattern from one direction to the other. I teach a lot of sock knitting classes, and I edit a lot of sock patterns, and speak to a lot of sock knitters, and I've found that the vast majority of sock knitters have a preferred direction. Some like toe-up, some like top-down. That's all good by me. I don't mind which way you go, as long as you're knitting socks.


What I do hear from knitters is that if they encounter a pattern that is for the "wrong" direction, then they are often discouraged. My article aims to help knitters convert a sock pattern from one direction to another, opening up a whole new range of sock patterns.

I love enabling sock knitters!

Sunday, May 25, 2014

Going for Roti, Saturday June 21; Oh yes, also teaching at Spun

I do love a good roti, and there's a terrific little roti shop in a strip-mall in Burlington, Ontario, just west of Toronto. Named D Hot Shoppe, it's unassuming but fantastic. I knew it was going to be good the first time I went, as the line up was both outrageously long, and outrageously diverse:  in that classic Canadian way, people of all cultural origins, suited types, half a soccer team, mums and kids, hard-hatted construction workers, locals and visitors, and yarn shop staff.

Oh yes, yarn shop. In the same strip mall at this roti shop is Spun Fibre Arts. The room is great, the staff is lovely, and the selection is wonderful. I love suburban shops - they have so much more space for yarn than my usual downtown haunts! (In addition, the unofficial mascot of Spun is miniature Dachshund, Shopsy, who is pure comedy on four short legs.)

It's not far west of Toronto, and I'm heading out there to teach Saturday June 21st. There's two classes scheduled, Pattern Reading and Soxpertise.

Pattern Reading
2 hours - 10am-noon
For knitters who are less confident with pattern instructions - learn how to read and fully understand patterns. We'll teach you how to understand garment sizing, and choose the right size to make. We will demystify the schematic, and commonly used abbreviations and conventions. We’ll also talk about how to choose and substitute yarns, and how to check gauge. And last but not least, we'll and address common problem areas like "reversing shapings" and "AT THE SAME TIME".

Soxpertise!
3 hours - 1-4 pm
For knitters with some sock experience, this interactive and lively workshop focuses on answering all of those frequently asked questions about sock knitting. We tackle topics such as: what’s the deal about toe-up vs. top down: how are they different? should you try both? is one better or easier than the other? Magic Loop/DPNs/2 Circulars: why and how? How to properly measure for, size and fit a sock – including tips on custom-fitting for ‘unusual’ feet – and review different types of heel shapings and how they affect fit and construction. We’ll address the tricky bits like how to avoid holes at the top of your heel, how to get a tidy gusset pick up, and special cast-ons and cast offs. I’ll talk about yarns and fibers and fabrics, and how to ensure that your hand-knit socks last as long as possible. I’ll provide facts and opinions on the surprisingly thorny topics of toe shapings and gussets. I’ll talk about the method and pros and cons of working two-at-once vs. one-at-a-time, and share tips for avoiding the dreaded second-sock syndrome. Bring your socks, your feet, your questions, concerns and issues.

To register, call the shop at 905-681-7786 or visit the Spun website here.

(If you're coming for the afternoon class, note that I will have breath mints with me. The curry is hot and strong.)

Wednesday, May 21, 2014

YES YOU CAN. On fixing a twist.

Technical note:  I understand the videos below don't work if you're using an iPad to view this page. You'll need to be on another type of computer. Limitation of Blogger and how it posts videos. Sorry!

I read a blog post this morning about working in the round. It was written to be an introduction to working on circular needles, and an encouragement for those who are struggling with it.

I love working in the round myself. Less purling! Faster! Hats! Socks! Cowls!

Although it's overall helpful, the writer says something that I fundamentally disagree with: that a twisted round is unfixable. This is a common belief: that if you join with a twist, it's a catastrophic, unfixable mistake.

Quite the opposite. It's entirely fixable. And so easy to fix that I've actually stopped checking for the twist before I join. Frankly, if I'm casting on many stitches onto a long circular, or coping with the porcupine that is a set of DPNs, I focus my energy on holding the needles in a way that's comfortable, and getting a good join.

Once I've worked my first round, I then check for a twist and fix it.

A round with a twist: no need for panic.
Yes, that's right. I fix the twist.

There is a 'but', and it's a reasonably big one: you can only fix the twist in the first round. After that, it's set. But that's ok - just get into the habit of checking for a twist after the first round is complete, and you're good.

Cast on, join your round as normal, and work all the way around.

Once you hit the start of the round, lie the work down and check for a twist.

If it isn't twisted, move on smugly.

If there is, just fix it! The video below shows you how.  In words: fix it by swinging the point of one of the needles through the middle of the round.


What you're actually doing is transferring the twist to the cast on edge. This is why you can't do it later on in your work, as the twist will be visible in the fabric. But a twist in the cast-on edge isn't visible.

Yes, this also works on a circular needle or magic loop. It's a slightly different way of looking at it, but what you're doing is just moving the twist along the needle until you hit the tip, and then "run" the twist off.


And then, either way, move on smugly.

You're welcome. ;-)

Working, working, working...

Too busy working to write much on the blog.

My writing time at the moment is being focused on a rather larger project: my next book!

Stay tuned for more details, but consider this the formal announcement that my Custom Fit Socks book is in the works.

Publication date of next summer - we will all have to be patient - but it's coming. And I think you'll like it!

My focus is on teaching you how to measure and assess your feet for proper sock fit, and then customizing a sock to fit exactly how you need it. There will be mathematical solutions and math-free solutions. There will be tables and formulas so you can design your own sock patterns - top-down and toe-up! - for any foot and any yarn, and I'll talk about how to customize my formulas and other patterns for special fit needs. There will also be some patterns.


Sunday, April 13, 2014

On Learning and Beginner-Friendly Projects: A few thoughts

I taught a class this past weekend on Fixing Mistakes in Lace. It's a very rewarding class to teach, as I'm helping knitters build very useful skills.

And it's a class full of "aha" moments. The first big one is when the students realize that they don't have to rip back to put in a missed yarnover. And the next is the discovery of the lifeline and its value in saving lives.... Well, ok, saving hours of knitting and ripping time, at the very least.

Two students were attending the class because they were participating in an online knit-along for a first lace project. One of them brought her swatch to show me. Now, if you've ever met me, you'll likely know that I have a lousy poker face... I'm really not good at disguising my feelings about something.

I was shocked when I saw the swatch - and I expressed that shock.

The knitter in question, B., seemed initially surprised (and probably a bit upset) at my shock. I think she thought I was shocked at the quality of her work.

Precisely the opposite: her work was great... I was shocked at the project. It was a pretty complex lace pattern - looked like a 20+ stitch, 20+ row repeat, worked in slightly fuzzy, 2-ply laceweight. I asked a few questions. Yes, this was advertised as a "beginner" lace project. Yes, this was the yarn recommended.

In my mind, that ain't no "beginner" lace project. No matter how good the online support, that's a challenging project.

My first couple of lace projects were fairly disastrous. There was so much ripping and reworking and cursing and perhaps even a few tears. And I'm so glad about that! I'm glad about that because I believe that experience makes me a better teacher. I remember that working with a fine and delicate laceweight yarn was intimidating and difficult. I did much better when I changed to a sturdier and smoother sock yarn. I remember that I did a lot better at first with a smaller lace repeat. I remember that being taught about a lifeline was critical to my enjoyment and success with the project.

Now, I don't wish to impugn the designer who is leading the knit-along. This person has made the choices of yarn and pattern for specific reasons, I'm sure. But this raises an interesting question: how does an experienced knitter decide what's 'easy'? What makes a good beginner-friendly project?

As a life-long knitter, what I find easy isn't at all what a newer knitter finds easy. I strongly believe that the best teachers are the ones who stay in touch with the learning process - the ones who stay in touch with how students learn. I love teaching in-store classes, and I don't think I'll ever give this up. These classes keep me engaged with newer knitters and they challenges they experience. I learn so much from the questions I get asked.

As an experienced knitter, there are so many things I just don't think about, so many things I take for granted... for example, I never questioned what a pattern meant when it said to "work even". It never occurred to me that this needed explaining. But I get asked about it at least once a week - this is a good reminder! It's important to listen to knitters read through instructions and ask questions about them.

And taking an example from this weekend's class, I find it easy and obvious to pick up a missed yarnover - I've done it thousands of times. But it's important to watch a knitter do this for the first time, and struggle with figuring out which way round to work into the yarnover. Watching reminds me why it's not obvious and not easy this first few times.

I'm grateful for my own awful knitting experiences. I'm grateful for newer knitters. I'm grateful for the "silly" questions. They make me a better teacher.


Thursday, April 10, 2014

More questions on sock fit

Loving the questions...

Through Twitter, a knitter asked about the number of gusset stitches:
How many should there be, how to pick them up, and how does this affect fit?
If you want to be scientific about it, it goes like this... figure out what circumference you need around the arch of your foot. Take the measurement, subtract off about 10-15% and then multiply that by your stitch gauge.
Let's use my numbers as an example. My foot is 8 inches around the ball of the foot, but 9 1/2 inches around the arch.  At 8 stitches an inch, I calculated the following stitch count for my sock: 8 inches - 10% is about 7 inches, and 7 x 8 = 56.

For my gusset circumference, 9 1/2 inches less about 10% is 8 1/2 inches. 8.5 x 8 = 68 stitches.

Let's consider a top-down flapped heel first. Your instep is usually half the total number of stitches - for me, that's 28. Check the pattern to see how many stitches are leftover from the heel turn - for my favourite band heel turn, I have 12 left over. So I've got 40 stitches after the heel turn. And I need to make up the remaining 28 stitches with the gusset pickup - that's 14 each side.  (And when I'm working a top down sock on 56 stitches, I aim to pick up 14 or 15, so that's just about right!)

Now: for many sock patterns, the instructions are simply to pick up one stitch for every slipped stitch on the side of the heel flap - that is, one stitch for every two rows. I submit to you that that number is too few. No matter how many rows you work. I like to pick up one stitch for every slipped slipped stitch at the side of the heel flap, plus two more. Yes, really. Two.

Aha, you say! But if I pick up more stitches, I'm going to get holes. Nope! Done properly, picking up extra stitches actually eliminates the risk of holes.

Avoid that tempting strand that runs between the stitches. If you pick up there, you're absolutely 100% going to create a huge hole. It's going to be loose, as that strand tends to stretch out when you're working the heel flap. And if you pick that up, you're effectively creating a yarnover - think about it, you're picking up a strand between the stitches. And even if you're "clever" about it, and work that yarnover through the back loop to twist it, you're still going to get a gap as you're still working an increase, and therefore forcing apart the instep and the heel stitches, creating a bit of a separation.  The trick is to pick up those two extra stitches in the straight line, continuing up from the slipped stitches. You're very deliberately picking up a stitch or two above the separation point between heel flap and instep - this hides that stretched-out strand of yarn in the break between the flap and the instep. To pick up the last couple, you're no longer putting the needle under the edge stitch, but poking it through from the RS of the fabric to the inside of the sock. (BTW, you are putting the needle under both strands of the edge stitch to do the pickup, aren't you? You should be.) (More on this in this blog post.)


For a toe-up heel, if I'm working on 56, I need to work gusset increases until I get to 68 stitches - the different is 12, so that's 6 on each side. That having been said, for most toe-up flap-and-gusset constructions, the number of rows in the heel flap is set by the number of gusset stitches, so I tend to consider this as a minimum number of gusset stitches. A 12-row heel flap sits too low on the heel for my liking, so I usually use the following formula: gusset stitches per side should be about 20% of the total sock stitches, so for a 56-stitch sock, I'd do 11 or 12 gusset stitches per side. Some knitters use 25% as their usual number, but I personally find this too many - I get bagginess around the front of the heel.


And Jenn asked in a comment:
Any hints on compensating for high insteps?
My widest point comes when putting the sock on - getting it over my heel/instep. If I knit the 'right' width for my calf I need to stretch the sock to the point I'm afraid of snapping something to get it over my heel. I've played with a few things (different heel flaps/stitch counts etc) but it seems if I want to actually get them on, they are baggy on the legs
There's a few possible elements at play here. First of all, I'd always recommend a sock with a flap and gusset construction, as that allows you to add extra circumference around the arch/instep. If working top-down, work an extra long heel flap, and then pick up "enough" gusset stitches - as above.  As to how long the heel flap should be, measure the vertical distance from the top of your instep to the ground. Aim for that length.

For toe-up, you'll need to reverse engineer this a bit. Measure that length, and then calculate how many rows that is.  (Flap length x round gauge in inches.) If you're working a "typical" toe-up sock where the heel flap is created by decreasing away a gusset stitch every row, your total number of gusset stitches - both sides added together - needs to be the number of rows you need. So at 10 rows/rounds an inch. if you need a 3 inch heel flap, that's 30 rows. And so you need 15 gusset stitches per side.


I hope that helps my readers! Anything else?

Tuesday, April 08, 2014

Sock Fit Part 3: Reader Questions

In a comment, May asks:
What would you suggest for someone who has "athletic" calves but skinny ankles?
Easy! Identify the size and stitch count you need for the foot/ankle, and also for the calf. (Use the negative ease rule in both cases - find the circumference that is about 10-15% smaller than your actual circumference.

At the simplest level, the process is this: If you're working top-down, cast on for larger size and work decreases as you work down the leg to ensure that you hit the smaller size by the time you're at the ankle. You can then finish the sock following the instructions for the smaller size. And if you're working toe-up, work the toe, foot and heel turn for the smaller size. Once you're back in the round and working the leg, work increases to get to the larger stitch count, and finish the leg.

How you actually do the shaping depends on your own leg. If the shape change is gradual from ankle to calf, change the stitch count over that distance. If your legs change shape quickly, change the stitch count quickly, too!

For example, let's say that your leg needs 72 stitches, and your foot needs 60 stitches. If working top-down, you will cast on 72, and need to have decreased to 60 by the ankle. If working toe-up, you will work the foot and heel on 60 stitches, and you'll need to increase to 72 for the leg.

That's 12 stitches of shaping.

If shaping gradually: Assuming your leg is at least 6 inches long, increase/decrease 2 stitches every inch or so on the leg. You can eyeball this, no need to be super-precise about it. After all, knitting stretches!

If shaping "quickly": work the shaping in one round in the bottom round of  the leg.

I'm doing a lot of writing on this topic right now - stay tuned for news about that being published...

Monday, April 07, 2014

More on sock fit - how about a class?!

Interested in exploring the topic of sock fit further? Questions about how to customize the fit of a sock to meet your particular foot shape?

Well, you're in luck! I'm teaching a class on Custom Fit Socks at the upcoming Interweave Knitting Lab in New Hampshire. I'm teaching a full slate of classes over the weekend, and the sock class runs Sunday May 18th, 9am to noon. There are a few spaces available!

More info here.

Saturday, April 05, 2014

On Ease and Sock Fit; Questions from Test Knitters

IMPORTANT NOTE: If you have a question, the best way to get an answer is to get in touch through email, or thorugh the website kateatherley.com. If you leave a comment here, a quirk in blogger means that I don't always know how to get in touch with you directly.
**************************************
These socks are too big... no slouch allowed!
I've been working on some new sock designs. Some of the more complex ones I've sent out for a test knit, and as always, I've had fantastic feedback come back.

It's good to have knitters of all levels test a pattern, both experienced and newer - they see very different things.  It's often the 'simplest' questions that are the smartest, the ones that get to the key issues. Sometimes the experienced knitters are 'too smart' in that they make assumptions, and fix things without even thinking about it. Newer sock knitters don't have much experience to rely on, so they look at the instructions more closely - they ask excellent questions.

Recently, I've had a bunch of related question come back to me, and they all start like this: the sock doesn't fit.

I always reply in the same way: How big is your foot? What size did you make? And why did you choose that size?

The answers have all been very revealing, and I've learned a lot. I think the key thing I've realized is that sock sizing isn't as well understood as I thought it was.

So, without further ado, a quick primer on sock fit and sizing.


Key fact #1: Size Matters One size fits all just doesn't. There's about a 25% difference in foot length and circumference between the average "smallest" and "largest" women's feet. That is, a a woman's US shoe size 11/UK women's size 9.5/EUR size 44 foot is going to be about 25% bigger than a woman's US shoe size 5/UK women's size 3.5/EUR size 36 foot. The idea that the same size sock will fit that foot equally well is just plain false. (The same is true for the "average" range of men's feet.)

Key fact #2: Socks should be worn with negative ease That is, they should be smaller than the foot (and leg) they are to go on. You want the sock to stretch to fit. A sock that stretches to fit will stay up on your leg, and stay in place on your foot. A common problem cited with hand-knit socks is that the legs don’t stay up: in many cases, this is simply because the sock is made too big. (The sock in the picture above suffers from that problem; look at the left one. It's wrinkly and baggy.)

A hand-knit sock (especially those made out of wool or other animal fibers) will stretch out over the day, and you don’t want it to be so floppy that it falls off. And a sock that stretches to fit will stay put on your foot; socks that move around in your shoes wear out faster, and be much less comfortable, due to the friction.

For an adult foot, the finished sock should be about 10% (practically speaking, about an inch/2.5cm) smaller than the leg and foot in circumference, and about half an inch/1cm shorter in length. For a child’s foot, you want the sock to be about 10% smaller in circumference (e.g. half an inch/1cm for a foot with a 5 inch/12cm circumference), and about a quarter to half an inch/.5-1cm shorter in length.

Key fact #2: When choosing a sock pattern, choose the size you're going to knit by finished sock circumference (This is sometimes listed as "actual".) Measure yourself around the ball of your foot, and choose a size that will result in a sock that's about an inch or so smaller than that.
Related point a) When we say "size" in a pattern, it's identifying the person who should be wearing the piece - e.g. small/medium/large; it's "Finished" or "Actual" that identifies the size of the item in question. With a garment, we typically expect positive ease - that is, that the finished sweater will be a bit bigger than the person, so that for a 40 inch chest, you might make a garment with a 44 inch finished chest circumference.
Related point b) The term "ease" here means the difference between the size of the person wearing the thing, and the size of the thing. If the thing is smaller, then we say it's worn with negative ease. If the thing is bigger, it's worn with positive ease. If the thing is the same size, it's worn with zero ease.)
Now, what happens if the sock doesn't give you finished/actual circumferences? Not to be a total curmudgeon, but I'd suggest those patterns should be avoided. How do you know what's going to fit you if it won't tell you what size you're making?

(That having been said, you can sometimes work it out... if you've got the gauge of the pattern stitch used for the foot/leg, and you know the stitch counts, then divide the number of stitches in the foot/leg by stitches per inch, and that's your finished size.)

What if it's sized by foot length? 
I'll be honest: I don't like this one bit. For conventional sock constructions, setting the foot length of a sock is simply a matter of "work until it's the required length". The key measurement for sock fit is foot circumference, as that sets the number of stitches for the leg and the foot. There are short wide feet and there are long narrow feet. You can't really draw conclusions about foot circumference based on foot length - that's just not safe or reasonable.

If the sock sizes are given as "to fit", or by shoe size only, without finished measurements (and you can't calculate it easily), then it's going to be a bit of a guessing game... you can hope that the designer has done his/her homework on how to fit.  Tread carefully.

If the sock sizes as given as "small", "medium", "large", or "child", "woman", "man" - again, tread carefully. If there's no finished measurements (or you can't work them out), avoid. (And again, I don't believe in one-size-fits-all, even if its "just" for a gender. As above, there's still a massive difference between a woman's small foot and a woman's large foot.)

And if there's only one size? If you can find/calculate finished size info, and it's the right measurement for you, to fit your foot, congratulations! Otherwise, move along. That pattern won't work for you.
Related point C) You'll notice that all of my published sock designs come in multiple sizes. You can see why.
Remember, knitting socks is a fair bit of work - what's the point in spending all that time if they don't fit?


Questions? Issues? Concerns? I'm actually writing more on this topic now. If I can help clarify anything, let me know!


An excellent question: is negative ease "built in" to the pattern? Ooh... yeah... this is interesting. I think there's a lot of misunderstanding even with designers about how to express sizes. It's actually very simple: you MUST GIVE Finished Measurements - the measurements of the item when knitting. It's best when a pattern that has both "to fit" and "finished" so that I know how the designer expects me to wear an item; either that, or "finished measurements" and a statement about how to wear it, e.g. "sock should be worn with about an inch of negative ease". You can't "build" ease into a measurement. Measurements are absolute. Either they are the finished item, or they are the size of the person you expect to wear them. If I see something that states that "ease is built into" the measurements, I'm both confused and nervous about it...


Tuesday, April 01, 2014

As the winter comes to a close...

It's been a long winter. In winter in which I've been very grateful to be a knitter. Being a knitter means that I have an excellent supply of warming gear: hats, mittens, scarves, cowls, legwarmers... And being a knitter means that as the winter gets longer, I can cheer myself up by changing out the accessories. I may be tired of my coat, but I can liven things up by changing from the black alpaca hat to the orange mohair one; I can change from the dark scarves to the bright ones. It's a small thing, but a nice thing.

But as the winter comes to a close, before I can put everything away, there's a vitally important step: a bath!

Moths - the dreaded wool-eaters - are a danger in the summer. Moths are attracted to dark spaces - the backs of closets where we have stuffed our winter gear. Moths are attracted to the nicest fibers - if wool is good, cashmere is positively delicious. And moths are attracted to items that are dirty - that have the oils from your hair and skin on them. This means that before you can put your woolies away, they need to be washed.

If they're items like hats and mitts and scarves, non-lacy stuff that doesn't need stretching or pinning, it's easy.

I fill up my bathtub with lukewarm water and Eucalan eucalyptus scent. (Eucalyptus is a natural moth-repellent.) I throw the items in, and wander away from a good half an hour. Drain the tub, while marvelling at how dirty the water is. (Snow is kinda filthy, it turns out.)

I have a front-loading washing machine, so I run the items through the spin cycle. The higher speed the spin, the more gentle it is... items are flung against the side of the tub and stay motionless throughout the spin. No fear of felting!

Then I lie them on a laundry rack to let them dry.


And then I put them away and dance the dance of joy and spring!


If you want more info on the horror that is Tineola bisselliella, a couple of great resources for you here: Wikipedia and University of Kentucky Entomology department.

Saturday, March 15, 2014

#sockjournal is catching on; my photo spot

I'm thoroughly enjoying the #sockjournal posts on Twitter. I love that it's catching on. This one makes me happy: a pair of the My Vampire Boyfriend socks - my design! -  knitted by Ariel, who is no slouch in the sock designing department herself.

Here's the ones I'm wearing today: my Top Down Wollmeise Birkenrinde pair. Wollmeise is a legendary German sock yarn - prized for its colourways, but also its feel. It's multi-ply - 10 or 12, I believe, and although wool and nylon, has the coolness and softness of cotton. This colour, "birch bark" in English, is a wonderful sophisticated take on black and white, and grey and purple highlights. The name is perfect.


Someone asked how on earth I'm getting these photos. Here's my setup: two pieces of white foamcore set up in our wide front window ledge. I sit on the ledge to get as much light as I can, and take a shot. The window is north facing, so the light is reasonably bright but diffuse, so it works quite well.


A quick note

Ever wanted to take a class with me, but couldn't? Interested in my Blocking Class? Now's the time!

Craftsy is offering a big sale this weekend, with discounts on all their classes, including mine. 


Tuesday, March 11, 2014

#sockjournal & Neon Sock Yarns; Shall We Knit classes

I'm having lots of fun with my #sockjournal project on Twitter. Every day I'm posting pictures of the socks I'm wearing; sometimes also pictures of the socks I'm knitting. I love that others are playing along, posting pictures of their own socks. And I love even more that I've apparently inspired a couple of knitters to take up sock knitting.

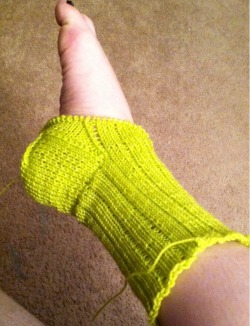
In particular, EmStar has blogged about her two projects on the go... A Bigger on the Inside, and a pair of my Basic Ribbed sock in a fantastic neon yellow.

photo shamelessly borrowed from EmStar's blog

All the grayness outside has me craving neon coloured sock yarns. I've fallen rather in love with this new line of Regia neon sock yarns. Seriously, they're fantastic.

Would be kind of great over black tights, no? 

I'm also rather loving Blue Moon's Socks that Rock Psychobarbie colourway. They have it in stock at Shall We Knit. 


And here's where I fall down. I'm off to Shall We Knit for a weekend of classes March 22 and 23rd. I adore going there - I love the shop and the team and all my Waterloo friends, both human and canine.

I'm teaching four classes:

  • Continental Knitting - get faster, get stronger, get ready for colourwork
  • Colourwork Bootcamp - ready to add a second colour? We cover stripes, Fair Isle, Intarsia and slipped stitch colour knitting.
  • Heels and Toes - for sock knitters looking to expand their knowledge and toolkit
  • Fixing Mistakes -because it happens to everyone

Kim and Ron of indigodragonfly will also be there, teaching classes and doing a trunk show. Likely also eating cheese.

More info here.

I'll let you know what I end up buying.


And yes, for those of you who were asking, I've dug out the pattern for that cabled sock I featured last week, and hope to have that ready for publication in the next week or so. It was very very old, a design from 2008, and I've had to recreate the charts from a corrupt file. I've sent it off for a full review and tech edit. I know I wasn't nearly as good a pattern writer then as I am now.

Thursday, March 06, 2014

"Today's Socks" #sockjournal

I've started an informal series on Twitter... "Today's Socks".

Have you been following?

Just about every day I'm tweeting a picture of the socks I'm wearing. Some are plain. Some are new. Some are old. All of them live in my sock drawer.

These are today's.


They're worked in Shelridge Farms's Ultra Heather sock yarn, a nice hardwearing mix of wool and nylon, just the way I like it. These must be seven or eight years old, one of my first published designs. They appeared in Canadian magazine A Needle Pulling Thread.

The copyright has reverted to me, I think I should republish them. The yarn is still available, and I'm pretty proud of them.

It occurs to me that I should add a hashtag for easy searching - will do that starting tomorrow. In the meantime, you should be able to see them all here, mixed in with various other photos.


Update: we have a hashtag! #sockjournal. Join in if you want!

If you're not a twitter user, or you haven't the faintest what a hashtag is, or are just confused, no worries. Just click on this link and you'll be able to see my socks. And hopefully others', too.


Sunday, March 02, 2014

Reader question: for Barbara W.

A reader left a comment on one of my blog posts. It's possible that I'm missing out on a clever feature in Blogger, but I can't honestly figure out how to reply by email. Although my correspondent created an account for commenting, I can't figure out how to email her back. (If I am missing something, I'd love a pointer, please!)

So, a reply in a blog post instead.
how do you garter stitch in eastern knitting without getting tight twisted fabric if you knit thru back loop every row?
from barbara w

Back in 2011, I wrote about blog post about combination knitting, a method that personal-hero-of-mine Annie Modesitt espouses.

Combination knitting is blindingly fast and easy and creates a very even fabric, in stockinette stitch worked flat. The downside to this method is that it's not really well-suited for working in the round, or garter stitch. My reader is entirely correct, if you work garter stitch this way, you get a twisted fabric. For garter stitch, I work in the more "conventional" method, knitting into the front loops of the stitches.


UPDATE: A smart Combination knitter left a smart comment on the post - go read it! She's entirely correct in what she says. It's actually an interesting thing. Ultimately, you can do anything you want in anyway that you want. That's one of the reasons that I love knitting so much.

The answer to the question is both "yes" and "no" at the same time. If you work a straight, unmodified Combination knit - that is, always knitting into the back leg of the stitch, then your fabric is going to end up twisted, as Barbara states. If you work the stitches so that you're knitting into the right loop, regardless of where they are mounted, then the fabric ends up entirely the way it should be.

How that plays out in reality is that to make that work for garter stitch, you either end up working into the front legs of the stitches, or changing how you wrap.

(Too much detail? Try it!)