Too busy working to write much on the blog.
My writing time at the moment is being focused on a rather larger project: my next book!
Stay tuned for more details, but consider this the formal announcement that my Custom Fit Socks book is in the works.
Publication date of next summer - we will all have to be patient - but it's coming. And I think you'll like it!
My focus is on teaching you how to measure and assess your feet for proper sock fit, and then customizing a sock to fit exactly how you need it. There will be mathematical solutions and math-free solutions. There will be tables and formulas so you can design your own sock patterns - top-down and toe-up! - for any foot and any yarn, and I'll talk about how to customize my formulas and other patterns for special fit needs. There will also be some patterns.
Wednesday, May 21, 2014

Sunday, April 13, 2014
On Learning and Beginner-Friendly Projects: A few thoughts
I taught a class this past weekend on Fixing Mistakes in Lace. It's a very rewarding class to teach, as I'm helping knitters build very useful skills.
And it's a class full of "aha" moments. The first big one is when the students realize that they don't have to rip back to put in a missed yarnover. And the next is the discovery of the lifeline and its value in saving lives.... Well, ok, saving hours of knitting and ripping time, at the very least.
Two students were attending the class because they were participating in an online knit-along for a first lace project. One of them brought her swatch to show me. Now, if you've ever met me, you'll likely know that I have a lousy poker face... I'm really not good at disguising my feelings about something.
I was shocked when I saw the swatch - and I expressed that shock.
The knitter in question, B., seemed initially surprised (and probably a bit upset) at my shock. I think she thought I was shocked at the quality of her work.
Precisely the opposite: her work was great... I was shocked at the project. It was a pretty complex lace pattern - looked like a 20+ stitch, 20+ row repeat, worked in slightly fuzzy, 2-ply laceweight. I asked a few questions. Yes, this was advertised as a "beginner" lace project. Yes, this was the yarn recommended.
In my mind, that ain't no "beginner" lace project. No matter how good the online support, that's a challenging project.
My first couple of lace projects were fairly disastrous. There was so much ripping and reworking and cursing and perhaps even a few tears. And I'm so glad about that! I'm glad about that because I believe that experience makes me a better teacher. I remember that working with a fine and delicate laceweight yarn was intimidating and difficult. I did much better when I changed to a sturdier and smoother sock yarn. I remember that I did a lot better at first with a smaller lace repeat. I remember that being taught about a lifeline was critical to my enjoyment and success with the project.
Now, I don't wish to impugn the designer who is leading the knit-along. This person has made the choices of yarn and pattern for specific reasons, I'm sure. But this raises an interesting question: how does an experienced knitter decide what's 'easy'? What makes a good beginner-friendly project?
As a life-long knitter, what I find easy isn't at all what a newer knitter finds easy. I strongly believe that the best teachers are the ones who stay in touch with the learning process - the ones who stay in touch with how students learn. I love teaching in-store classes, and I don't think I'll ever give this up. These classes keep me engaged with newer knitters and they challenges they experience. I learn so much from the questions I get asked.
As an experienced knitter, there are so many things I just don't think about, so many things I take for granted... for example, I never questioned what a pattern meant when it said to "work even". It never occurred to me that this needed explaining. But I get asked about it at least once a week - this is a good reminder! It's important to listen to knitters read through instructions and ask questions about them.
And taking an example from this weekend's class, I find it easy and obvious to pick up a missed yarnover - I've done it thousands of times. But it's important to watch a knitter do this for the first time, and struggle with figuring out which way round to work into the yarnover. Watching reminds me why it's not obvious and not easy this first few times.
I'm grateful for my own awful knitting experiences. I'm grateful for newer knitters. I'm grateful for the "silly" questions. They make me a better teacher.
And it's a class full of "aha" moments. The first big one is when the students realize that they don't have to rip back to put in a missed yarnover. And the next is the discovery of the lifeline and its value in saving lives.... Well, ok, saving hours of knitting and ripping time, at the very least.
Two students were attending the class because they were participating in an online knit-along for a first lace project. One of them brought her swatch to show me. Now, if you've ever met me, you'll likely know that I have a lousy poker face... I'm really not good at disguising my feelings about something.
I was shocked when I saw the swatch - and I expressed that shock.
The knitter in question, B., seemed initially surprised (and probably a bit upset) at my shock. I think she thought I was shocked at the quality of her work.
Precisely the opposite: her work was great... I was shocked at the project. It was a pretty complex lace pattern - looked like a 20+ stitch, 20+ row repeat, worked in slightly fuzzy, 2-ply laceweight. I asked a few questions. Yes, this was advertised as a "beginner" lace project. Yes, this was the yarn recommended.
In my mind, that ain't no "beginner" lace project. No matter how good the online support, that's a challenging project.
My first couple of lace projects were fairly disastrous. There was so much ripping and reworking and cursing and perhaps even a few tears. And I'm so glad about that! I'm glad about that because I believe that experience makes me a better teacher. I remember that working with a fine and delicate laceweight yarn was intimidating and difficult. I did much better when I changed to a sturdier and smoother sock yarn. I remember that I did a lot better at first with a smaller lace repeat. I remember that being taught about a lifeline was critical to my enjoyment and success with the project.
Now, I don't wish to impugn the designer who is leading the knit-along. This person has made the choices of yarn and pattern for specific reasons, I'm sure. But this raises an interesting question: how does an experienced knitter decide what's 'easy'? What makes a good beginner-friendly project?
As a life-long knitter, what I find easy isn't at all what a newer knitter finds easy. I strongly believe that the best teachers are the ones who stay in touch with the learning process - the ones who stay in touch with how students learn. I love teaching in-store classes, and I don't think I'll ever give this up. These classes keep me engaged with newer knitters and they challenges they experience. I learn so much from the questions I get asked.
As an experienced knitter, there are so many things I just don't think about, so many things I take for granted... for example, I never questioned what a pattern meant when it said to "work even". It never occurred to me that this needed explaining. But I get asked about it at least once a week - this is a good reminder! It's important to listen to knitters read through instructions and ask questions about them.
And taking an example from this weekend's class, I find it easy and obvious to pick up a missed yarnover - I've done it thousands of times. But it's important to watch a knitter do this for the first time, and struggle with figuring out which way round to work into the yarnover. Watching reminds me why it's not obvious and not easy this first few times.
I'm grateful for my own awful knitting experiences. I'm grateful for newer knitters. I'm grateful for the "silly" questions. They make me a better teacher.
Thursday, April 10, 2014
More questions on sock fit
Loving the questions...
Through Twitter, a knitter asked about the number of gusset stitches:
Let's use my numbers as an example. My foot is 8 inches around the ball of the foot, but 9 1/2 inches around the arch. At 8 stitches an inch, I calculated the following stitch count for my sock: 8 inches - 10% is about 7 inches, and 7 x 8 = 56.
For my gusset circumference, 9 1/2 inches less about 10% is 8 1/2 inches. 8.5 x 8 = 68 stitches.
Let's consider a top-down flapped heel first. Your instep is usually half the total number of stitches - for me, that's 28. Check the pattern to see how many stitches are leftover from the heel turn - for my favourite band heel turn, I have 12 left over. So I've got 40 stitches after the heel turn. And I need to make up the remaining 28 stitches with the gusset pickup - that's 14 each side. (And when I'm working a top down sock on 56 stitches, I aim to pick up 14 or 15, so that's just about right!)
Now: for many sock patterns, the instructions are simply to pick up one stitch for every slipped stitch on the side of the heel flap - that is, one stitch for every two rows. I submit to you that that number is too few. No matter how many rows you work. I like to pick up one stitch for every slipped slipped stitch at the side of the heel flap, plus two more. Yes, really. Two.
Aha, you say! But if I pick up more stitches, I'm going to get holes. Nope! Done properly, picking up extra stitches actually eliminates the risk of holes.
Avoid that tempting strand that runs between the stitches. If you pick up there, you're absolutely 100% going to create a huge hole. It's going to be loose, as that strand tends to stretch out when you're working the heel flap. And if you pick that up, you're effectively creating a yarnover - think about it, you're picking up a strand between the stitches. And even if you're "clever" about it, and work that yarnover through the back loop to twist it, you're still going to get a gap as you're still working an increase, and therefore forcing apart the instep and the heel stitches, creating a bit of a separation. The trick is to pick up those two extra stitches in the straight line, continuing up from the slipped stitches. You're very deliberately picking up a stitch or two above the separation point between heel flap and instep - this hides that stretched-out strand of yarn in the break between the flap and the instep. To pick up the last couple, you're no longer putting the needle under the edge stitch, but poking it through from the RS of the fabric to the inside of the sock. (BTW, you are putting the needle under both strands of the edge stitch to do the pickup, aren't you? You should be.) (More on this in this blog post.)

For a toe-up heel, if I'm working on 56, I need to work gusset increases until I get to 68 stitches - the different is 12, so that's 6 on each side. That having been said, for most toe-up flap-and-gusset constructions, the number of rows in the heel flap is set by the number of gusset stitches, so I tend to consider this as a minimum number of gusset stitches. A 12-row heel flap sits too low on the heel for my liking, so I usually use the following formula: gusset stitches per side should be about 20% of the total sock stitches, so for a 56-stitch sock, I'd do 11 or 12 gusset stitches per side. Some knitters use 25% as their usual number, but I personally find this too many - I get bagginess around the front of the heel.
And Jenn asked in a comment:
For toe-up, you'll need to reverse engineer this a bit. Measure that length, and then calculate how many rows that is. (Flap length x round gauge in inches.) If you're working a "typical" toe-up sock where the heel flap is created by decreasing away a gusset stitch every row, your total number of gusset stitches - both sides added together - needs to be the number of rows you need. So at 10 rows/rounds an inch. if you need a 3 inch heel flap, that's 30 rows. And so you need 15 gusset stitches per side.
I hope that helps my readers! Anything else?
Through Twitter, a knitter asked about the number of gusset stitches:
How many should there be, how to pick them up, and how does this affect fit?If you want to be scientific about it, it goes like this... figure out what circumference you need around the arch of your foot. Take the measurement, subtract off about 10-15% and then multiply that by your stitch gauge.
Let's use my numbers as an example. My foot is 8 inches around the ball of the foot, but 9 1/2 inches around the arch. At 8 stitches an inch, I calculated the following stitch count for my sock: 8 inches - 10% is about 7 inches, and 7 x 8 = 56.
For my gusset circumference, 9 1/2 inches less about 10% is 8 1/2 inches. 8.5 x 8 = 68 stitches.
Let's consider a top-down flapped heel first. Your instep is usually half the total number of stitches - for me, that's 28. Check the pattern to see how many stitches are leftover from the heel turn - for my favourite band heel turn, I have 12 left over. So I've got 40 stitches after the heel turn. And I need to make up the remaining 28 stitches with the gusset pickup - that's 14 each side. (And when I'm working a top down sock on 56 stitches, I aim to pick up 14 or 15, so that's just about right!)
Now: for many sock patterns, the instructions are simply to pick up one stitch for every slipped stitch on the side of the heel flap - that is, one stitch for every two rows. I submit to you that that number is too few. No matter how many rows you work. I like to pick up one stitch for every slipped slipped stitch at the side of the heel flap, plus two more. Yes, really. Two.
Aha, you say! But if I pick up more stitches, I'm going to get holes. Nope! Done properly, picking up extra stitches actually eliminates the risk of holes.
Avoid that tempting strand that runs between the stitches. If you pick up there, you're absolutely 100% going to create a huge hole. It's going to be loose, as that strand tends to stretch out when you're working the heel flap. And if you pick that up, you're effectively creating a yarnover - think about it, you're picking up a strand between the stitches. And even if you're "clever" about it, and work that yarnover through the back loop to twist it, you're still going to get a gap as you're still working an increase, and therefore forcing apart the instep and the heel stitches, creating a bit of a separation. The trick is to pick up those two extra stitches in the straight line, continuing up from the slipped stitches. You're very deliberately picking up a stitch or two above the separation point between heel flap and instep - this hides that stretched-out strand of yarn in the break between the flap and the instep. To pick up the last couple, you're no longer putting the needle under the edge stitch, but poking it through from the RS of the fabric to the inside of the sock. (BTW, you are putting the needle under both strands of the edge stitch to do the pickup, aren't you? You should be.) (More on this in this blog post.)
For a toe-up heel, if I'm working on 56, I need to work gusset increases until I get to 68 stitches - the different is 12, so that's 6 on each side. That having been said, for most toe-up flap-and-gusset constructions, the number of rows in the heel flap is set by the number of gusset stitches, so I tend to consider this as a minimum number of gusset stitches. A 12-row heel flap sits too low on the heel for my liking, so I usually use the following formula: gusset stitches per side should be about 20% of the total sock stitches, so for a 56-stitch sock, I'd do 11 or 12 gusset stitches per side. Some knitters use 25% as their usual number, but I personally find this too many - I get bagginess around the front of the heel.
And Jenn asked in a comment:
Any hints on compensating for high insteps?There's a few possible elements at play here. First of all, I'd always recommend a sock with a flap and gusset construction, as that allows you to add extra circumference around the arch/instep. If working top-down, work an extra long heel flap, and then pick up "enough" gusset stitches - as above. As to how long the heel flap should be, measure the vertical distance from the top of your instep to the ground. Aim for that length.
My widest point comes when putting the sock on - getting it over my heel/instep. If I knit the 'right' width for my calf I need to stretch the sock to the point I'm afraid of snapping something to get it over my heel. I've played with a few things (different heel flaps/stitch counts etc) but it seems if I want to actually get them on, they are baggy on the legs
For toe-up, you'll need to reverse engineer this a bit. Measure that length, and then calculate how many rows that is. (Flap length x round gauge in inches.) If you're working a "typical" toe-up sock where the heel flap is created by decreasing away a gusset stitch every row, your total number of gusset stitches - both sides added together - needs to be the number of rows you need. So at 10 rows/rounds an inch. if you need a 3 inch heel flap, that's 30 rows. And so you need 15 gusset stitches per side.
I hope that helps my readers! Anything else?
Tuesday, April 08, 2014
Sock Fit Part 3: Reader Questions
In a comment, May asks:
At the simplest level, the process is this: If you're working top-down, cast on for larger size and work decreases as you work down the leg to ensure that you hit the smaller size by the time you're at the ankle. You can then finish the sock following the instructions for the smaller size. And if you're working toe-up, work the toe, foot and heel turn for the smaller size. Once you're back in the round and working the leg, work increases to get to the larger stitch count, and finish the leg.
How you actually do the shaping depends on your own leg. If the shape change is gradual from ankle to calf, change the stitch count over that distance. If your legs change shape quickly, change the stitch count quickly, too!
For example, let's say that your leg needs 72 stitches, and your foot needs 60 stitches. If working top-down, you will cast on 72, and need to have decreased to 60 by the ankle. If working toe-up, you will work the foot and heel on 60 stitches, and you'll need to increase to 72 for the leg.
That's 12 stitches of shaping.
If shaping gradually: Assuming your leg is at least 6 inches long, increase/decrease 2 stitches every inch or so on the leg. You can eyeball this, no need to be super-precise about it. After all, knitting stretches!
If shaping "quickly": work the shaping in one round in the bottom round of the leg.
I'm doing a lot of writing on this topic right now - stay tuned for news about that being published...
What would you suggest for someone who has "athletic" calves but skinny ankles?Easy! Identify the size and stitch count you need for the foot/ankle, and also for the calf. (Use the negative ease rule in both cases - find the circumference that is about 10-15% smaller than your actual circumference.
At the simplest level, the process is this: If you're working top-down, cast on for larger size and work decreases as you work down the leg to ensure that you hit the smaller size by the time you're at the ankle. You can then finish the sock following the instructions for the smaller size. And if you're working toe-up, work the toe, foot and heel turn for the smaller size. Once you're back in the round and working the leg, work increases to get to the larger stitch count, and finish the leg.
How you actually do the shaping depends on your own leg. If the shape change is gradual from ankle to calf, change the stitch count over that distance. If your legs change shape quickly, change the stitch count quickly, too!
For example, let's say that your leg needs 72 stitches, and your foot needs 60 stitches. If working top-down, you will cast on 72, and need to have decreased to 60 by the ankle. If working toe-up, you will work the foot and heel on 60 stitches, and you'll need to increase to 72 for the leg.
That's 12 stitches of shaping.
If shaping gradually: Assuming your leg is at least 6 inches long, increase/decrease 2 stitches every inch or so on the leg. You can eyeball this, no need to be super-precise about it. After all, knitting stretches!
If shaping "quickly": work the shaping in one round in the bottom round of the leg.
I'm doing a lot of writing on this topic right now - stay tuned for news about that being published...
Monday, April 07, 2014
More on sock fit - how about a class?!

Well, you're in luck! I'm teaching a class on Custom Fit Socks at the upcoming Interweave Knitting Lab in New Hampshire. I'm teaching a full slate of classes over the weekend, and the sock class runs Sunday May 18th, 9am to noon. There are a few spaces available!
More info here.
Saturday, April 05, 2014
On Ease and Sock Fit; Questions from Test Knitters
IMPORTANT NOTE: If you have a question, the best way to get an answer is to get in touch through email, or thorugh the website kateatherley.com. If you leave a comment here, a quirk in blogger means that I don't always know how to get in touch with you directly.
**************************************
I've been working on some new sock designs. Some of the more complex ones I've sent out for a test knit, and as always, I've had fantastic feedback come back.
It's good to have knitters of all levels test a pattern, both experienced and newer - they see very different things. It's often the 'simplest' questions that are the smartest, the ones that get to the key issues. Sometimes the experienced knitters are 'too smart' in that they make assumptions, and fix things without even thinking about it. Newer sock knitters don't have much experience to rely on, so they look at the instructions more closely - they ask excellent questions.
Recently, I've had a bunch of related question come back to me, and they all start like this: the sock doesn't fit.
I always reply in the same way: How big is your foot? What size did you make? And why did you choose that size?
The answers have all been very revealing, and I've learned a lot. I think the key thing I've realized is that sock sizing isn't as well understood as I thought it was.
So, without further ado, a quick primer on sock fit and sizing.
Key fact #1: Size Matters One size fits all just doesn't. There's about a 25% difference in foot length and circumference between the average "smallest" and "largest" women's feet. That is, a a woman's US shoe size 11/UK women's size 9.5/EUR size 44 foot is going to be about 25% bigger than a woman's US shoe size 5/UK women's size 3.5/EUR size 36 foot. The idea that the same size sock will fit that foot equally well is just plain false. (The same is true for the "average" range of men's feet.)
Key fact #2: Socks should be worn with negative ease That is, they should be smaller than the foot (and leg) they are to go on. You want the sock to stretch to fit. A sock that stretches to fit will stay up on your leg, and stay in place on your foot. A common problem cited with hand-knit socks is that the legs don’t stay up: in many cases, this is simply because the sock is made too big. (The sock in the picture above suffers from that problem; look at the left one. It's wrinkly and baggy.)
A hand-knit sock (especially those made out of wool or other animal fibers) will stretch out over the day, and you don’t want it to be so floppy that it falls off. And a sock that stretches to fit will stay put on your foot; socks that move around in your shoes wear out faster, and be much less comfortable, due to the friction.
For an adult foot, the finished sock should be about 10% (practically speaking, about an inch/2.5cm) smaller than the leg and foot in circumference, and about half an inch/1cm shorter in length. For a child’s foot, you want the sock to be about 10% smaller in circumference (e.g. half an inch/1cm for a foot with a 5 inch/12cm circumference), and about a quarter to half an inch/.5-1cm shorter in length.
Key fact #2: When choosing a sock pattern, choose the size you're going to knit by finished sock circumference (This is sometimes listed as "actual".) Measure yourself around the ball of your foot, and choose a size that will result in a sock that's about an inch or so smaller than that.
(That having been said, you can sometimes work it out... if you've got the gauge of the pattern stitch used for the foot/leg, and you know the stitch counts, then divide the number of stitches in the foot/leg by stitches per inch, and that's your finished size.)
What if it's sized by foot length?
I'll be honest: I don't like this one bit. For conventional sock constructions, setting the foot length of a sock is simply a matter of "work until it's the required length". The key measurement for sock fit is foot circumference, as that sets the number of stitches for the leg and the foot. There are short wide feet and there are long narrow feet. You can't really draw conclusions about foot circumference based on foot length - that's just not safe or reasonable.
If the sock sizes are given as "to fit", or by shoe size only, without finished measurements (and you can't calculate it easily), then it's going to be a bit of a guessing game... you can hope that the designer has done his/her homework on how to fit. Tread carefully.
If the sock sizes as given as "small", "medium", "large", or "child", "woman", "man" - again, tread carefully. If there's no finished measurements (or you can't work them out), avoid. (And again, I don't believe in one-size-fits-all, even if its "just" for a gender. As above, there's still a massive difference between a woman's small foot and a woman's large foot.)
And if there's only one size? If you can find/calculate finished size info, and it's the right measurement for you, to fit your foot, congratulations! Otherwise, move along. That pattern won't work for you.
Questions? Issues? Concerns? I'm actually writing more on this topic now. If I can help clarify anything, let me know!
An excellent question: is negative ease "built in" to the pattern? Ooh... yeah... this is interesting. I think there's a lot of misunderstanding even with designers about how to express sizes. It's actually very simple: you MUST GIVE Finished Measurements - the measurements of the item when knitting. It's best when a pattern that has both "to fit" and "finished" so that I know how the designer expects me to wear an item; either that, or "finished measurements" and a statement about how to wear it, e.g. "sock should be worn with about an inch of negative ease". You can't "build" ease into a measurement. Measurements are absolute. Either they are the finished item, or they are the size of the person you expect to wear them. If I see something that states that "ease is built into" the measurements, I'm both confused and nervous about it...
**************************************
 |
| These socks are too big... no slouch allowed! |
It's good to have knitters of all levels test a pattern, both experienced and newer - they see very different things. It's often the 'simplest' questions that are the smartest, the ones that get to the key issues. Sometimes the experienced knitters are 'too smart' in that they make assumptions, and fix things without even thinking about it. Newer sock knitters don't have much experience to rely on, so they look at the instructions more closely - they ask excellent questions.
Recently, I've had a bunch of related question come back to me, and they all start like this: the sock doesn't fit.
I always reply in the same way: How big is your foot? What size did you make? And why did you choose that size?
The answers have all been very revealing, and I've learned a lot. I think the key thing I've realized is that sock sizing isn't as well understood as I thought it was.
So, without further ado, a quick primer on sock fit and sizing.
Key fact #1: Size Matters One size fits all just doesn't. There's about a 25% difference in foot length and circumference between the average "smallest" and "largest" women's feet. That is, a a woman's US shoe size 11/UK women's size 9.5/EUR size 44 foot is going to be about 25% bigger than a woman's US shoe size 5/UK women's size 3.5/EUR size 36 foot. The idea that the same size sock will fit that foot equally well is just plain false. (The same is true for the "average" range of men's feet.)
Key fact #2: Socks should be worn with negative ease That is, they should be smaller than the foot (and leg) they are to go on. You want the sock to stretch to fit. A sock that stretches to fit will stay up on your leg, and stay in place on your foot. A common problem cited with hand-knit socks is that the legs don’t stay up: in many cases, this is simply because the sock is made too big. (The sock in the picture above suffers from that problem; look at the left one. It's wrinkly and baggy.)
A hand-knit sock (especially those made out of wool or other animal fibers) will stretch out over the day, and you don’t want it to be so floppy that it falls off. And a sock that stretches to fit will stay put on your foot; socks that move around in your shoes wear out faster, and be much less comfortable, due to the friction.
For an adult foot, the finished sock should be about 10% (practically speaking, about an inch/2.5cm) smaller than the leg and foot in circumference, and about half an inch/1cm shorter in length. For a child’s foot, you want the sock to be about 10% smaller in circumference (e.g. half an inch/1cm for a foot with a 5 inch/12cm circumference), and about a quarter to half an inch/.5-1cm shorter in length.
Key fact #2: When choosing a sock pattern, choose the size you're going to knit by finished sock circumference (This is sometimes listed as "actual".) Measure yourself around the ball of your foot, and choose a size that will result in a sock that's about an inch or so smaller than that.
Related point a) When we say "size" in a pattern, it's identifying the person who should be wearing the piece - e.g. small/medium/large; it's "Finished" or "Actual" that identifies the size of the item in question. With a garment, we typically expect positive ease - that is, that the finished sweater will be a bit bigger than the person, so that for a 40 inch chest, you might make a garment with a 44 inch finished chest circumference.
Related point b) The term "ease" here means the difference between the size of the person wearing the thing, and the size of the thing. If the thing is smaller, then we say it's worn with negative ease. If the thing is bigger, it's worn with positive ease. If the thing is the same size, it's worn with zero ease.)Now, what happens if the sock doesn't give you finished/actual circumferences? Not to be a total curmudgeon, but I'd suggest those patterns should be avoided. How do you know what's going to fit you if it won't tell you what size you're making?
(That having been said, you can sometimes work it out... if you've got the gauge of the pattern stitch used for the foot/leg, and you know the stitch counts, then divide the number of stitches in the foot/leg by stitches per inch, and that's your finished size.)
What if it's sized by foot length?
I'll be honest: I don't like this one bit. For conventional sock constructions, setting the foot length of a sock is simply a matter of "work until it's the required length". The key measurement for sock fit is foot circumference, as that sets the number of stitches for the leg and the foot. There are short wide feet and there are long narrow feet. You can't really draw conclusions about foot circumference based on foot length - that's just not safe or reasonable.
If the sock sizes are given as "to fit", or by shoe size only, without finished measurements (and you can't calculate it easily), then it's going to be a bit of a guessing game... you can hope that the designer has done his/her homework on how to fit. Tread carefully.
If the sock sizes as given as "small", "medium", "large", or "child", "woman", "man" - again, tread carefully. If there's no finished measurements (or you can't work them out), avoid. (And again, I don't believe in one-size-fits-all, even if its "just" for a gender. As above, there's still a massive difference between a woman's small foot and a woman's large foot.)
And if there's only one size? If you can find/calculate finished size info, and it's the right measurement for you, to fit your foot, congratulations! Otherwise, move along. That pattern won't work for you.
Related point C) You'll notice that all of my published sock designs come in multiple sizes. You can see why.Remember, knitting socks is a fair bit of work - what's the point in spending all that time if they don't fit?
Questions? Issues? Concerns? I'm actually writing more on this topic now. If I can help clarify anything, let me know!
An excellent question: is negative ease "built in" to the pattern? Ooh... yeah... this is interesting. I think there's a lot of misunderstanding even with designers about how to express sizes. It's actually very simple: you MUST GIVE Finished Measurements - the measurements of the item when knitting. It's best when a pattern that has both "to fit" and "finished" so that I know how the designer expects me to wear an item; either that, or "finished measurements" and a statement about how to wear it, e.g. "sock should be worn with about an inch of negative ease". You can't "build" ease into a measurement. Measurements are absolute. Either they are the finished item, or they are the size of the person you expect to wear them. If I see something that states that "ease is built into" the measurements, I'm both confused and nervous about it...
Tuesday, April 01, 2014
As the winter comes to a close...
It's been a long winter. In winter in which I've been very grateful to be a knitter. Being a knitter means that I have an excellent supply of warming gear: hats, mittens, scarves, cowls, legwarmers... And being a knitter means that as the winter gets longer, I can cheer myself up by changing out the accessories. I may be tired of my coat, but I can liven things up by changing from the black alpaca hat to the orange mohair one; I can change from the dark scarves to the bright ones. It's a small thing, but a nice thing.
But as the winter comes to a close, before I can put everything away, there's a vitally important step: a bath!
Moths - the dreaded wool-eaters - are a danger in the summer. Moths are attracted to dark spaces - the backs of closets where we have stuffed our winter gear. Moths are attracted to the nicest fibers - if wool is good, cashmere is positively delicious. And moths are attracted to items that are dirty - that have the oils from your hair and skin on them. This means that before you can put your woolies away, they need to be washed.
If they're items like hats and mitts and scarves, non-lacy stuff that doesn't need stretching or pinning, it's easy.
I fill up my bathtub with lukewarm water and Eucalan eucalyptus scent. (Eucalyptus is a natural moth-repellent.) I throw the items in, and wander away from a good half an hour. Drain the tub, while marvelling at how dirty the water is. (Snow is kinda filthy, it turns out.)
I have a front-loading washing machine, so I run the items through the spin cycle. The higher speed the spin, the more gentle it is... items are flung against the side of the tub and stay motionless throughout the spin. No fear of felting!
Then I lie them on a laundry rack to let them dry.

And then I put them away and dance the dance of joy and spring!
If you want more info on the horror that is Tineola bisselliella, a couple of great resources for you here: Wikipedia and University of Kentucky Entomology department.
But as the winter comes to a close, before I can put everything away, there's a vitally important step: a bath!
Moths - the dreaded wool-eaters - are a danger in the summer. Moths are attracted to dark spaces - the backs of closets where we have stuffed our winter gear. Moths are attracted to the nicest fibers - if wool is good, cashmere is positively delicious. And moths are attracted to items that are dirty - that have the oils from your hair and skin on them. This means that before you can put your woolies away, they need to be washed.
If they're items like hats and mitts and scarves, non-lacy stuff that doesn't need stretching or pinning, it's easy.
I fill up my bathtub with lukewarm water and Eucalan eucalyptus scent. (Eucalyptus is a natural moth-repellent.) I throw the items in, and wander away from a good half an hour. Drain the tub, while marvelling at how dirty the water is. (Snow is kinda filthy, it turns out.)
I have a front-loading washing machine, so I run the items through the spin cycle. The higher speed the spin, the more gentle it is... items are flung against the side of the tub and stay motionless throughout the spin. No fear of felting!
Then I lie them on a laundry rack to let them dry.

And then I put them away and dance the dance of joy and spring!
If you want more info on the horror that is Tineola bisselliella, a couple of great resources for you here: Wikipedia and University of Kentucky Entomology department.
Saturday, March 15, 2014
#sockjournal is catching on; my photo spot
I'm thoroughly enjoying the #sockjournal posts on Twitter. I love that it's catching on. This one makes me happy: a pair of the My Vampire Boyfriend socks - my design! - knitted by Ariel, who is no slouch in the sock designing department herself.
Here's the ones I'm wearing today: my Top Down Wollmeise Birkenrinde pair. Wollmeise is a legendary German sock yarn - prized for its colourways, but also its feel. It's multi-ply - 10 or 12, I believe, and although wool and nylon, has the coolness and softness of cotton. This colour, "birch bark" in English, is a wonderful sophisticated take on black and white, and grey and purple highlights. The name is perfect.

Someone asked how on earth I'm getting these photos. Here's my setup: two pieces of white foamcore set up in our wide front window ledge. I sit on the ledge to get as much light as I can, and take a shot. The window is north facing, so the light is reasonably bright but diffuse, so it works quite well.

Here's the ones I'm wearing today: my Top Down Wollmeise Birkenrinde pair. Wollmeise is a legendary German sock yarn - prized for its colourways, but also its feel. It's multi-ply - 10 or 12, I believe, and although wool and nylon, has the coolness and softness of cotton. This colour, "birch bark" in English, is a wonderful sophisticated take on black and white, and grey and purple highlights. The name is perfect.
Someone asked how on earth I'm getting these photos. Here's my setup: two pieces of white foamcore set up in our wide front window ledge. I sit on the ledge to get as much light as I can, and take a shot. The window is north facing, so the light is reasonably bright but diffuse, so it works quite well.
A quick note
Ever wanted to take a class with me, but couldn't? Interested in my Blocking Class? Now's the time!
Craftsy is offering a big sale this weekend, with discounts on all their classes, including mine.
Craftsy is offering a big sale this weekend, with discounts on all their classes, including mine.
Tuesday, March 11, 2014
#sockjournal & Neon Sock Yarns; Shall We Knit classes
I'm having lots of fun with my #sockjournal project on Twitter. Every day I'm posting pictures of the socks I'm wearing; sometimes also pictures of the socks I'm knitting. I love that others are playing along, posting pictures of their own socks. And I love even more that I've apparently inspired a couple of knitters to take up sock knitting.
In particular, EmStar has blogged about her two projects on the go... A Bigger on the Inside, and a pair of my Basic Ribbed sock in a fantastic neon yellow.
All the grayness outside has me craving neon coloured sock yarns. I've fallen rather in love with this new line of Regia neon sock yarns. Seriously, they're fantastic.
I'm also rather loving Blue Moon's Socks that Rock Psychobarbie colourway. They have it in stock at Shall We Knit.
And here's where I fall down. I'm off to Shall We Knit for a weekend of classes March 22 and 23rd. I adore going there - I love the shop and the team and all my Waterloo friends, both human and canine.
I'm teaching four classes:
Kim and Ron of indigodragonfly will also be there, teaching classes and doing a trunk show. Likely also eating cheese.
More info here.
I'll let you know what I end up buying.
And yes, for those of you who were asking, I've dug out the pattern for that cabled sock I featured last week, and hope to have that ready for publication in the next week or so. It was very very old, a design from 2008, and I've had to recreate the charts from a corrupt file. I've sent it off for a full review and tech edit. I know I wasn't nearly as good a pattern writer then as I am now.
In particular, EmStar has blogged about her two projects on the go... A Bigger on the Inside, and a pair of my Basic Ribbed sock in a fantastic neon yellow.
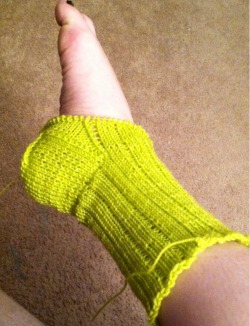 |
| photo shamelessly borrowed from EmStar's blog |
All the grayness outside has me craving neon coloured sock yarns. I've fallen rather in love with this new line of Regia neon sock yarns. Seriously, they're fantastic.
 |
| Would be kind of great over black tights, no? |
I'm also rather loving Blue Moon's Socks that Rock Psychobarbie colourway. They have it in stock at Shall We Knit.
And here's where I fall down. I'm off to Shall We Knit for a weekend of classes March 22 and 23rd. I adore going there - I love the shop and the team and all my Waterloo friends, both human and canine.
I'm teaching four classes:
- Continental Knitting - get faster, get stronger, get ready for colourwork
- Colourwork Bootcamp - ready to add a second colour? We cover stripes, Fair Isle, Intarsia and slipped stitch colour knitting.
- Heels and Toes - for sock knitters looking to expand their knowledge and toolkit
- Fixing Mistakes -because it happens to everyone
Kim and Ron of indigodragonfly will also be there, teaching classes and doing a trunk show. Likely also eating cheese.
More info here.
I'll let you know what I end up buying.
And yes, for those of you who were asking, I've dug out the pattern for that cabled sock I featured last week, and hope to have that ready for publication in the next week or so. It was very very old, a design from 2008, and I've had to recreate the charts from a corrupt file. I've sent it off for a full review and tech edit. I know I wasn't nearly as good a pattern writer then as I am now.
Thursday, March 06, 2014
"Today's Socks" #sockjournal
I've started an informal series on Twitter... "Today's Socks".
Have you been following?
Just about every day I'm tweeting a picture of the socks I'm wearing. Some are plain. Some are new. Some are old. All of them live in my sock drawer.
These are today's.

They're worked in Shelridge Farms's Ultra Heather sock yarn, a nice hardwearing mix of wool and nylon, just the way I like it. These must be seven or eight years old, one of my first published designs. They appeared in Canadian magazine A Needle Pulling Thread.
The copyright has reverted to me, I think I should republish them. The yarn is still available, and I'm pretty proud of them.
It occurs to me that I should add a hashtag for easy searching - will do that starting tomorrow. In the meantime, you should be able to see them all here, mixed in with various other photos.
Update: we have a hashtag! #sockjournal. Join in if you want!
If you're not a twitter user, or you haven't the faintest what a hashtag is, or are just confused, no worries. Just click on this link and you'll be able to see my socks. And hopefully others', too.
Have you been following?
Just about every day I'm tweeting a picture of the socks I'm wearing. Some are plain. Some are new. Some are old. All of them live in my sock drawer.
These are today's.

They're worked in Shelridge Farms's Ultra Heather sock yarn, a nice hardwearing mix of wool and nylon, just the way I like it. These must be seven or eight years old, one of my first published designs. They appeared in Canadian magazine A Needle Pulling Thread.
The copyright has reverted to me, I think I should republish them. The yarn is still available, and I'm pretty proud of them.
It occurs to me that I should add a hashtag for easy searching - will do that starting tomorrow. In the meantime, you should be able to see them all here, mixed in with various other photos.
Update: we have a hashtag! #sockjournal. Join in if you want!
If you're not a twitter user, or you haven't the faintest what a hashtag is, or are just confused, no worries. Just click on this link and you'll be able to see my socks. And hopefully others', too.
Sunday, March 02, 2014
Reader question: for Barbara W.
A reader left a comment on one of my blog posts. It's possible that I'm missing out on a clever feature in Blogger, but I can't honestly figure out how to reply by email. Although my correspondent created an account for commenting, I can't figure out how to email her back. (If I am missing something, I'd love a pointer, please!)
So, a reply in a blog post instead.
Back in 2011, I wrote about blog post about combination knitting, a method that personal-hero-of-mine Annie Modesitt espouses.
Combination knitting is blindingly fast and easy and creates a very even fabric, in stockinette stitch worked flat. The downside to this method is that it's not really well-suited for working in the round, or garter stitch. My reader is entirely correct, if you work garter stitch this way, you get a twisted fabric. For garter stitch, I work in the more "conventional" method, knitting into the front loops of the stitches.
UPDATE: A smart Combination knitter left a smart comment on the post - go read it! She's entirely correct in what she says. It's actually an interesting thing. Ultimately, you can do anything you want in anyway that you want. That's one of the reasons that I love knitting so much.
The answer to the question is both "yes" and "no" at the same time. If you work a straight, unmodified Combination knit - that is, always knitting into the back leg of the stitch, then your fabric is going to end up twisted, as Barbara states. If you work the stitches so that you're knitting into the right loop, regardless of where they are mounted, then the fabric ends up entirely the way it should be.
How that plays out in reality is that to make that work for garter stitch, you either end up working into the front legs of the stitches, or changing how you wrap.
(Too much detail? Try it!)
So, a reply in a blog post instead.
how do you garter stitch in eastern knitting without getting tight twisted fabric if you knit thru back loop every row?
from barbara w
Back in 2011, I wrote about blog post about combination knitting, a method that personal-hero-of-mine Annie Modesitt espouses.
Combination knitting is blindingly fast and easy and creates a very even fabric, in stockinette stitch worked flat. The downside to this method is that it's not really well-suited for working in the round, or garter stitch. My reader is entirely correct, if you work garter stitch this way, you get a twisted fabric. For garter stitch, I work in the more "conventional" method, knitting into the front loops of the stitches.
UPDATE: A smart Combination knitter left a smart comment on the post - go read it! She's entirely correct in what she says. It's actually an interesting thing. Ultimately, you can do anything you want in anyway that you want. That's one of the reasons that I love knitting so much.
The answer to the question is both "yes" and "no" at the same time. If you work a straight, unmodified Combination knit - that is, always knitting into the back leg of the stitch, then your fabric is going to end up twisted, as Barbara states. If you work the stitches so that you're knitting into the right loop, regardless of where they are mounted, then the fabric ends up entirely the way it should be.
How that plays out in reality is that to make that work for garter stitch, you either end up working into the front legs of the stitches, or changing how you wrap.
(Too much detail? Try it!)
Wednesday, February 26, 2014
Something springy and nice and girly and FUN.
The weather might not be cooperating, but your feet can still feel springy.

The first time I clapped eyes on Rain City Knit's Confetti colourway of sock yarn, I knew I needed to make something with it. I knew it was going to be a design challenge... the yarn has fantastic colours, but very busy variegation.

After much swatching (MUCH) I landed on a very simple lace rib pattern. (Actually, if truth be told, the stitch pattern was a total accident. I had charted up a pattern but messed up the numbers in my swatch, and what resulted wasn't at all what I had in mind... but you know, I liked it so much I based the entire sock on it.) It's lacy, but not fussy. Girly but not too much. Neon but not too crazy. It's exactly what I was aiming for, exactly what I'm craving: fun.
Because the Polar Vortex is never going away, I wore them today over a pair of black tights, and I love them that way. One day, I hope to be able to wear them on their own.

Top down, in multiple sizes (women's finished foot circumferences 7 (7.5, 8, 8.5) inches); pattern is written for DPNs/Magic Loop/2 Circulars. Suitable for knitters with a little sock experience, but no lace experience required. As long as you yo and k2tog, you're good.
On Ravelry and Patternfish $5. If you're looking for the yarn, Lettuce Knit has a good stock.

The first time I clapped eyes on Rain City Knit's Confetti colourway of sock yarn, I knew I needed to make something with it. I knew it was going to be a design challenge... the yarn has fantastic colours, but very busy variegation.
After much swatching (MUCH) I landed on a very simple lace rib pattern. (Actually, if truth be told, the stitch pattern was a total accident. I had charted up a pattern but messed up the numbers in my swatch, and what resulted wasn't at all what I had in mind... but you know, I liked it so much I based the entire sock on it.) It's lacy, but not fussy. Girly but not too much. Neon but not too crazy. It's exactly what I was aiming for, exactly what I'm craving: fun.
Because the Polar Vortex is never going away, I wore them today over a pair of black tights, and I love them that way. One day, I hope to be able to wear them on their own.
Top down, in multiple sizes (women's finished foot circumferences 7 (7.5, 8, 8.5) inches); pattern is written for DPNs/Magic Loop/2 Circulars. Suitable for knitters with a little sock experience, but no lace experience required. As long as you yo and k2tog, you're good.
On Ravelry and Patternfish $5. If you're looking for the yarn, Lettuce Knit has a good stock.
"Shooting myself in the foot"
Shamelessly stealing the joke from Franklin, I admit.
In my Craft University Sock knitting class, I am sharing pictures of the socks I'm wearing.
Monday I was wearing my very warm Waikiwi merino/possum/alpaca blend socks. Love this yarn. Gorgeous colours, fantastically soft, and beautifully, wonderfully warm.

Which we need. Look at it out there.

In my Craft University Sock knitting class, I am sharing pictures of the socks I'm wearing.
Monday I was wearing my very warm Waikiwi merino/possum/alpaca blend socks. Love this yarn. Gorgeous colours, fantastically soft, and beautifully, wonderfully warm.
Which we need. Look at it out there.

Sunday, February 23, 2014
Two Upcoming Events
Very excited to announce two events I'm teaching at this spring.
(Ok, it's true, I may also just be excited about the concept of spring.)
These events are two major highlights of my knitting year: The Toronto Downtown Knit Collective Knitter's Frolic, held at the always lovely Japanese Cultural Centre in Toronto, April 26 & 27th.

and
Interweave's Knitting Lab being held in Manchester, New Hampshire May 13-18th.
Both of these events bring together my favourite things: yarn shopping and smart and enthusiastic knitting students. Seriously, the quality of the shopping, the classes and the students is always fantastic.
At the Frolic, I'm teaching
More Frolic workshop details here.
At Knitting Lab, I'm teaching
More Knitting Lab workshop details here.
(Ok, it's true, I may also just be excited about the concept of spring.)
These events are two major highlights of my knitting year: The Toronto Downtown Knit Collective Knitter's Frolic, held at the always lovely Japanese Cultural Centre in Toronto, April 26 & 27th.
and
Interweave's Knitting Lab being held in Manchester, New Hampshire May 13-18th.
Both of these events bring together my favourite things: yarn shopping and smart and enthusiastic knitting students. Seriously, the quality of the shopping, the classes and the students is always fantastic.
At the Frolic, I'm teaching
- Pattern Writing
- Kitchener Confidence
- Working in the Round: DPNs, Magic Loop, 2 Circulars
- And a full-day Introduction to Fair Isle workshop - Design Your Own Fair Isle Fingerless mitts. This workshop in particular is ideal for knitters who are new(ish) to working with multiple colours, and are looking for a fun way to build their skills and dip their toes into designing.
More Frolic workshop details here.
At Knitting Lab, I'm teaching
- The Perfect Fit: How to read & understand garment sizing info, how to choose the right size to knit, and simpler alterations to improve the fit of any garment
- Fixing Mistakes
- Two Socks in One: The War & Peace Method
- Pattern Writing
- Custom Fit Socks
More Knitting Lab workshop details here.
Thursday, February 20, 2014
On Free Knitting Videos. You know, on that free video website. The one whose name begins with 'You' and end with 'Tube'
Although I teach a lot of classes for more experienced knitters, at least once a month I find myself in front of a room full of newer knitters. I love these classes - I adore seeing newer (or indeed, lapsed) knitters taking on a new challenge, expanding their skills, seeking out new types of projects. It's immensely gratifying to instill confidence and excitement in newer knitters.
Invariably, at some point in these classes, the topic of YouTube comes up. Newer knitters (most especially the younger ones, not to demographically profile) report going to YouTube to learn to knit. Experienced knitters of all ages go to YouTube to review a stitch or technique they're unfamiliar with.
And invariably, I stop the discussion.
I am in the habit of warning knitters away from YouTube for knitting skills. Do not go to YouTube for knitting videos, I say. I often have to say it twice. (Fully acknowledging it makes me sounds like a total crank.)
My rationale? YouTube is the wild west. Everybody and their dog can put a video up on YouTube. And I don't know about your dog, but Dexter is really not very good at telling ssk and k2tog apart...
There's no moderator. There's no-one checking the videos to make sure they're right. But more insidiously, perhaps, there's no one checking the videos to make sure that they are good. You know, actually helpful. (Because knowing how to do something doesn't mean you know how to teach it.)
I've had knitters led horribly astray with YouTube videos that are outright wrong. I've also had knitters led just as wrong by videos that aren't helpful.
If you do a search a phrase like "how to knit", you get "About 615,000 results". Yes. Really. How on earth are you supposed to know what the best one is going to be? If something is new to you, how on earth are you supposed to know what's a good and helpful video? It's asking too much of newer knitters to be able to evaluate videos.
As with free patterns, I encourage knitters to seek out a "reliable" source. Someone they can trust to know what the heck they are talking about and - more to the point - know how to explain it well.
I highly recommend knittinghelp.com. There's tons and tons of videos, and they're all right and good and well explained and helpful. In addition, I love that on the increases and decrease pages, there are photos of each of the stitches so you can see the results and compare. She has both Continental and English style videos for many stitches. Fab!
Knitty has recently added a video techniques column, "The Neurotic Knitter". Kristen is building a great library of all sorts of techiques.
There are some teachers doing excellent work on YouTube. I love Lucy Neatby's no-nonsense approach. Very Pink Knits has a lot of great videos covering the fundamentals, and Cat Bordhi does excellent tutorials for many 'more advanced' techniques.
So yes, it's not that all free online videos are bad. Far from it. And goodness knows there are thousands and thousands more - and better - knitters because of these videos. But I just want to make sure that these knitters are learning right.
Now, this isn't to ignore my own "Learn to Knit" video class. But that's sort of a different beast: it's a full, paid, multi-hour class that takes you through a series of lessons and projects. Here, I'm talking about quickie, one-technique, short-form free videos.
So, readers: are there any sites or videos or teachers you'd particularly recommend? Anyone missing from my list?
Invariably, at some point in these classes, the topic of YouTube comes up. Newer knitters (most especially the younger ones, not to demographically profile) report going to YouTube to learn to knit. Experienced knitters of all ages go to YouTube to review a stitch or technique they're unfamiliar with.
And invariably, I stop the discussion.
I am in the habit of warning knitters away from YouTube for knitting skills. Do not go to YouTube for knitting videos, I say. I often have to say it twice. (Fully acknowledging it makes me sounds like a total crank.)
My rationale? YouTube is the wild west. Everybody and their dog can put a video up on YouTube. And I don't know about your dog, but Dexter is really not very good at telling ssk and k2tog apart...
There's no moderator. There's no-one checking the videos to make sure they're right. But more insidiously, perhaps, there's no one checking the videos to make sure that they are good. You know, actually helpful. (Because knowing how to do something doesn't mean you know how to teach it.)
I've had knitters led horribly astray with YouTube videos that are outright wrong. I've also had knitters led just as wrong by videos that aren't helpful.
If you do a search a phrase like "how to knit", you get "About 615,000 results". Yes. Really. How on earth are you supposed to know what the best one is going to be? If something is new to you, how on earth are you supposed to know what's a good and helpful video? It's asking too much of newer knitters to be able to evaluate videos.
As with free patterns, I encourage knitters to seek out a "reliable" source. Someone they can trust to know what the heck they are talking about and - more to the point - know how to explain it well.
I highly recommend knittinghelp.com. There's tons and tons of videos, and they're all right and good and well explained and helpful. In addition, I love that on the increases and decrease pages, there are photos of each of the stitches so you can see the results and compare. She has both Continental and English style videos for many stitches. Fab!
Knitty has recently added a video techniques column, "The Neurotic Knitter". Kristen is building a great library of all sorts of techiques.
There are some teachers doing excellent work on YouTube. I love Lucy Neatby's no-nonsense approach. Very Pink Knits has a lot of great videos covering the fundamentals, and Cat Bordhi does excellent tutorials for many 'more advanced' techniques.
So yes, it's not that all free online videos are bad. Far from it. And goodness knows there are thousands and thousands more - and better - knitters because of these videos. But I just want to make sure that these knitters are learning right.
Now, this isn't to ignore my own "Learn to Knit" video class. But that's sort of a different beast: it's a full, paid, multi-hour class that takes you through a series of lessons and projects. Here, I'm talking about quickie, one-technique, short-form free videos.
So, readers: are there any sites or videos or teachers you'd particularly recommend? Anyone missing from my list?
Wednesday, February 19, 2014
New Pattern: The Gina Lollobrigida Cowl
A couple of years ago, the lovely Kim of indigodragonfly asked me to design for her club. I had a skein of laceweight, and a million ideas.
The main club pattern was something else - more on which, later - but a by-product of that design was a lovely little laceweight cowl. I've been wearing it a lot of late (sometimes in the house, damn you Polar Vortex), but also as a dash of lovely and sophisticated color to brighten up my otherwise drab winter get-ups.

The design was named after bombshell Italian actress Gina Lollobrigida... the stitch pattern used is called Italian Chain Ribbing, and it reminded me of a the sort of lace that you might see featured out in one those classic 1960s pin-up shots. Who says we can't be sexy in the middle of the worst winter we've had in years?
Admit it - it’s the middle of February, it’s still snowing and miserably cold, and you’re tired of all your scarves and cowls. Use a bit of laceweight to create something new and luxurious and lovely. It will take you through those chilly days of spring very nicely.
Who doesn't have a couple of hundred yards of laceweight kicking around? Leftovers? A sample skein? If you've got more yarn, you can make it deeper; if you've got less, make it a bit shallower. Heck, it would look great in a light sock yarn, too...
This pattern is suitable for knitters with a little lace knitting experience, and a little crochet experience.

Available on Ravelry and Patternfish. $5.
The main club pattern was something else - more on which, later - but a by-product of that design was a lovely little laceweight cowl. I've been wearing it a lot of late (sometimes in the house, damn you Polar Vortex), but also as a dash of lovely and sophisticated color to brighten up my otherwise drab winter get-ups.
The design was named after bombshell Italian actress Gina Lollobrigida... the stitch pattern used is called Italian Chain Ribbing, and it reminded me of a the sort of lace that you might see featured out in one those classic 1960s pin-up shots. Who says we can't be sexy in the middle of the worst winter we've had in years?
Admit it - it’s the middle of February, it’s still snowing and miserably cold, and you’re tired of all your scarves and cowls. Use a bit of laceweight to create something new and luxurious and lovely. It will take you through those chilly days of spring very nicely.
Who doesn't have a couple of hundred yards of laceweight kicking around? Leftovers? A sample skein? If you've got more yarn, you can make it deeper; if you've got less, make it a bit shallower. Heck, it would look great in a light sock yarn, too...
This pattern is suitable for knitters with a little lace knitting experience, and a little crochet experience.
Available on Ravelry and Patternfish. $5.
Tuesday, February 11, 2014
Learn to Knit Socks, Interweave Craft University

Their "Craft University" platform is quite unlike the other ways of delivering online courses. It uses an environment inspired by distance learning tools that universities and colleges use. I loved it.
Although video is an important piece of it, it's not just about the video.
It is a combination of video and downloadable patterns and 'lectures' and group discussions and interactivity. Feb 24th, we're starting another session of my Learn to Knit Socks class.
There are five lessons, and you can work through at your own pace. We set a time limit of a month for the class, to encourage engagement and progress. Although sometimes it can be fun to sign up for a class with no limit, this is a topic that benefits from focus and practice, and putting some gentle deadlines on the class definitely helps with that.
(No-one is going tell you off if you don't get the class finished, of course, and all class notes and patterns and downloadable resources are yours to keep forever.)
But the real value comes with the interaction - with me, and with your fellow students. Over the month of the class., I logged in two and sometimes three times to a day to answer questions from students, to join in discussions, and to post new material.
I worked a sock as we worked through the class material, and was able to create real-time content updates to answer questions and expand on discussion points. I loved that I was able to add to the class material to delve into topics students wanted me to; I posted extra pictures and video to explain a point that was challenging....
It is a combination of video and downloadable patterns and 'lectures' and group discussions and interactivity. Feb 24th, we're starting another session of my Learn to Knit Socks class.
There are five lessons, and you can work through at your own pace. We set a time limit of a month for the class, to encourage engagement and progress. Although sometimes it can be fun to sign up for a class with no limit, this is a topic that benefits from focus and practice, and putting some gentle deadlines on the class definitely helps with that.
(No-one is going tell you off if you don't get the class finished, of course, and all class notes and patterns and downloadable resources are yours to keep forever.)
But the real value comes with the interaction - with me, and with your fellow students. Over the month of the class., I logged in two and sometimes three times to a day to answer questions from students, to join in discussions, and to post new material.
I worked a sock as we worked through the class material, and was able to create real-time content updates to answer questions and expand on discussion points. I loved that I was able to add to the class material to delve into topics students wanted me to; I posted extra pictures and video to explain a point that was challenging....
 |
| When a student asked how I count my heel rows... |
The feedback from students was great. Although the class might not have been in a format they were used to, many commented that this was a really great way to handle material that needs more than just demos. In some ways it was better than an in-store class, as we had a month to work together, and so students could take their time and really practice their new skills.
So yes, if you're interested in tackling sock knitting, and can't attend one of my classes in person, try Interweave's Craft University.
For more info, and to sign up....
Monday, February 10, 2014
On the Long Tail Cast On; Staying Loose, and Busting a Myth
Although I'm quite relaxed about a number of things, I'm particular about cast ons. I'm a big fan of the Long Tail Cast On. It's quick, it's attractive, and it creates a very easy-to-work-from edge. When done correctly, it's also stretchy and flexible.
 Hey, did you know? I've just launched another new online class: this one specifically about casting on and binding off! It's ideal for newer knitters who are looking to build their skills.
(I don't like the knit cast on at all - it has very little to recommend it. The edge it makes is a frustrating combination of both too tight, and too loose. It lacks stretch, but yet it still flares out, and I don't like the look of the open loops at the edge.)
I do like the Cable Cast on, for many purposes. The only place it doesn't work well, I find, is when you want stretch - like for a top-down sock.
For that, I prescribe the Long Tail method. Nope, who I am kidding? I insist on the Long Tail Method for top-down socks.
If you don't know it, and haven't watched my class, the inimitable Lucy Neatby's video is very good.
There are two main questions that knitters have about this cast on....
1. How much tail do you need? There are accurate ways of estimating - Lucy mentions one - and then there's mine... For sock yarn, I leave half an inch (one cm) per stitch. For anything else, about an inch. I have never run short.
Yes, there's always too much - but that's not actually a bad thing. I am totally shameless about using my cast on tails to seam up, so having extra yarn is a good idea. And anyway, I'd rather not having to stress about being too close. (And really, if that extra yard is the difference between running out of yarn and not, you've got other problems... ) You use the two strands up at different rates - using up more of the one over your finger - and if you use a very accurate method and then mix up the two strands, you risk running out. (Ask me how I know... )
2. How to keep it loose. Knitters often tell me that they work this cast on too tightly. There are actually two different issues... are the stitches too tight, or is the edge too tight?
These are quite different problems, and the answers are quite different.
If the stitches are too tight, you'll find you might have difficulty knitting into them on your first row/round. If the edge is too tight, then your sock might not go on.
Knitters are often told that they should cast on over two needles held together, or even over a larger needle.
AHA! I often proclaim! No! This is a total red herring! I do my standard demo to prove this doesn't help.

So this isn't a good solution for making the edge stretchier.
HOWEVER. However! A conversation with Donna Druchunas that helped me realize that this two-needles trick still has value. Donna often casts on over two needles, even going so far as to specify it in her patterns. When editing a pattern of hers, I asked why, and was prepared to be all smug with my "superior knowledge". Her simple reply turned my world upside down... "Yes, I know the stitches are too big. I want them to be bigger."
So yes, IF you find it difficult to knit into the stitches in your first row/round, then yes, cast on over two needles held together, remove the second needle, and then working your first row/round. Donna also uses this as a substitute for a provisional cast-on... making the stitches too big provides enough room to knit into them from the other direction.
But if you can't get your sock on, then you need to space your stitches out more.
And then there's another point of debate... to start with a slip knot or not?
I always start with a slip knot, as I like how it looks -- that slip not looks like a stitch, and behaves more like a stitch. And when working in the round, I find it helps line up the join a little better. But it's not mandatory. When I'm teaching, I always start with a slip knot, as it tends to stay in place better - but once you've got the hang of the process, it's entirely personal choice.

(I don't like the knit cast on at all - it has very little to recommend it. The edge it makes is a frustrating combination of both too tight, and too loose. It lacks stretch, but yet it still flares out, and I don't like the look of the open loops at the edge.)
I do like the Cable Cast on, for many purposes. The only place it doesn't work well, I find, is when you want stretch - like for a top-down sock.
For that, I prescribe the Long Tail method. Nope, who I am kidding? I insist on the Long Tail Method for top-down socks.
If you don't know it, and haven't watched my class, the inimitable Lucy Neatby's video is very good.
There are two main questions that knitters have about this cast on....
1. How much tail do you need? There are accurate ways of estimating - Lucy mentions one - and then there's mine... For sock yarn, I leave half an inch (one cm) per stitch. For anything else, about an inch. I have never run short.
Yes, there's always too much - but that's not actually a bad thing. I am totally shameless about using my cast on tails to seam up, so having extra yarn is a good idea. And anyway, I'd rather not having to stress about being too close. (And really, if that extra yard is the difference between running out of yarn and not, you've got other problems... ) You use the two strands up at different rates - using up more of the one over your finger - and if you use a very accurate method and then mix up the two strands, you risk running out. (Ask me how I know... )
2. How to keep it loose. Knitters often tell me that they work this cast on too tightly. There are actually two different issues... are the stitches too tight, or is the edge too tight?
These are quite different problems, and the answers are quite different.
If the stitches are too tight, you'll find you might have difficulty knitting into them on your first row/round. If the edge is too tight, then your sock might not go on.
Knitters are often told that they should cast on over two needles held together, or even over a larger needle.
AHA! I often proclaim! No! This is a total red herring! I do my standard demo to prove this doesn't help.
If I cast on with two different color yarns, one for the finger, one for the thumb, you can see why....
the stretchiness of the edge is controlled by the yarn that lies in the foundation edge, along the needle, below the stitches. In this photo, that's the yellow yarn.
To make the edge stretchier, what you need to do is space the stitches out as you make them - leave some breathing room between the stitches. That is, you're making sure that there's lots of yarn in the foundation edge - lots of yellow. I like to leave at least a stitch's worth of space between the stitches, as you can see in the image above. (A knitter I spoke to last week said that her rule of thumb is to leave a needle's width between the stitches. I like that even more!)
Casting on over a larger needle doesn't change the amount of the foundation yarn (the yellow in this picture). All you're doing is making the stitches (the green loops) larger than they should be. If you knit these stitches normally, you're affecting the look of the first row, but not the stretchiness.
 |
| casting on over two needles held together... |
 |
| with second needle removed.. the sts are larger, but the edge isn't any looser |
HOWEVER. However! A conversation with Donna Druchunas that helped me realize that this two-needles trick still has value. Donna often casts on over two needles, even going so far as to specify it in her patterns. When editing a pattern of hers, I asked why, and was prepared to be all smug with my "superior knowledge". Her simple reply turned my world upside down... "Yes, I know the stitches are too big. I want them to be bigger."
So yes, IF you find it difficult to knit into the stitches in your first row/round, then yes, cast on over two needles held together, remove the second needle, and then working your first row/round. Donna also uses this as a substitute for a provisional cast-on... making the stitches too big provides enough room to knit into them from the other direction.
But if you can't get your sock on, then you need to space your stitches out more.
And then there's another point of debate... to start with a slip knot or not?
I always start with a slip knot, as I like how it looks -- that slip not looks like a stitch, and behaves more like a stitch. And when working in the round, I find it helps line up the join a little better. But it's not mandatory. When I'm teaching, I always start with a slip knot, as it tends to stay in place better - but once you've got the hang of the process, it's entirely personal choice.
Wednesday, February 05, 2014
An Interview with Me; E-book Giveaway
Student Cindy Brumpton, a member of the Kawartha Lakes Knitting Guild, interviewed me for her newsletter last month.
I had a great conversation with Cindi about my knitting history, reminiscing about some of my early experiments in knitting... including that not-entirely-foot-shaped first sock.
Readers can enter to win a digital copy of one of my books.
I had a great conversation with Cindi about my knitting history, reminiscing about some of my early experiments in knitting... including that not-entirely-foot-shaped first sock.
Readers can enter to win a digital copy of one of my books.
Subscribe to:
Posts (Atom)


