Thursday, April 29, 2010
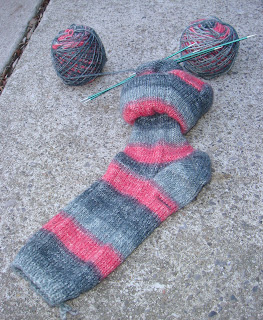
Two-Socks-in-One: The Pattern/Go on, you know you want to try it...
Not only is it possible to knit two socks at the same time, one inside the other, but we also have proven conclusively that it can be fun.
And now, so you can play along at home, I have a full pattern and how-to guide.
Start the way I always do, with a training version...
And then move on to the full-size version.
My pattern provides all the instructions and guidance you need.
It also provides several additional features that improve upon previously published versions of this technique: I've engineered it so that it exactly duplicates my standard top-down sock, with carefully chosen directional decreases, and it comes in multiple sizes - women's S, M & L, men's S & L.
Although I used DPNs, as is my wont, the pattern is written for any needle type - DPNs, two circulars, or magic loop.
Pattern available on Ravelry and Patternfish, and it provides very detailed notes to help you out.
Go on, I dare you!
Tuesday, April 27, 2010
Spatchcocked: The Sweater
As promised!
This design uses Noro Shirakaba, a lovely new cotton, silk and wool blend that comes in surprisingly subtle - for Noro, anyway - colourways.
Four sizes available: Finished bust: 38 ins/97 cm, 42 ins/107 cm, 46 ins/117 cm, 50 ins/127 cm. Wear it loose and relaxed, with at least a couple of inches of ease.
The design is worked in one piece - yes! one piece! You cast on for the lower back, knit up the back, cast on for the sleeves, work the full width of the back, cast off for the neckline, and then work the fronts separately.
There is, therefore, minimal finishing!
It's a very wearable piece, going nicely over a dress or a tshirt in the summer.
Available from Ravelry, Patternfish and The Purple Purl, where the sample is on display.
Friday, April 23, 2010
Colour-Your-Own-Story Baby Blanket
We drove out to meet her today. She's a little sweetie, and we're honoured to be considered auntie and uncle.
Since they told us they were expecting, I had been thinking of what to make. Her Dad was Norman's best man, and they have been friends for a very very long time. I knew this baby would need something special.
So I got my designing hat on, and came up with a blankie.
The concept isn't new, but as always, I've added my own twist. It's a giant mitred square, made with seven different balls of Mission Falls 1824 Cotton. It's machine washable, and apparently exactly the right size for tucking into the car seat and moses basket.
I had much fun with the colours. If you're using multiple colours, the rule of thumb is to use an odd number. Somehow looks better that way.
So I chose 7 colours: I started with a pink in case the baby was a girl, and a blue in case the baby was a boy. And then I added purple for Heather, Sophie's mum. Green for George, her dad. George not only begins with G like green, but he is an environment scientist. The orange is for their cat, Fig; the black is for their dog, Zevon. And the last colour... well, as I mentioned above, it's a reference to an amusing situation we shared with them. In this case, it's about that time their cat peed in our car.
And so was born an idea. The colour-your-own-story baby blanket.
To start, there should be a shade of pink and a shade of blue. To cover all the bases.
And there should be a colour for each parent - colours that connects to their names, or their favourite colours.
And then colours for any siblings (human or animal). Either the colours of the pets, or favourite colours of the siblings.
And then a colour that connects the knitter to the parents. And then get knitting!
Colour-Your-Own-Story Baby Blanket
Materials
7 different balls Mission Falls 1824 Cotton (or other washable worsted/aran weight yarn; the Mission Falls 1824 wool would work just as well)
-a colour each for the two parents
-a shade of blue (bright or subtle, your choice) in case baby is a boy
-a shade of pink (bright or subtle, your choice) in case baby is a girl
-2 colours to represent the family welcoming the baby - colours of the pets, favourite colours of the siblings, the colours of the university at which the couple met
-and a colour to tell a story - are these your favourite friends to drink red wine with? use red! white wine? - use white!; do you love to camp with these friends - then how about the colour of the tent?; the colour of the logo of the company you were working at when you met? - have fun and be creative!
1 24 inch/60 cm 4.5mm circular needle
Gauge:
18 sts per 4 inches on garter stitch on 4.5mm needles; it's not critical to match size, it's more about getting a nice fabric with a bit of drape
Finished size:
approximately 66 cm/26 inches square
Method:
With the first colour, cast on 3 sts.
Row 1 (RS): K1, m1, place marker, k1, m1, k1.
I like to use Elizabeth Zimmerman's backwards loop make 1 increase here - just make a backwards loop and put it on the right needle.
Row 2 and all following WS rows: Knit all sts.
Row 3 and all following RS rows: K to marker, m1, slip marker, k1, m1, knit to end.
Repeat rows 2 & 3.
Change colours as you near the end of the ball at the start of a RS row. As the rows get longer, the stripes will get shorter - you'll get fewer rows per stripe. For the later balls, you may only get 24 or 26 rows. As you come close to the end of the ball, you can figure out if you've got enough left by measuring the yarn against the blanket. Each row needs about three times its width in yarn, so if you've got at least 12 times the width of one of the sides of the blanket, you have enough for another pair of rows. When in doubt, just change yarns.
Keep going until all 7 colours are used up. Cast off loosely on the WS.
Give it a good machine wash before you hand it over - to soften it up and get it ready for baby.
Baby Blanket Delivery
Off to meet baby Sophie, and gift her with a baby blanket I designed especially for her. The colour combo is outrageous, but for a reason. Each colour has significance:
Purple for her mum, Heather. Green for her dad, George. Orange for Fig, her cat; black for Zevon, her dog. Pink in case it was a girl; blue in case it was a boy. And the yellow? Well... the yellow is for the time Fig peed in our car. (But I probably won't mention that bit... )
Let's hope she likes it!
Pattern will be published as a freebie on this blog in the next couple of days.
Tuesday, April 20, 2010
New Pattern: Baby Booties
There seems to be a rash of babies at the moment - N's best friend George and his wife Heather recently welcomed baby Sophie to the world. N's cousin is expecting any minute. Some good friends recently had twins (welcome Connor and Liam!), and another very good friend is due in August.
This is too much for a knitter - there just isn't time for so many blankets in quick succession. Can I suggest booties?
Newborn to 3 months size. Using less than one ball of DK weight cotton, they are knitted flat and sewn up. There's a plain version with a ribbed cuff and one a little fancier. This style uses a crochet chain tie to ensure they stay on kicky little feet.
Suitable for knitters with a little experience, but not taxing. And certainly quick for emergency baby gifts!
Available online at Ravelry and Patternfish.
Thursday, April 15, 2010
Further on Lace Decreases/Good Discussion
Some good discussion on my last post - I've been enjoying the comments. Thanks to everyone.
One commenter, Laura, remarks that in general she agrees with me, but has been knitting Jared Flood's Girasole, and it calls for sk2po, and that it looks better in that context than the s2kpo she would usually use.
I've had a look at the pattern - I can't see the details in the pictures, but it definitely seems like a visible lean may well indeed work well in the diagonal lines. I will try to get a closer look.
Northmoon also suggests that in the context of the Swallowtail, the sk2po does provide a nice little 'cap' that closes up the leaf. Evelyn Clark, the designer of Swallowtail, is a smart woman, and I'm sure she chose it deliberately. I perhaps wasn't fair picking on her or her design specifically, but it happens to be a great illustration of the lean of the decrease.
I do know that I see the sk2po used significantly more often than the s2kpo. And most of the time, when I see the leaning one, I automatically replace it with a vertical decrease - and it looks the better for it. It makes me wonder if the s2kpo is, like the ssk, a reasonably new innovation/invention/discovery/unvention. Is it possible that there are patterns out there that predate it? Is it possible that if the designer had been familiar with it, they would have written the pattern differently?
All that having been said, I'm now revisiting some of my favourite lace books to with a new eye - to see which double decrease is used, and to consider in which situations the leaning version might actually work better.
This is one of the great things about the blog - the discussion. I'm loving having my world expanded by getting to know new people, hearing other opinions, and learning new things. Keep commenting, world! Thanks!
Wednesday, April 14, 2010
Lace Knitting: On the double decrease; s2kpo vs. sk2po
I had great fun last week speaking to the Kawarthas Knitting Guild, on the topic of Entrelac.
I met some lovely people (ladies and a gentleman), and we learnt some new things, and had a good discussion.
We got talking about decreases, as you do with Entrelac. Directional decreases. Entrelac uses a p2tog which leans tidily to the right, and an ssk which leans tidily to the left.
S., a knitter almost as opinionated as me (and I mean that as a compliment!), said that she'd done a workshop on decreases a few weeks before. I made my usual confession about ssk being my favourite decrease. (It's not really about which decrease it is, it's more than I have a favourite decrease...)
And then she asked me about double decreases... you know, the s2k blah blah blah decrease.
And oh boy, do I have an opinion on this!
When you need to decrease two stitches, particularly in lace, you often see the following decrease used: sk2po. It's described as being a centered double decrease.
Well, yes and no. And I hate it.
It's worked as follows: slip 1 stitch knitwise, k2tog, and then pass the slipped stitch over the k2tog. It's absolutely centered, yes. It doesn't lean, in that it doesn't cause the fabric to lean - but it certainly looks like it leans. See the decrease on the left in this swatch:
And then look at the right decrease.
The one on the right is how I think you should do a centered double decrease: s2kpo. Slip 2 sts together knitwise, knit 1, then pass the 2 slipped stitches over the knit stitch.
Very tidy. Doesn't lean, decreases two stitches, and looks centered. It has a very strong vertical line which I think looks terrific.
It surprises me how many patterns call for the sk2po decrease for a centered decrease. I think it's ugly, and it can mess up the line of the pattern stitch.
Look at my Swallowtail shawl, for example. I love this pattern, don't get me wrong. But I think the leaf motifs would be much more attractive if the top decrease was centered.
What do you think?
Tuesday, April 13, 2010
Bear with me... doing some blog upgrades
A few links might not work. Normal service will be resumed shortly, etc., etc.
Thanks for your patience!
Sunday, April 11, 2010
Noro Shirakaba cardigan thingy: spatchcocked
Read this word in a BBQ cookbook once, and it has just stuck with me...
spatchcocked.
It's usually used to mean a particular preparation of chicken - you remove the backbone, cut it in half, and then flatten it out. I've used it a couple of times to describe how a garment looks when partially sewn together and laid out.
I usually get blank looks. But I find it an oddly appropriate, even evocative word to describe how the sweater looks which is why I insist on using it.
And this is my new Noro design, spatchcocked on blocking mats, while it dries.
It's knit in one piece, and I've just got to do two seams, up the sides and under the arms.
Friday, April 09, 2010
Noro Yarns continue to surprise: Shirakaba
Not only is the new Noro Shirakaba remarkably restrained in its colouring... I mean, it's practically a solid colour... but it's also machine washable!
After the recent successful machine-washing experiments with Silk Garden, I'm feeling emboldened.
I am working on a new design - pictures to follow shortly - in Shirakaba. Today's laundry day, so I grabbed the swatch, and threw it in with the jeans on a cold wash.
Pre-wash:
Post-wash:
Post-wash:
Funny little ruler included for sense of scale.
No felting, no shrinking - it just softened up nicely.
Monday, April 05, 2010
Violent Disagreement: On Blocking & Sewing Up
I teach a Finishing class on a regular basis. It's a popular class, as finishing is one of those things that tends to make knitter nervous.
In the class, I talk about blocking. The first thing I try to do is demystify it: to help knitters understand that it's not some arcane process that requires special equipment and training, or a separate room in your house. All you need it some water - give your knitting a bath!
You need to pay attention to the washing instructions for the yarn, of course. A machine-washable yarn can be treated a bit more vigorously than a non-machine washable yarn. I tend not to steam block, or use spray bottles or any of that.
Here's my rationale: if you're making a garment, it's going to get washed at some stage. So block it the way you'll wash it. (And yes, this is how I block my swatches, too.)
If it's machine washable, send it through an appropriate wash. If it's hand wash only, dunk it in the sink, let it soak for a while, roll it in a towel to wring it out, and lay it flat to dry.
Do I pin it as it dries? Depends on what is it. If it's lace, it needs to be stretched and pinned to open up the pattern stitches.
For garments, if it's the right size and shape, I don't worry about pinning.
If you are sewing something up, blocking is a critically important part of that process. Always block your pieces before you sew up. Three reasons: one cosmetic, two practical.
The cosmetic reason: blocking something magically evens everything out and makes it look more finished. Try it with a pair of socks, or two sleeves, or two mittens - wash one and not the other, and compare how they look. I never declare a piece of knitting done until it's had a bath. Even if it's a piece that doesn't need sewing up or stretching.
Practical reason #1: blocking reduces that pesky rolling on the edges stocking stitch. It doesn't remove it entirely - nothing will - but it will make your edges a fair bit flatter. This helps enormously when you're seaming.
Practical reason #2: If the garment is going to change size or shape - to grow or shrink - you need this to happen before you sew up.
Here's the Violent Disagreement bit: someone recently pointed out that Debbie Stoller, in the first Stitch and Bitch book says that she doesn't know anyone who blocks before sewing up, and she doesn't see the point.
I was shocked.
She's so wrong on this it's not funny. If you sew something together and then wash it, and it shrinks, your seams will be all puckery. And if you sew something together, wash it, and it stretches, your seams will not stretch with it. (Especially because we don't always use the knitting yarn for the sewing up.)
Oh Debbie - your book is otherwise so very good.... I am saddened that we have come to this.
Sunday, April 04, 2010
Mad Math Skillz
Marnie MacLean has posted an enormously detailed tutorial on her blog about how to use MS Excel to assist with resizing patterns.
I laughed at first.
And then I stopped.
It's no secret that I have a degree in mathematics. And I spent 15 years working in IT.
And clearly I've been taking it all for granted.
My educational and professional background means that this stuff is so damn obvious to me. I mean, of course you create cells with the stitch and row gauges, and then you input the sizes and have the stitch numbers calculated using a formula.
It's how I do all my sizing. In fact, a spreadsheet is how I do all my designing tasks - planning, sizing, charting, taking notes as I work. I could give up word processing, but never spreadsheets.
(I used to be an an exclusive user of Microsoft Office, but have been slowing moving over to Open Office of late. It's a free, open-source Office software pack, and it's really very good.)
It's good to be reminded sometimes that you can't assume that everyone else knows what you know.
On that note, I'm not going to recreate the wheel. Go read Marnie's post.
Subscribe to:
Posts (Atom)