2010 is coming rapidly to a close. What a year!
This is the year I went pro. I finally gave up the day job, and have been working full-time as a knitting professional. It's been challenging and busy, but I'm so very glad I did it.
I can't believe all the things I've done this year:
I've taught classes at
-Lettuce Knit
-The Purple Purl
-PassionKnit
-the dearly departed Naked Sheep
-two DKC events
-the Creativ Festival
-Shall We Knit in New Hamburg
And I've had speaking engagements at
-the Kawartha Lakes Knitting Guild
-the Kitchener Waterloo Knitting Guild
I've written for
-this blog
-the Knittyblog
-the Signature Needles blog
I've had designs published in
-Knitty
-Yarn Forward Mag
I've appeared in several books, including
The Perfect Finish
Behind the scenes, I've done:
-technical editing & production support for 4 issues of Knitty
-editing for 4 issues of A Needle Pulling Thread Magazine
-various other tech editing work for yarn companies and publishers
I've published a bunch of new designs, including
-the Heirloom Baby Bonnet
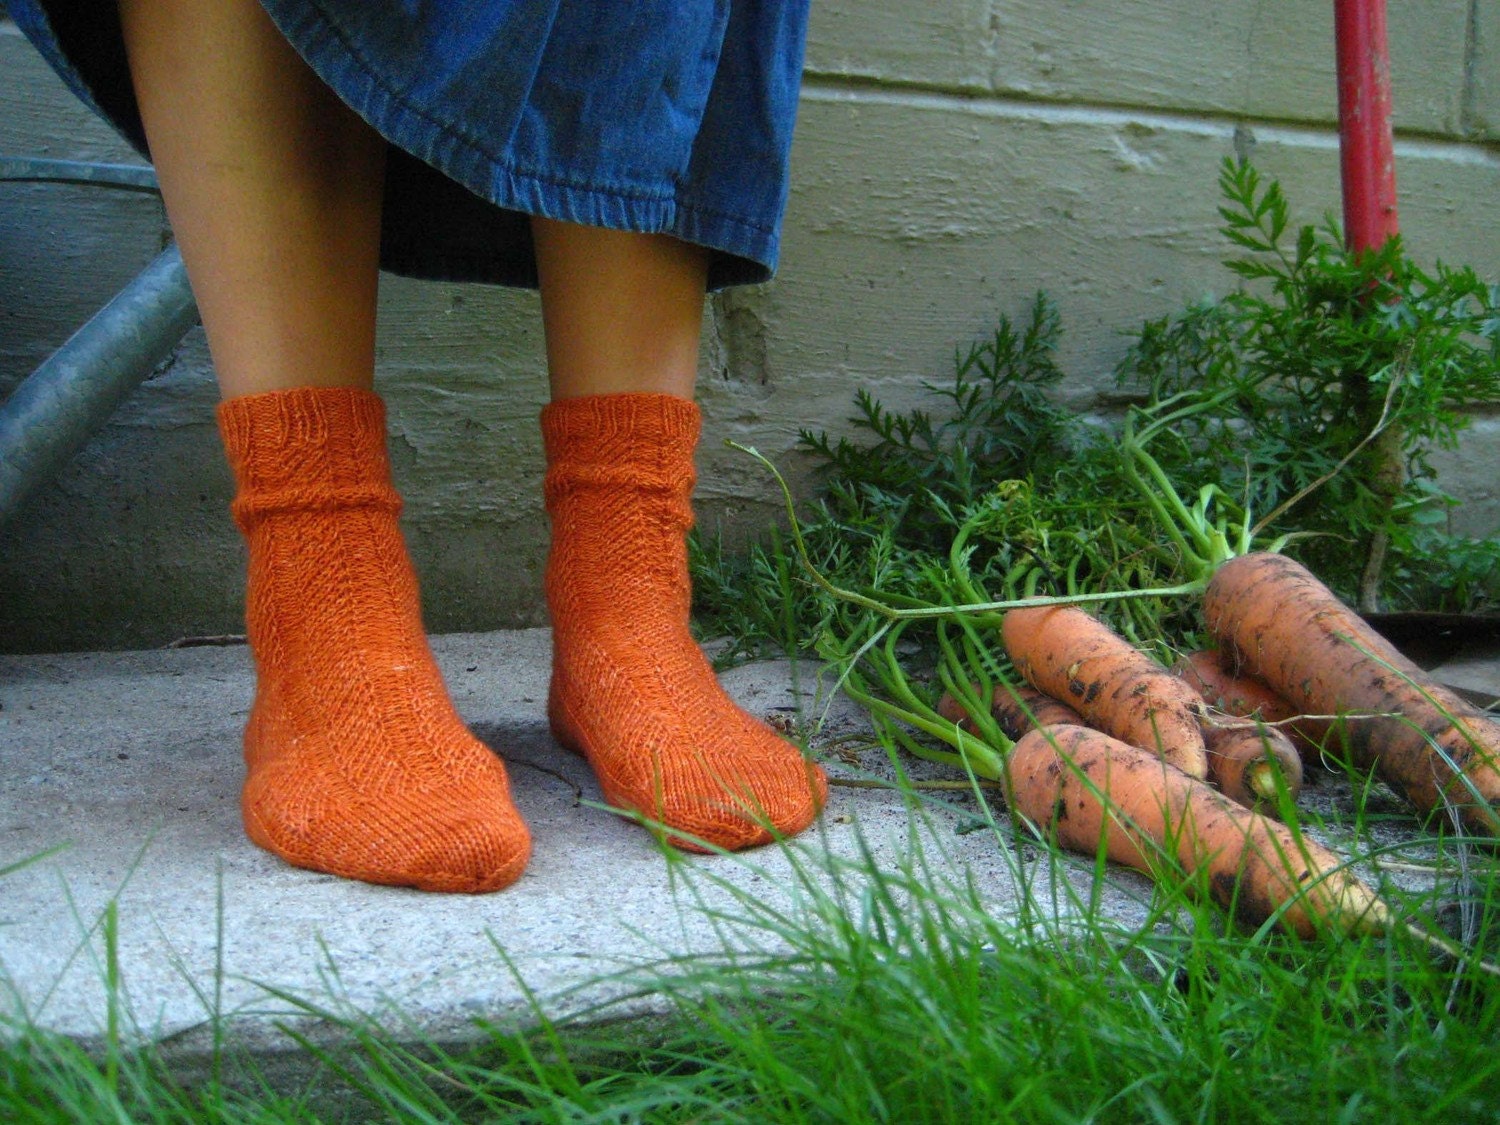
-the Roasted Carrot Sock
-the Walking on Sunshine socks
And I've loved every single minute of it.
Thanks a million to everyone I've worked with and for, and everyone who has bought my patterns, and everyone I've met this year. Your support means so much to me.
I can't tell you how much I'm looking forward to 2011. 2011 brings new challenges and ideas and publications - not least of which is my very own book. More details on that as we get closer, but we're hoping for spring/summer publication.
Thursday, December 23, 2010
Tuesday, December 14, 2010
Crowdsourcing: Thank you!
Big thanks to my readers and Twitter followers for some help they've provided me recently: I have lots of babies' head measurements, and some great feedback on the catnip-stuffed mouse pattern.
I have learned several things: my readers are helpful and generous, babies' head vary greatly in size, and some cats are pretty vicious!
I have learned several things: my readers are helpful and generous, babies' head vary greatly in size, and some cats are pretty vicious!
Friday, December 10, 2010
May I Please Measure Your Baby's Head?
A few months ago I worked on the pattern for the Heirloom Baby Bonnet. It's been a winner - people love knitting it, and I love seeing the adorable results.

I've been asked about writing it for multiple sizes. The original pattern was sized to match the original bonnet. (See story here.) It fits about a 3 month old.
It's not as easily resized as a standard hat, because of the way it fits. I've found useful tables of head circumferences only - the Craft Yarn Council of America site has a great page here.
(The graphic comes from their site.)
But head circumference isn't immediately helpful for this design. I need the other direction - around under the chin and up over the top of the head, and then the partial circumference around the back of the head at about cheek height.
I've been grumbling that I don't have access to a baby to measure, and I'm pretty sure I'd be arrested if I started trying to measure the heads of babies in the street.
And then it occurs to me - out there in internet land, there are babies! And mamas of said babies who might be willing to help me.
Mamas? Can you help?
I'm looking for the following info, for babies up to 18 months old: age of the babe, circumference of the head around the chin and up over the top of the head, and measurement around the back of the head from cheek to cheek.
Please leave a comment or email me the info. Free copy of the multi-size baby bonnet pattern to anyone who can help.
Thank you!
Thursday, December 09, 2010
Happy Birthday Lettuce Knit - Still Reasonably Local

I moved into the Kensington Market neighbourhood of Toronto 7 and a half years ago. At the time, I remarked to my hubby that it seemed perfect - everything we needed was in walking distance - except a yarn shop.
This said was purely in jest, as there was a very good yarn shop 1.6km (1 mile) away, a very nice 15 minute walk through a park.
And lo and behold, 6 months later, Lettuce Knit opened. On the very street on which I live! Just over 200m (about 230 yds) away. I was in heaven.
Over the 7 years the shop has been open, it's moved twice, each time to larger premises. Sadly, it's been moving further away.... now it's at number 86 Nassau Street, a whole 70m (75yds) further down the street.
Despite this extra distance, I may well be the luckiest knitter in the world - I don't know many who live quite that local to their local yarn shop. It's less than a skein's distance away!
And I'm even luckier to be part of the Lettuce family: I've been teaching and working there for 4 of its 7 years. Happy Birthday to my most local yarn shop, and the great team that works there!
Anyone live closer to a yarn shop? (Megan, who lives about 50m away, doesn't count, she's the owner!)
Thursday, December 02, 2010
Being Rude Again/A Victim of Geography
I had a Twitter conversation with a friend this morning, and N. pointed out it me that it looked from the outside like I was being rude about a designer. Specifically, I said that I thought the designs of Debbie Bliss are "gorgeous... her write-ups not so much".
I do have a bit of a big mouth - my opinions can be strong, and I sometimes type before I think. I don't take back my statement, but let me add some context.
I love love love the designs of Debbie Bliss. She has a genuine gift for simplicity and elegance. She understands that less is more in a way that few other designers do. I've knitted a number of her designs over the years, and I buy her magazine and her books.
But I have been known to grumble about her pattern writeups - and today I did. Her instructions are known to be fairly... shall we say... minimal. It's not about mistakes or problems, not at all. As a knitter and a teacher I've never encountered any actual mistakes or problems with any of them. The issue is always about the level of detail in the instructions.
I don't actually blame any of this on Debbie Bliss or her technical editors. I blame geography. And it's not just Debbie Bliss - the Rowan pattern books are similar in the way they are written.
I've recently been doing some technical editing for a yarn company, helping them convert some patterns published in Europe to a more North American standard.
The standards for pattern writing are wildly different between Europe and North America. And the UK patterns fall somewhere in between.
It's about space. European pattern books typically print their patterns in multiple language, and therefore where they can edit to be more concise, they do. And that conciseness results in patterns that require a little more knowledge and experience to successfully follow them, that's all.
Consider the following example, taken directly from a pattern published in Europe.
Back:
Cast on 117(129) sts, then work over the 39(45) sts at each outer edge as foll: edge st and st st, in pattern mix foll chart A over the 39 center sts, dec 4 sts evenly across as given = 113(125)sts. When work measures 32 cm, on 103rd row patt mix, bind off for armholes at each end 3(5) sts once, then on every 2nd row 2 sts once and 1st 3 times = 97(105) sts.
It's perfectly correct, and it's perfectly knittable, but there's a lot of information packed into those few words. And it's not just about denseness, it also requires a fair bit of experience. For example, it tells you to bind off sts for armholes "at each end... every 2nd row". Taken at face value, that instruction could be tricky... after all, it's not possible to bind off at the start and end of a row (without doing some "stitch gymnastics", anyway).
Re-written to a style more familiar to North American knitters, the instruction becomes:
Using 3.5mm (US 4) needles, cast on 117 (129) sts.
Row 1 (RS): K 39 (45), work Chart A row 1 across center 39 sts (including decreases as charted), k to end. 113 (125) sts.
Row 2 (WS): P 39 (45), work Chart A row 2 across center 35 sts, p to end.
Continue in pattern as established until pattern row 102 is complete.
Bind off 3(5) sts at the start next 2 rows, continuing to work Chart on center 35 sts as established. 107 (115) sts.
Bind off 2(2) at the start of the next 2 rows. 103 (111) sts.
Decrease 1 st at each end of the following 3 RS rows. 97(105) sts.
Compare a typical Debbie Bliss or Rowan pattern to this European example - it's positively voluble!
Patterns published in the UK don't necessarily have the same space constraints as other European patterns, as they are only publishing in one language, and therefore they do provide a fair bit more detail. It's just that it's not necessarily the level of detail that you see in typical modern North American patterns.
Really, the biggest issue with this is that because Ms. Bliss's gorgeous designs appeal to newer knitters in their simplicity, but the pattern instructions can challenging.
There's a longer discussion here about how much knowledge is appropriate to assume on the part of the knitter... I know that there have been, and there will always be, discussions about whether simplifying and adding more detail is "dumbing down".
Despite my somewhat cranky demeanor, I'm all about encouragement. I want knitters to feel confident and be successful with their projects - and if that means taking a few extra lines to explain something in more detail, then I'm all for it! After all, we knit for pleasure - we shouldn't make it any more difficult than it needs to be.
Wednesday, December 01, 2010
And so the Holiday Season Begins...
Happy December!
It's a time for celebrations and feasting and decorating and giving of goodies. No matter what you celebrate, I hope the closing of the year finds you well and happy and surrounded by what gives you joy.
Me, I'm surrounded by knitting, delicious treats and a warm, sleepy dog. We're a bi-festive family, celebrating both Christmas and Hanukkah.
For the past couple of years, I've designed a couple of holiday treats for my lovely friends at Signature Needle Arts, one of each of the holidays I celebrate.
This year there's the Argyle Stocking.

And the Hanukkah Mitten and Sock Garland - for decorating, and filling with gelt.


Visit the Signature Needle Arts Website to get the patterns.
Monday, November 29, 2010
More On the Majesty of Mattress Stitch
(Ok, so the alliteration ran out there...)
Loving the comments on my Knittyblog post about Mattress stitch. Some very helpful suggestions!
Loving the comments on my Knittyblog post about Mattress stitch. Some very helpful suggestions!
Thursday, November 25, 2010
The Precious: Snowflower Shawl
For several weeks this summer I was working on a secret project... That's the (only) problem with knitting designs for publications - I can't blog about them.
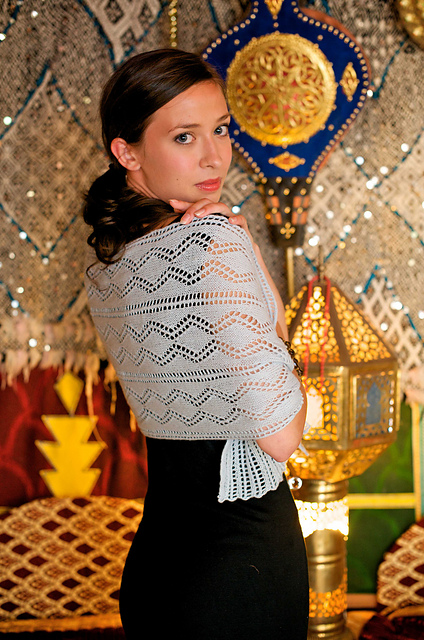
This was a big project. By yardage, it's one of the biggest things I've knit, calling for about 1500m of lace weight cashmere. And being 1500m of lace weight cashmere, it's also one of the most precious things I've knitted.
It's finally been published, and I'm thrilled to be able to show it off...
The Snowflower Shawl, for Yarn Forward Magazine Issue 31.
 (All images courtesy Yarn Forward Magazine, copyright St Range photography/Darren Strange.)
It's the last part in a three-part series on how to expand your lace knitting skills.
The first was the Double Diamond stole, in issue 29.
 The second part was the Falling Leaves triangle shawl, in issue 30.

And the finale is this circular shawl, based on Elizabeth Zimmerman's Pi shawl shaping.
One of the reasons I love designing for Yarn Forward - other than the fact they send me such gorgeous yarns to work with - is that the publications are available digitally. The publication is based in the UK, but anyone can buy a copy, and the issues remain for sale long after the print copies have sold out.
This was a big project. By yardage, it's one of the biggest things I've knit, calling for about 1500m of lace weight cashmere. And being 1500m of lace weight cashmere, it's also one of the most precious things I've knitted.
It's finally been published, and I'm thrilled to be able to show it off...
The Snowflower Shawl, for Yarn Forward Magazine Issue 31.
(All images courtesy Yarn Forward Magazine, copyright St Range photography/Darren Strange.)It's the last part in a three-part series on how to expand your lace knitting skills.
The first was the Double Diamond stole, in issue 29.
The second part was the Falling Leaves triangle shawl, in issue 30.And the finale is this circular shawl, based on Elizabeth Zimmerman's Pi shawl shaping.
One of the reasons I love designing for Yarn Forward - other than the fact they send me such gorgeous yarns to work with - is that the publications are available digitally. The publication is based in the UK, but anyone can buy a copy, and the issues remain for sale long after the print copies have sold out.
Tuesday, November 23, 2010
Harumph, I say; harumph!
Minor guilty confession of the week: I read the Dear Prudence advice column on Slate.
Or at least I used to.
In a live chat column she wrote this week, a reader enquires:
It's the answer that made my hair stand on end:
On behalf of all the sock knitters in the world, I am truly offended that Ms. Prudence thinks that the socks we make are "lumpy, itchy and droopy". Perhaps we should launch a campaign to send her some socks so she can see the quality of what we make - and understand how very very wrong she is.
What do you think?
Or at least I used to.
In a live chat column she wrote this week, a reader enquires:
- Q. Help! Advice on Gift-Giving: I am a knitter who is knitting socks for my son's preschool class. I intend to give these socks as Christmas gifts this year. I am keeping them a secret as I would like them to be surprises. The only one who knows is the teacher as I needed her help getting the kids' feet sizes. My question revolves around the note I am going to include with the socks. Of course it will include washing and drying instructions (cold water and low heat); however, I am stumped about how to ask for the socks back if the kids don't like them, so they can be redistributed. Now, I don't really want the socks back for my own son; I would like the socks to go to someone who'd actually wear them. What would you do in this instance?
It's the answer that made my hair stand on end:
- A: In this instance, I would stop with the socks and knit a sweater for my own child. While many people enjoy handmade scarves, there's a reason people stopped wearing lumpy, itchy, droopy handmade socks as soon as industrial looms were invented. It's sweet of you to want to make gifts for the entire class, but you're investing way too much time in a gift that won't be appreciated. If you want to do something handmade, maybe you should bake some treats. Or you could offer to come in and do a knitting lesson for the kids. Unless you're making socks they can hang by the fireplace for Christmas, no one wants handmade socks in their Christmas stocking.
On behalf of all the sock knitters in the world, I am truly offended that Ms. Prudence thinks that the socks we make are "lumpy, itchy and droopy". Perhaps we should launch a campaign to send her some socks so she can see the quality of what we make - and understand how very very wrong she is.
What do you think?
Monday, November 22, 2010
Someone Else's FO: Kureyon Basic Triangle Shawl

Another lovely example of my Basic Triangle Shawl, in Noro Kureyon. Gorgeous - and thanks to Kathleen for the picture. I do so love this yarn - look at those stripes!
Wednesday, November 17, 2010
Heel: For Feet Worthy of Hand-Knit Socks
Earlier this fall, I handed a giant bag of my hand-knit socks over to a friend... my sock drawer sat practically empty for a couple of weeks, as the temperature dropped. It was a bit scary, I have to admit. I had to resort to wearing store-bought socks for a while.
And why on earth would I do something so silly?
My socks went off to modelling school to become famous.

The lovely people at Soak have just launched a new product - Heel - a wonderful foot cream - "for feet worthy of hand-knit socks". (I've been using it for a few weeks, and it's great.)
They needed some socks for the packaging art, and I'm honoured to say that they chose mine!
There's a great post on the Soak blog about the photo shoot, and some really gorgeous shots.

And why on earth would I do something so silly?
My socks went off to modelling school to become famous.
The lovely people at Soak have just launched a new product - Heel - a wonderful foot cream - "for feet worthy of hand-knit socks". (I've been using it for a few weeks, and it's great.)
They needed some socks for the packaging art, and I'm honoured to say that they chose mine!
There's a great post on the Soak blog about the photo shoot, and some really gorgeous shots.
Tuesday, November 16, 2010
Off Topic: Christmas Cake
Updates: No nuts, no! The original recipe doesn't call for them, and although I love them, hubby has some allergies. Re: loaf pans & sizes. I've used a variety of pans and it works great. 8 by 8 square plans, big loaf pans, small loaf pans.... I don't worry about the size of pan, I just start checking for doneness at the 2 hour mark.
I've been tweeting about this often enough and had enough questions that I figured I should just blog about it...
Like many Canadians, I'm an immigrant in a culturally mixed marriage, and Norman and I try to honour the holidays and traditions of both our cultures. One cultural tradition I've brought to the relationship is fruitcake. I absolutely adore fruitcake. I know it's not to everyone's taste, but I also insist that many haven't tasted it the way it's supposed to be made.
And in my opinion, that's boozy. (Apologies to the non-drinkers in the crowd. I know and respect that there are some who don't drink or use alcohol. You can actually get a very similar effect by using a mixture of strong coffee and fruit juice for soaking the fruit, and then soaking the cakes in fruit cordials and syrups.)
My Mum makes the "proper" cake every year, the one we eat during the actual festive meals. I make what I've come to refer to as the "standby" cake. The one we can eat in the run up to Christmas, the one we can offer to guests, the one I can cut up and take to parties and get-togethers during the season. Although Mum's is more traditional, the way I love it, I've found that many fruitcake skeptics enjoy my slightly unorthodox (pun intended?) version. My cake is very dark, sticky and fudgy in texture - and fairly moist with dark rum.
As I tweeted, the recipe I use is, oddly, Canadian. When we first arrived in Canada, my Mum bought of a copy of the now-out-of-print Madame Jehane Benoit's Encyclopedia of Canadian Cooking.
Shortly after I finished university, I decided I wanted to try making fruitcake, but being an inexperienced baker with a minimal kitchen and budget, I wasn't sure I was up for trying the full thing. Mum found me a recipe in Madame Benoit's book - called, amusingly enough, My Mother's Fruitcake.
I've been making it for years now, and I think it's pretty good.
The book seems to be long out of print, and so, with full credit, here's the recipe:
“My Mother’s Fruit Cake” from Madame Jehane Benoit’s Encyclopedia of Canadian Cooking
2 cup currants
2 cups seedless raisins
1 cup mixed peel
1/4 cup rum or orange juice
2 cups butter
2 cups fine granulated sugar
6 eggs, well beaten
2 cups molasses
7 cups all purpose flour
1 tsp baking powder
1 tsp ground nutmeg
1 tablespoon cinnamon
1 tablespoon ground cloves
Put fruit and juice/rum in a bowl and soak for 12 hours, covered, stirring a a few times.
Preheat oven to 240 deg F. (Yes, very low.) Line cake tins with greaseproof paper.
Cream butter with sugar until very light. Add eggs one by one, stirring hard each time. Add molasses.
Sift together dry ingredients.
Add half of flour to creamed butter, mix well.
Add rest of flour alternately with fruit.
Stir until thoroughly blended.
Bake for 3 hours or until cake tester comes out clean.
My notes:
1. I play fast and loose with the fruit. I usually cut back on the raisins and currants and make up the amount with dried cranberries (or glace cherries, but the cranberries are better). I put some finely chopped candied ginger in one year, that was nice. If you don 't like the mixed peel, ditch that and use more cranberries and even dried cherries and blueberries.
2. 1/4 cup juice or rum for 12 hours.... I use about 1/2 to 3/4 cup of booze – whatever is in the bar: rum, gold tequila, rye, bourbon, Southern Comfort, cheap scotch, brandy – and soak for about a week.
3. I use strong dark molasses – the blackstrap variety – because I love the dark and slightly bitter taste it brings. If you’re less about molasses, use the lighter kind.
4. I bake it at least three or four weeks early then store it in the fridge in containers and pour dark rum on it every few days. It will seem fairly soggy, that's ok. Stop watering it about a week before you want to start serving it so the top dries out a bit. This is really the key to making it more interesting and fun than "normal" fruitcake.
5. The batter gets very hard to stir once you’re adding the flour & fruit in. Use serious wooden spoons. I usually lose at least one spatula or wooden spoon to it every year.
6. I bake in loaf pans and it takes 2 to 2 and a bit hours. It’s hard to tell if it’s done – I do the tap the underside trick, like loaves of bread.
I've been tweeting about this often enough and had enough questions that I figured I should just blog about it...
Like many Canadians, I'm an immigrant in a culturally mixed marriage, and Norman and I try to honour the holidays and traditions of both our cultures. One cultural tradition I've brought to the relationship is fruitcake. I absolutely adore fruitcake. I know it's not to everyone's taste, but I also insist that many haven't tasted it the way it's supposed to be made.
And in my opinion, that's boozy. (Apologies to the non-drinkers in the crowd. I know and respect that there are some who don't drink or use alcohol. You can actually get a very similar effect by using a mixture of strong coffee and fruit juice for soaking the fruit, and then soaking the cakes in fruit cordials and syrups.)
My Mum makes the "proper" cake every year, the one we eat during the actual festive meals. I make what I've come to refer to as the "standby" cake. The one we can eat in the run up to Christmas, the one we can offer to guests, the one I can cut up and take to parties and get-togethers during the season. Although Mum's is more traditional, the way I love it, I've found that many fruitcake skeptics enjoy my slightly unorthodox (pun intended?) version. My cake is very dark, sticky and fudgy in texture - and fairly moist with dark rum.
As I tweeted, the recipe I use is, oddly, Canadian. When we first arrived in Canada, my Mum bought of a copy of the now-out-of-print Madame Jehane Benoit's Encyclopedia of Canadian Cooking.
Shortly after I finished university, I decided I wanted to try making fruitcake, but being an inexperienced baker with a minimal kitchen and budget, I wasn't sure I was up for trying the full thing. Mum found me a recipe in Madame Benoit's book - called, amusingly enough, My Mother's Fruitcake.
I've been making it for years now, and I think it's pretty good.
The book seems to be long out of print, and so, with full credit, here's the recipe:
“My Mother’s Fruit Cake” from Madame Jehane Benoit’s Encyclopedia of Canadian Cooking
2 cup currants
2 cups seedless raisins
1 cup mixed peel
1/4 cup rum or orange juice
2 cups butter
2 cups fine granulated sugar
6 eggs, well beaten
2 cups molasses
7 cups all purpose flour
1 tsp baking powder
1 tsp ground nutmeg
1 tablespoon cinnamon
1 tablespoon ground cloves
Put fruit and juice/rum in a bowl and soak for 12 hours, covered, stirring a a few times.
Preheat oven to 240 deg F. (Yes, very low.) Line cake tins with greaseproof paper.
Cream butter with sugar until very light. Add eggs one by one, stirring hard each time. Add molasses.
Sift together dry ingredients.
Add half of flour to creamed butter, mix well.
Add rest of flour alternately with fruit.
Stir until thoroughly blended.
Bake for 3 hours or until cake tester comes out clean.
My notes:
1. I play fast and loose with the fruit. I usually cut back on the raisins and currants and make up the amount with dried cranberries (or glace cherries, but the cranberries are better). I put some finely chopped candied ginger in one year, that was nice. If you don 't like the mixed peel, ditch that and use more cranberries and even dried cherries and blueberries.
2. 1/4 cup juice or rum for 12 hours....
3. I use strong dark molasses – the blackstrap variety – because I love the dark and slightly bitter taste it brings. If you’re less about molasses, use the lighter kind.
4. I bake it at least three or four weeks early then store it in the fridge in containers and pour dark rum on it every few days. It will seem fairly soggy, that's ok. Stop watering it about a week before you want to start serving it so the top dries out a bit. This is really the key to making it more interesting and fun than "normal" fruitcake.
5. The batter gets very hard to stir once you’re adding the flour & fruit in. Use serious wooden spoons. I usually lose at least one spatula or wooden spoon to it every year.
6. I bake in loaf pans and it takes 2 to 2 and a bit hours. It’s hard to tell if it’s done – I do the tap the underside trick, like loaves of bread.
Wednesday, November 10, 2010
On The Road Again: Shall We Knit
This weekend I'm back to teach some classes at Shall We Knit in New Hamburg, just outside of Kitchener.
I had a marvelous time when I was there in April, and I'm thrilled to have been invited back.
I'm teaching my ever-popular Fearless Finishing class, and my Yarn Knowledge class. Yarn Knowledge is a newer class on my list, and I developed in response to the questions I hear regularly from knitters - newer and established alike...
- Mystified by all these terms - double knitting, worsted, aran? Unsure whether fingering is a potato or a yarn? Wondering why you should care about whether a yarn is superwash or not? How do you go about finding a substitute yarn for a pattern? This class will explain yarn terminology, help you understand yarn substitution and gauge, and make you a more confident yarn shopper and knitter.
Info on both classes here.
Some spaces are still available.
And I'll be back there in January for Continental Knitting, and my wild and crazy Two Socks In One Class.
Monday, November 08, 2010
Qiviut Sock Yarn
Go look at today's Knitty Blog post - Qiviut sock yarn! And if you don't know why that's exciting, that's extra reason to read it.
The Naked Sheep: So Long and Thanks for All the Fish
Yesterday I taught my last class at The Naked Sheep in Toronto. I've been teaching there since it opened, in mid 2004.
This wonderful little yarn shop in Toronto's Beaches district is closing this month, and I'm sad to see it go.
I am so very grateful to both Lorena, the original owner,

and Lisa,

the current owner, for the opportunity to teach there all these years.
The Naked Sheep gave me my big break - it was the first shop I taught at. The Naked Sheep introduced me to Noro. The Naked Sheep allowed me to mingle with so many wonderful people. I will miss my classes there, and my Sunday morning gang, and the excellent team who worked there.
It's thanks to the Sheep that I am the knitter and teacher and designer I am. Without the Sheep, I'd still be stuck in a cubicle somewhere in IT-land, wishing I could knit during conference calls.
The Sheep was one of the first of the current generation of knitting shops in Toronto - shops that appeal to newer knitters, to a younger crowd. In the 1990s in Toronto many of the knitting shops closed down, and only a few hardy stores remained. When she opened in 2004, Lorena had a store that appealed not only to established knitters, but also created an environment that lured in younger non-knitters. The Sheep's beginner classes and Wednesday knit nights remained amazingly popular all throughout the life of the store. When Lisa purchased the store, her enthusiasm and energy took the store to a new level and she did an amazing job of running it while holding down a full-time job and being a mother to two very active kids.
Many, many knitters in Toronto are knitters because of the Sheep.
All I can say is thank you.

This wonderful little yarn shop in Toronto's Beaches district is closing this month, and I'm sad to see it go.
I am so very grateful to both Lorena, the original owner,
and Lisa,
the current owner, for the opportunity to teach there all these years.
The Naked Sheep gave me my big break - it was the first shop I taught at. The Naked Sheep introduced me to Noro. The Naked Sheep allowed me to mingle with so many wonderful people. I will miss my classes there, and my Sunday morning gang, and the excellent team who worked there.
It's thanks to the Sheep that I am the knitter and teacher and designer I am. Without the Sheep, I'd still be stuck in a cubicle somewhere in IT-land, wishing I could knit during conference calls.
The Sheep was one of the first of the current generation of knitting shops in Toronto - shops that appeal to newer knitters, to a younger crowd. In the 1990s in Toronto many of the knitting shops closed down, and only a few hardy stores remained. When she opened in 2004, Lorena had a store that appealed not only to established knitters, but also created an environment that lured in younger non-knitters. The Sheep's beginner classes and Wednesday knit nights remained amazingly popular all throughout the life of the store. When Lisa purchased the store, her enthusiasm and energy took the store to a new level and she did an amazing job of running it while holding down a full-time job and being a mother to two very active kids.
Many, many knitters in Toronto are knitters because of the Sheep.
All I can say is thank you.
Friday, November 05, 2010
My Old Nemesis, We Meet Again
In the fall of 2005, I knitted a scarf with KidSilk Haze.

The idea was that since I had a winter coat that was fairly... err... bold in its patterning, I needed black accessories to go with it.

It may well have been the single most miserable knitting experience of my life.
Awful.
The post I wrote back then seriously undersells the pain I suffered. I refrained from grumbling about how many times I changed needles to find ones that worked well with the yarn. I never did find a needle that made it an enjoyable experience.
It was so awful I remember it well. Bitterly. I shudder at the thought.
And I was desperately unhappy with the finished result - it wasn't wide enough, I'd stopped short of the intended length, and the cast off was too tight. I put it away, and swore never to use the yarn again.
I had such a miserable time that I regularly warn people away from the yarn.
I nearly staged an intervention once when I saw a mother teaching her daughter to knit with this yarn.
But then, oh then... I found the scarf again this fall. And I wore it for the first time since the fall of 2005.
Oh dear god, it's gorgeous. It's light, and ethereal and warm and actually very nice. It's still too narrow to wear as I had intended, but it looks really rather great as a little cravat sort of thing.
So... as I'm noodling on a project I need to demonstrate the use of biasing to a newer knitter, I ponder again my garter stitch scarf. Am I crazy to think I should recommend this (with firm notes on appropriate needle choice and pointers on how not to lose your mind) to new-ish knitters?
The idea was that since I had a winter coat that was fairly... err... bold in its patterning, I needed black accessories to go with it.
It may well have been the single most miserable knitting experience of my life.
Awful.
The post I wrote back then seriously undersells the pain I suffered. I refrained from grumbling about how many times I changed needles to find ones that worked well with the yarn. I never did find a needle that made it an enjoyable experience.
It was so awful I remember it well. Bitterly. I shudder at the thought.
And I was desperately unhappy with the finished result - it wasn't wide enough, I'd stopped short of the intended length, and the cast off was too tight. I put it away, and swore never to use the yarn again.
I had such a miserable time that I regularly warn people away from the yarn.
I nearly staged an intervention once when I saw a mother teaching her daughter to knit with this yarn.
But then, oh then... I found the scarf again this fall. And I wore it for the first time since the fall of 2005.
Oh dear god, it's gorgeous. It's light, and ethereal and warm and actually very nice. It's still too narrow to wear as I had intended, but it looks really rather great as a little cravat sort of thing.
So... as I'm noodling on a project I need to demonstrate the use of biasing to a newer knitter, I ponder again my garter stitch scarf. Am I crazy to think I should recommend this (with firm notes on appropriate needle choice and pointers on how not to lose your mind) to new-ish knitters?
Saturday, October 30, 2010
Friday, October 29, 2010
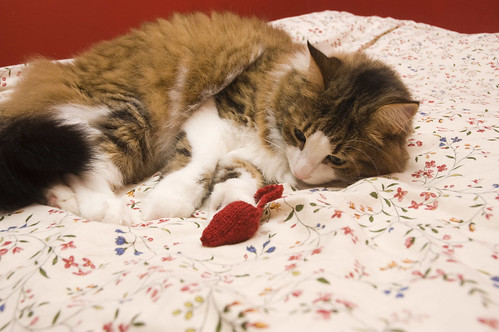
Catnip-stuffed Cat Toy: Free Pattern
I've developed a knitted cat toy pattern recently, and being currently without a cat, I would love a few knitters and their kitties to test it for me.
Sarah and her adorable Gabby have already given it a go and it found it reasonably suitable.
In particular, I'd like it to be tested with a superwash wool and a non-superwash wool - I want to know if the felting works for or against it in terms of longevity of play.
Please leave any and all feedback as comments - thanks much! Easy to read? Makes sense? Fun to knit? Fun to play with? The pattern is designed to be a reasonably easy intro to working on DPNs - do you think that's the case?
And even if you don't have comments - knit away, and may both you and the feline members of your family have fun!
Mouse for Kittie
Materials, Finished Size & Gauge:
I used Sirdar Eco Wool DK and 3.75mm dpns, but any pure wool would work nicely; use needles a size smaller than the ball band calls for.
This yarn and needle combo gave me a finished size of mouse about 3 inches long, with a gauge of about 23 sts per 4 inches. Ultimately, as long as it's a reasonably tight fabric - to keep the stuffing in - you're good.
Method:
Cast on 12 sts using your favourite method, leaving an 8 inch tail. Distribute across 3 dpns - 4 on each. Join for working in the round, being careful not to twist.
(Bonus expert tip: even if it is twisted, you can fix this after the first round. Make sure you check after knitting the first round, and if you need to, untwist!)
Knit 1 round even, pulling the first stitch nice and snug. Place a safety pin in the fabric to mark the start of round.
Round 2: (K1, m1, k2, m1, k1) 3 times. 18 sts.
Round 3: Knit.
Round 4: (K1, m1, k4, m1, k1) 3 times. 24 sts.
Rounds 5-9: Knit.
Round 10: (K2tog, k6) 3 times. 21 sts.
Round 11: Knit.
Round 12: (K2tog, k5) 3 times. 18 sts.
Round 13: Knit.
Round 14: (K2tog, k4) 3 times. 15 sts.
Round 15: Knit.
Round 16: (K2tog, k3) 3 times. 12 sts.
Round 17: Knit.
Round 18: (K2tog, k2) 3 times. 9 sts.
Round 19: Knit.
Round 20: (K2tog, k1) 3 times. 6 sts.
Cut yarn, leaving a 4-inch tail. Thread yarn onto darning needle and pull through rem stitches. Cinch to close.
Stuff mouse firmly with a combination of wool roving or snipped wool yarn ends, with a little bundle of catnip wrapped in a tissue in the middle. (Cats don't like the smell of plastic, so they may not like a polyester-stuffed mouse as much.)
Thread tail from cast-on onto darning needle and use it to gather the cast-on edge. It doesn't need to be pretty. Pull it tight to close and weave in both ends.
To make a tail, cut three 16 inch lengths of your yarn. Thread them through the gathered cast-on end, ensuring they are hanging evenly - you want 6 threads of about the same length. Tie an overhand knot in all six as close to the top as possible, and then braid the tail together, doubling each strand. When tail is about 3 or 4 inches long, finish with another overhand knot, and trim, leaving a 1-inch tassel.
Hand to cat, and see what happens.
Monday, October 25, 2010
One lousy stitch
The Harlot has experienced this issue recently, too.
I have been working two socks at the same time - no, not that way - just two socks on two different sets of needles. One is on dpns, the other on magic loop. I often do this, to take as a prop to my sock knitting classes.
I've been working on the two, on and off, and as it often the way with projects I take to classes as demos, I'm not always paying full attention to them. Stuff goes wrong.
Take a look at the current pair - both almost finished.

See something odd?
The one sock (the upper one in the photo) has a nice organic stripey pattern all throughout the sock. The second (the lower one in the photo) has a rather nifty and much more regular stripe pattern on the foot. The red is pooling on one side of the foot.
All well and good, but they don't look the same anymore.
I did some thinking and some counting and came to a rather embarrassing realization: I'd missed a gusset decrease somewhere, and one sock has one stitch more than the other. One single lousy stitch can make this much of a difference. Wild, eh?
(Yes, that's Dexter helping me with the photoshoot. He is sad that the socks seem to be too big for him.)

Saturday, October 23, 2010
3 Months
 Three months ago today Dexter moved in with us. In the first days after he was found, we shared fostering him with a neighbour, the lovely Florence. Dexter spent the days with us, and nights snuggled with Florence, as we didn't want to leave him alone in his injured and confused state.
In those first days, he mostly slept, as he was recovering from his injuries. He had a nasty cut on his tail, and wobbly back legs - likely due to a run-in with a bike or a scooter.
He moved in with us full-time on July 23rd, exactly a week after he mysteriously appeared in another neighbour's front yard. We got him a new collar and leash, and a tag with our phone number and his (new!) name inscribed on it. At that point, we were still searching for his family - online, through various animal services, and with posters distributed to vets all around the city and around the neighbourhood. At about the three week mark it became pretty clear that he'd settled in, he was feeling much better (thanks to Dr. Larry and team, our excellent vets) and no-one was looking for him. And over those weeks, he became our dog.
Based on how he looks, and his personality and behaviours, we're absolutely confident he's a beagle mix of some kind. We are also fairly sure that the other half of the mix is coonhound, as he looks remarkably like one - just half the size - and displays a lot of their known behavioural and personality traits, including a passion for treeing and barking at squirrels.
Whatever he is, he's definitely a scent-hound. He's also a quick study, a little stubborn, and mouthy.
Things we've learned in three months of living with a hound:
- His favourite walk of the week is Tuesday morning - garbage day! Much to sniff.
- He can run with great speed, although his right back leg is a bit flappy, the only lingering effect of his injuries.
- He can open our front door if we forget to lock it.
- He has a bedtime. Whether we've walked or not, no matter what we're all doing, at 10:45pm Dexter gets up on the bed and snuggles down for the night.
- And balls of yarn are precisely that.... balls, to be chased around the house and played with.
Friday, October 22, 2010
If they don't provide a lanyard for the pass, you can always make one

Look! A crochet FO!
This is about as sophisticated as I get with a crochet hook, but I thought it was pretty clever....
Sunday, October 17, 2010
Creativ Festival Classes
 Just a reminder that I`m teaching a few classes at the Creativ Festival in Toronto this coming weekend...
Some of them are sold out (!), but a few spaces remain in the following classes:
-Cables 101, Friday at 6pm
-Fixing Mistakes, Saturday at 11am
and
-Designing Custom-Fit Socks, Saturday at 1pm.
More info on the classes and registration details here...
I like teaching at this show - it`s a great way to meet knitters from outside of the Toronto area.
And of course, there`s always some shopping to do.
I`ll also be making some appearances in the booth of A Needle Pulling Thread magazine - drop by to say hello.
Tuesday, October 12, 2010
The Lizard Ridge Leftovers/Insanity Vest Continues Apace


This will certainly be a discussion piece. You're not seeing the full impact of the colours since it's a self portrait taken in our green bathroom in poor light.
I will wear it as you see it here - with a black t-shirt and jeans.
Since the photo was taken, I had a good evening of knitting and I'm into the final stretch of the body. The only decisions left will be how to edge it, and what I'll need to give Denny to thank her for weaving in all those ends...
I think for edging I'll just do a simple rolled edge - picking up stitches all the way around, knit a round or two, and then cast off.
Saturday, October 09, 2010
In Which I Show My Dirty Laundry, Metaphorically
A post on the Knittyblog about why I love spreadsheets, and how I use them to help me in my knitting.
Showing the world that snippet of my stash inventory feels like showing my dirty laundry in public, it really does.
Denny confessed to me today that she really couldn't understand how I could be good at math and bad at arithmetic. Ask anyone who's tried to split a restaurant bill with me - I always have to get my writer hubby to work out the tip.
On a different note: Happy Birthday, John. The world misses you. I miss you. You have been more of an influence on me than many know - and not just because of my undying love for Chelsea boots and caps.
Monday, October 04, 2010
At Last! A Solution for My Lizard Ridge Leftovers
I finished Lizard Ridge 3 years, 3 months and 10 days ago.
Since then, there has been a little plastic bag of leftovers in my stash.

When I cleaned out my stash a few weeks ago, I was reminded that it was there.
And I started thinking.
I'd always meant to use them up, these leftovers. I'd weighed it - there was about 400gm in the bag. (If truth be told, it's not entirely Lizard Ridge leftovers. There are a few bits and pieces from other projects in there, too.) But net net: I had 400m of Kureyon, mostly in little tiny 5g balls.
I had tried some crochet, but since there wasn't enough to make an actual blanket - and given that I already had a Kureyon blanket - it didn't seem like the right application.
I've been teaching a class recently on my Top-Down Vest pattern, and I've been working with the pattern, trying a few modifications and variations. The original pattern calls for worsted weight gauge - 20 sts/4 inches. But there was no reason I couldn't do it with an aran weight (18 sts/4 inches) - and 400m is just about exactly what I need to make a vest.
And the die was cast.
So I have began a top-down vest with my Lizard Ridge Leftovers.
There is a fine line between a knitting project that marks you as eccentric, and one that marks you as truly insane.


I'll let you judge whether I have crossed the line...
Sunday, October 03, 2010
Hats Hats Hats!
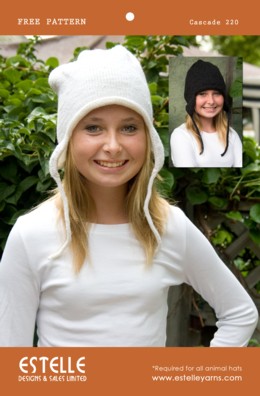
A few months ago I worked on a series of hat designs for Estelle yarns. Much fun was had...
There's the basic hat... Nice and simple, using Cascade 220 - with earflaps for warmth.
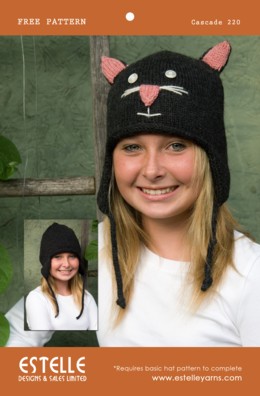
There's a kitten...
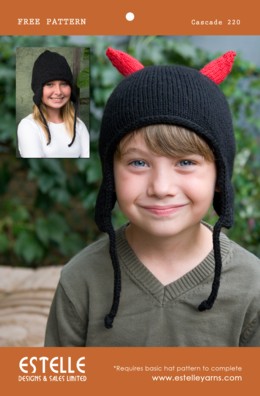
A devil...
A polar bear...

And naturally, a raccoon...
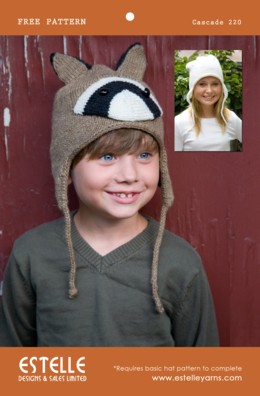
Free patterns available for download here. Something for every taste and personality!
There's the basic hat... Nice and simple, using Cascade 220 - with earflaps for warmth.
There's a kitten...
A devil...
A polar bear...
And naturally, a raccoon...
Free patterns available for download here. Something for every taste and personality!
Wednesday, September 29, 2010
Top-Down Conversion Tutorial Part Three: The Body
When last we met, dear readers, you had a back and two front pieces.
The back looks like this:

The fronts look like this:

At this stage, you should seam the shoulders together. (This step is saved if you start the fronts by picking up stitches, of course.)
You'll have something that looks like this...

And from here, it's easy.
If you're working an open vest, just work back and forth on the united stitches; if you're working a closed vest, work in rounds.
It will look like this, and you'll be able to try it on, and add waist shaping as required...

And I'm clearly on a roll with this method, because I've made another one.

This was a leftovers vest, using up some Cascade 220 from a design project. I wanted the vest fitted so that it would be a good layer under a jacket - and frankly, because I didn't have that much yarn. It's the length it is because I ran out of the white! Precisely the advantage of working top-down! There's fairly extreme bust/waist shaping, to keep it fitted and snug.
If you're working top-down and are truly worried about running of yarn, then I recommend working the neck and armhole edgings before you continue with the body.
The back looks like this:
The fronts look like this:

At this stage, you should seam the shoulders together. (This step is saved if you start the fronts by picking up stitches, of course.)
You'll have something that looks like this...

And from here, it's easy.
If you're working an open vest, just work back and forth on the united stitches; if you're working a closed vest, work in rounds.
It will look like this, and you'll be able to try it on, and add waist shaping as required...
And I'm clearly on a roll with this method, because I've made another one.

This was a leftovers vest, using up some Cascade 220 from a design project. I wanted the vest fitted so that it would be a good layer under a jacket - and frankly, because I didn't have that much yarn. It's the length it is because I ran out of the white! Precisely the advantage of working top-down! There's fairly extreme bust/waist shaping, to keep it fitted and snug.
If you're working top-down and are truly worried about running of yarn, then I recommend working the neck and armhole edgings before you continue with the body.
Tuesday, September 28, 2010
Roasted Carrot Sock Pattern Available Online: Updated
The pattern is now available for purchase at the Etsy shop of Viola Fibers...
If you haven't yet had the chance to try Viola Fibers yarns, I suggest you do. They are seriously wonderful.
Also available at Patternfish and Ravelry.
Saturday, September 25, 2010
Catching Up/Book Giveaway Update/Knitting for Preemies Links
Dear Readers... You might know that I have been dividing my blogging energy of late.
Are you also reading the KnittyBlog? I post there at least once a week. I write the weekly What's What Wednesday Round-up. It's a round up of events, cool things going on in the knitterly world, and fun stuff we've found online.
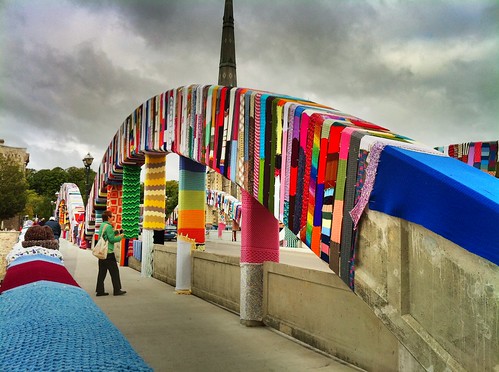
I also write on other topics. This week I wrote about the KNIT CamBRIDGE project. If you haven't read about it, I recommend you do. You will be moved and amazed. I was.
And it's taken a while, sorry, but we have landed on a winner for the book of patterns for clothes for premature babies. Janice H - please email me at kate at wisehildaknits dot com with your postal address and I'll send it to you.
Now, that having been said, lots of knitters told me about their efforts to knit for preemies and neo-natal wards at their local hospitals. I hate to leave knitters without patterns, so I recommend they visit this site. There's a great roundup of patterns for the tiniest babies there, with links to tips on making suitable clothes, and information on sizing and growth charts. A very valuable resource.
Thanks to all of you who give love and warmth in the form of knitted stitches.
Are you also reading the KnittyBlog? I post there at least once a week. I write the weekly What's What Wednesday Round-up. It's a round up of events, cool things going on in the knitterly world, and fun stuff we've found online.
I also write on other topics. This week I wrote about the KNIT CamBRIDGE project. If you haven't read about it, I recommend you do. You will be moved and amazed. I was.
And it's taken a while, sorry, but we have landed on a winner for the book of patterns for clothes for premature babies. Janice H - please email me at kate at wisehildaknits dot com with your postal address and I'll send it to you.
Now, that having been said, lots of knitters told me about their efforts to knit for preemies and neo-natal wards at their local hospitals. I hate to leave knitters without patterns, so I recommend they visit this site. There's a great roundup of patterns for the tiniest babies there, with links to tips on making suitable clothes, and information on sizing and growth charts. A very valuable resource.
Thanks to all of you who give love and warmth in the form of knitted stitches.
Sunday, September 19, 2010
New Sock Design: River Run
A few months ago, Three Irish Girls invited me to create an exclusive design for their yarn... they shipped me a skein of the loveliest, freshest light blue... I took one look at it, and it was obvious what it wanted to be... it was a clear, fresh mountain stream, cascading over rocks.
And so was born River Run...

Another pair using one of my signature details - differing left and right socks. If you're one of those knitters who suffers from Second Sock Syndrome, this should help keep you interested. A keen eye will notice that I was having fun with the ribbing, too...


The pattern is available for purchase from their website, here.
I love their yarn - great semi-solid colourways, and a lovely soft hand with that all-important nylon for long wear. Even if you're not up for River Run, they have lots of other great designs, and lovely yarn.
And so was born River Run...
Another pair using one of my signature details - differing left and right socks. If you're one of those knitters who suffers from Second Sock Syndrome, this should help keep you interested. A keen eye will notice that I was having fun with the ribbing, too...

The pattern is available for purchase from their website, here.
I love their yarn - great semi-solid colourways, and a lovely soft hand with that all-important nylon for long wear. Even if you're not up for River Run, they have lots of other great designs, and lovely yarn.
Thursday, September 16, 2010
Top-Down Conversion Tutorial Part Two: Upper Fronts
Alright, back to the pattern.
You've got the upper back worked at this point, and it looks roughly like this...
The next pieces to be worked are the upper fronts. There are two ways this can be done: you can start them as separate pieces or you can pick up the starting stitches along the cast-on edge at the top of the back.
It's a little simpler to do them as separate pieces, so I'll discuss that.
The front shoulders match the back shoulders - that is, the cast-on steps. The first step is 5 sts, the second is 6, and you need to end up with 11 sts.
For the left front: Cast on 5 sts, purl to end (RS). Cast on 6 sts, purl to end (RS), then knit across all 11 sts. RS is now facing and we've got our full 11 shoulder stitches. We know that we don't need to do anything about the armholes until the piece is 5 inches long, so we just need to worry about the neck shaping.
Going from the bottom up, the neckline shaping starts 3.5 inches up from the start of the armhole shaping. And it takes place over 8 rows: the initial cast off, and then 3 reps of a decrease every RS row.
Work first 14 (15, 16, 17) stitches. Attach second ball of yarn and cast off centre 14 stitches. Work to end. Continuing in pattern, decrease 1 stitch at neck edge next 3 (3, 4, 4) right side rows. 11 (12, 12, 13) stitches remain on each side.
So if I'm going from the top down, I need to finish the neckline shaping 3.5 inches from the end of the armhole shaping. And remember that I finish the armhole shaping 6 inches from the top - see the earlier post for this - so I need to finish the neckline shaping 2.5 inches from the start. (That is, 6 inches minus 3.5 inches.)
What's my row gauge? 4 rows per inch, and 2.5 inches is 10 rows, and I've got 8 rows of neckline shaping, so I need to start the neckline shaping 2 rows down from the end of the shoulder shaping. I've just finished the shoulder shaping, so I work 2 rows even, and then start neckline shaping.
To do the neckline shaping, I need to increase 1 st at neck edge on the following 3 RS rows. Easy. Do make sure you work the final WS row, so you're in the right place for the next step.
And then I'm done the left front. Those stitches go on hold, and you can cut the yarn.
For the right front, it's the same, but with shapings reversed... The cast on goes as follows: Cast on 5 sts, knit to end (WS). Cast on 6 sts, knit to end (WS). RS is now facing and we've got our full 11 shoulder stitches. Again, work those two even rows, and then start the neckline shaping: increase 1 sts at neck edge on the following 3 RS rows, and work the WS row to make sure you're in the right spot.
So now you've got two pieces ready to be joined... With the yarn that is attached to the right front piece, purl across those sts, cast on 14, and then purl across the left front stitches. Knit all sts back for the WS. You can now continue even on these joined sts until it's 5 inches long, just as you did for the back. And work the armhole shaping just as for the back.
Next up: joining the body.
You've got the upper back worked at this point, and it looks roughly like this...
 The next pieces to be worked are the upper fronts. There are two ways this can be done: you can start them as separate pieces or you can pick up the starting stitches along the cast-on edge at the top of the back.
It's a little simpler to do them as separate pieces, so I'll discuss that.
The front shoulders match the back shoulders - that is, the cast-on steps. The first step is 5 sts, the second is 6, and you need to end up with 11 sts.
For the left front: Cast on 5 sts, purl to end (RS). Cast on 6 sts, purl to end (RS), then knit across all 11 sts. RS is now facing and we've got our full 11 shoulder stitches. We know that we don't need to do anything about the armholes until the piece is 5 inches long, so we just need to worry about the neck shaping.
Going from the bottom up, the neckline shaping starts 3.5 inches up from the start of the armhole shaping. And it takes place over 8 rows: the initial cast off, and then 3 reps of a decrease every RS row.
Work first 14 (15, 16, 17) stitches. Attach second ball of yarn and cast off centre 14 stitches. Work to end. Continuing in pattern, decrease 1 stitch at neck edge next 3 (3, 4, 4) right side rows. 11 (12, 12, 13) stitches remain on each side.
So if I'm going from the top down, I need to finish the neckline shaping 3.5 inches from the end of the armhole shaping. And remember that I finish the armhole shaping 6 inches from the top - see the earlier post for this - so I need to finish the neckline shaping 2.5 inches from the start. (That is, 6 inches minus 3.5 inches.)
What's my row gauge? 4 rows per inch, and 2.5 inches is 10 rows, and I've got 8 rows of neckline shaping, so I need to start the neckline shaping 2 rows down from the end of the shoulder shaping. I've just finished the shoulder shaping, so I work 2 rows even, and then start neckline shaping.
To do the neckline shaping, I need to increase 1 st at neck edge on the following 3 RS rows. Easy. Do make sure you work the final WS row, so you're in the right place for the next step.
And then I'm done the left front. Those stitches go on hold, and you can cut the yarn.
For the right front, it's the same, but with shapings reversed... The cast on goes as follows: Cast on 5 sts, knit to end (WS). Cast on 6 sts, knit to end (WS). RS is now facing and we've got our full 11 shoulder stitches. Again, work those two even rows, and then start the neckline shaping: increase 1 sts at neck edge on the following 3 RS rows, and work the WS row to make sure you're in the right spot.
So now you've got two pieces ready to be joined... With the yarn that is attached to the right front piece, purl across those sts, cast on 14, and then purl across the left front stitches. Knit all sts back for the WS. You can now continue even on these joined sts until it's 5 inches long, just as you did for the back. And work the armhole shaping just as for the back.
Next up: joining the body.
Monday, September 13, 2010
Top-Down Conversion Tutorial Part One: Upper Back
As I've blogged recently, I've been reworking an old design... the initial idea, progress report one, progress report two, progress report three.
It's done, and I'm very pleased with it.


I love how the exaggerated cowl contrasts with the very fitted body, and I adore the classic oatmealy texture of the yarn, which was screaming out for a cable.
As I mentioned, it's reworking of a vest I knitted years ago.

But this time, I wanted to knit it from the top down. As I've said before, working top-down has some excellent advantages: you can adjust the length and the body fit as you go, and you can manage yarn usage if you're worried you might run out.
And for a vest it's easy-peasy! Here's the original pattern:
Plaid Cable Vest
SIZES:
Ladies XS, S, M, L
FINISHED MEASUREMENTS:
Bust: 34 (36, 28, 40) inches/86 (92, 96, 101) cm
Length: 19 (20, 21, 22) inches/48 (50, 53, 56) cm
MATERIALS:
3 (3, 4, 4) x 100 gm Rowan Plaid – Sample is in colour 160
1 pair 8 mm needles
1 cable needle
2 stitch markers
TENSION:
11 sts and 16 rows over 4 inches/10 cm square in stocking stitch using 8mm needles.
TERMS:
C6B: slip 3 stitches to cable needle and hold in back; knit 3; knit 3 from cable needle
METHOD:
Directions are for smallest size with larger sizes in parentheses.
Back:
Using 8mm needles, cast on 48 (52, 56, 60) stitches.
Row 1 (RS): knit 31 (33, 35, 37), place marker, knit 6, place second marker, knit to end. The markers indicate the position of the cable.
Row 2: knit 11 (13, 15, 17), purl 6, knit to end.
Row 3: knit.
Row 4: as row 2.
From here, you’ll work the body of the vest in reverse stocking stitch – purl on right side rows, knit on wrong side – while working the cable in stocking stitch.
Row 5 (RS): purl to first marker, knit 6, purl to end.
Row 6: knit to first marker, purl 6, knit to end.
Row 7: purl to first marker, C6B, purl to end.
Row 8: knit to first marker, purl 6, knit to end.
Row 9: purl to first marker, knit 6, purl to end.
Row 10: knit to first marker, purl 6, knit to end.
Row 11: purl to first marker, knit 6, purl to end.
Row 12: knit to first marker, purl 6, knit to end.
Row 13: purl to first marker, knit 6, purl to end.
These 8 rows establish cable pattern.
Repeat cable pattern until piece measures 4 (4 ¼, 4 ¼, 4 ½) inches/10 (11, 11, 12) cm from cast on, ending with a WS row.
Continuing in cable pattern, p2tog at beginning and end of next 2 right side rows.
44 (48, 52, 56) stitches.
Continue even in cable pattern until piece measures 8 (8 ½, 8 ½, 9) inches/
20 (22, 22, 24) cm from cast on. Increase 1 stitch at beginning and end of next 2 right side rows. 48 (52, 56, 60) stitches.
Shape Armholes:
Continue even in cable pattern until piece measures 12 (12 ½, 13, 13 ½) inches/
30 (32, 33, 35) cm, ending with a WS row.
Cast off 2 (2, 3, 3) stitches at beginning of next two rows.
Cast off 1 stitch at beginning of next 2 (4, 4, 6) rows. 42 (44, 46, 48) stitches.*
Work even until armhole measures 6 (6 ½, 7, 7½) inches/15 (16, 18, 19) cm, ending with a WS row.
Shape shoulders:
Cast off 6 (6, 6, 7) stitches at beginning next two rows.
Cast off 5 (6, 6, 6) stitches at beginning next two rows.
Cast off remaining 20 (20, 22, 22) stitches.
Front:
Work as for back until *.
Work even until armhole measures 3 ½ (3 ¾, 4, 4 ¼) inches/9 (9.5, 10, 11) cm, ending with a WS row.
Work first 14 (15, 16, 17) stitches. Attach second ball of yarn and cast off centre 14 stitches. Work to end.
You’ll work both sides of the front at the same time from here. Tip: don’t put your needles down unless you’ve worked a row on both sides – it’s too easy to lose track of where you are.
Continuing in pattern, decrease 1 stitch at neck edge next 3 (3, 4, 4) right side rows. 11 (12, 12, 13) stitches remain on each side.
Work even until armhole measures 6 (6 ¾, 7 ¼, 7¾) inches/16 (17, 19. 20) cm, ending with a WS row.
Cast off 6 (6, 6, 7) stitches at armhole edge, work to end.
Cast off remaining 5 (6, 6, 6) stitches.
Cowl neck:
Block pieces to desired measurements. Sew left shoulder seam.
With right side facing, pick up 22 (22, 24, 24) stitches along back, 12 (14, 16, 18) along left front, 14 stitches along front, and 12 (14, 16, 18) along right front. 60 (65, 70, 74) stitches total.
First row (wrong side facing), purl all stitches through back loop. Work in stocking stitch for 8 inches. Note that the purl side of the cowl is the inside, so that it matches the body of the vest when folded over.
Cast off loosely.
Finishing:
Sew right shoulder and cowl seam, reversing seam for cowl, as the inside of the cowl is visible when folded over.
Armhole edging:
With right side facing, pick up 48 (52, 56, 60) stitches around armhole. Cast off knitwise, working stitches through the back loop.
Work both sides alike.
Sew side seams.
Obviously, the cowl instructions and edgings remain the same, no worries about that. For the sake of this tutorial I'm going to ignore the cable for the time being. The vest is worked in reverse stocking stitch, so the right side is the purl side.
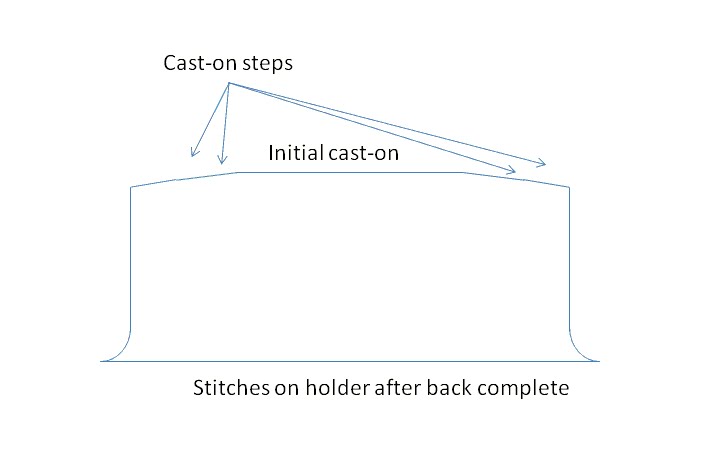
Let's focus on the back, and work with the numbers for the smallest size. We start at the top of the back neck.
The back neck and shoulders are shaped: you have 42 sts, then cast off in five steps: 6 twice, 5 twice, and then the remaining 20.
So to work from the top, I cast on 20, and then cast on in steps: 5 stitches twice then 6 stitches twice, giving me 42 stitches.
In detail it goes like this:
Cast on 20 sts. Purl 1 row (RS). Cast on 5 sts, purl to end. Cast on 5 sts, knit to end. Cast on 6 sts, purl to end. Cast on 6 sts, knit to end. 42 sts total.
Then you work even in reverse stocking stitch for a while on those 42 sts, until you need to do armhole shaping.
We need to work out how far to work. The pattern tells me that the armhole should be 6 inches long before the shoulder shaping. And I know that I work 4 rows of armhole shaping for the smallest size - that initial cast-off over two rows, and then 1 repeat of a two-row pattern. And at my row gauge, 4 rows is an inch. And so therefore I need my armhole to be 5 inches long measured from the final cast-on step. So I work even for 5 inches.
And armhole shaping in reverse is easy and fun. In the original, it goes like this:
Cast off 2 (2, 3, 3) stitches at beginning of next two rows.
Cast off 1 stitch at beginning of next 2 (4, 4, 6) rows.
So I cast on 1 st at the start of the next 2 rows, and then cast on 2 sts at the start of the following 2 rows. And I have 48 sts, as required.
And then these stitches go on a holder.
Next up: converting the upper fronts.
It's done, and I'm very pleased with it.


I love how the exaggerated cowl contrasts with the very fitted body, and I adore the classic oatmealy texture of the yarn, which was screaming out for a cable.
As I mentioned, it's reworking of a vest I knitted years ago.

But this time, I wanted to knit it from the top down. As I've said before, working top-down has some excellent advantages: you can adjust the length and the body fit as you go, and you can manage yarn usage if you're worried you might run out.
And for a vest it's easy-peasy! Here's the original pattern:
Plaid Cable Vest
SIZES:
Ladies XS, S, M, L
FINISHED MEASUREMENTS:
Bust: 34 (36, 28, 40) inches/86 (92, 96, 101) cm
Length: 19 (20, 21, 22) inches/48 (50, 53, 56) cm
MATERIALS:
3 (3, 4, 4) x 100 gm Rowan Plaid – Sample is in colour 160
1 pair 8 mm needles
1 cable needle
2 stitch markers
TENSION:
11 sts and 16 rows over 4 inches/10 cm square in stocking stitch using 8mm needles.
TERMS:
C6B: slip 3 stitches to cable needle and hold in back; knit 3; knit 3 from cable needle
METHOD:
Directions are for smallest size with larger sizes in parentheses.
Back:
Using 8mm needles, cast on 48 (52, 56, 60) stitches.
Row 1 (RS): knit 31 (33, 35, 37), place marker, knit 6, place second marker, knit to end. The markers indicate the position of the cable.
Row 2: knit 11 (13, 15, 17), purl 6, knit to end.
Row 3: knit.
Row 4: as row 2.
From here, you’ll work the body of the vest in reverse stocking stitch – purl on right side rows, knit on wrong side – while working the cable in stocking stitch.
Row 5 (RS): purl to first marker, knit 6, purl to end.
Row 6: knit to first marker, purl 6, knit to end.
Row 7: purl to first marker, C6B, purl to end.
Row 8: knit to first marker, purl 6, knit to end.
Row 9: purl to first marker, knit 6, purl to end.
Row 10: knit to first marker, purl 6, knit to end.
Row 11: purl to first marker, knit 6, purl to end.
Row 12: knit to first marker, purl 6, knit to end.
Row 13: purl to first marker, knit 6, purl to end.
These 8 rows establish cable pattern.
Repeat cable pattern until piece measures 4 (4 ¼, 4 ¼, 4 ½) inches/10 (11, 11, 12) cm from cast on, ending with a WS row.
Continuing in cable pattern, p2tog at beginning and end of next 2 right side rows.
44 (48, 52, 56) stitches.
Continue even in cable pattern until piece measures 8 (8 ½, 8 ½, 9) inches/
20 (22, 22, 24) cm from cast on. Increase 1 stitch at beginning and end of next 2 right side rows. 48 (52, 56, 60) stitches.
Shape Armholes:
Continue even in cable pattern until piece measures 12 (12 ½, 13, 13 ½) inches/
30 (32, 33, 35) cm, ending with a WS row.
Cast off 2 (2, 3, 3) stitches at beginning of next two rows.
Cast off 1 stitch at beginning of next 2 (4, 4, 6) rows. 42 (44, 46, 48) stitches.*
Work even until armhole measures 6 (6 ½, 7, 7½) inches/15 (16, 18, 19) cm, ending with a WS row.
Shape shoulders:
Cast off 6 (6, 6, 7) stitches at beginning next two rows.
Cast off 5 (6, 6, 6) stitches at beginning next two rows.
Cast off remaining 20 (20, 22, 22) stitches.
Front:
Work as for back until *.
Work even until armhole measures 3 ½ (3 ¾, 4, 4 ¼) inches/9 (9.5, 10, 11) cm, ending with a WS row.
Work first 14 (15, 16, 17) stitches. Attach second ball of yarn and cast off centre 14 stitches. Work to end.
You’ll work both sides of the front at the same time from here. Tip: don’t put your needles down unless you’ve worked a row on both sides – it’s too easy to lose track of where you are.
Continuing in pattern, decrease 1 stitch at neck edge next 3 (3, 4, 4) right side rows. 11 (12, 12, 13) stitches remain on each side.
Work even until armhole measures 6 (6 ¾, 7 ¼, 7¾) inches/16 (17, 19. 20) cm, ending with a WS row.
Cast off 6 (6, 6, 7) stitches at armhole edge, work to end.
Cast off remaining 5 (6, 6, 6) stitches.
Cowl neck:
Block pieces to desired measurements. Sew left shoulder seam.
With right side facing, pick up 22 (22, 24, 24) stitches along back, 12 (14, 16, 18) along left front, 14 stitches along front, and 12 (14, 16, 18) along right front. 60 (65, 70, 74) stitches total.
First row (wrong side facing), purl all stitches through back loop. Work in stocking stitch for 8 inches. Note that the purl side of the cowl is the inside, so that it matches the body of the vest when folded over.
Cast off loosely.
Finishing:
Sew right shoulder and cowl seam, reversing seam for cowl, as the inside of the cowl is visible when folded over.
Armhole edging:
With right side facing, pick up 48 (52, 56, 60) stitches around armhole. Cast off knitwise, working stitches through the back loop.
Work both sides alike.
Sew side seams.
Obviously, the cowl instructions and edgings remain the same, no worries about that. For the sake of this tutorial I'm going to ignore the cable for the time being. The vest is worked in reverse stocking stitch, so the right side is the purl side.
Let's focus on the back, and work with the numbers for the smallest size. We start at the top of the back neck.
The back neck and shoulders are shaped: you have 42 sts, then cast off in five steps: 6 twice, 5 twice, and then the remaining 20.
So to work from the top, I cast on 20, and then cast on in steps: 5 stitches twice then 6 stitches twice, giving me 42 stitches.
In detail it goes like this:
Cast on 20 sts. Purl 1 row (RS). Cast on 5 sts, purl to end. Cast on 5 sts, knit to end. Cast on 6 sts, purl to end. Cast on 6 sts, knit to end. 42 sts total.
Then you work even in reverse stocking stitch for a while on those 42 sts, until you need to do armhole shaping.
We need to work out how far to work. The pattern tells me that the armhole should be 6 inches long before the shoulder shaping. And I know that I work 4 rows of armhole shaping for the smallest size - that initial cast-off over two rows, and then 1 repeat of a two-row pattern. And at my row gauge, 4 rows is an inch. And so therefore I need my armhole to be 5 inches long measured from the final cast-on step. So I work even for 5 inches.
And armhole shaping in reverse is easy and fun. In the original, it goes like this:
Cast off 2 (2, 3, 3) stitches at beginning of next two rows.
Cast off 1 stitch at beginning of next 2 (4, 4, 6) rows.
So I cast on 1 st at the start of the next 2 rows, and then cast on 2 sts at the start of the following 2 rows. And I have 48 sts, as required.
And then these stitches go on a holder.
Next up: converting the upper fronts.
Subscribe to:
Posts (Atom)