Thursday, December 26, 2013

Once you've made mitts, it's important not to lose them

Strings! Perhaps it was just that I was a careful child, but I've never actually had mittens with strings.

I get asked about them fairly often, in mitten knitting classes - how to make them, how long they should be - but I've never had more than vague suggestions to offer.

I recently completed a pair of mittens in one of my favourite yarns - Sweet Georgia's Superwash Chunky  - and I had some of the skein leftover.

So I decided to make a string for them.

I used 4.5mm/US 7 DPNs - several sizes smaller than I used to make the mittens - cast on 3 stitches and worked a length of i-cord....


The question was, of course, how long the string should be. After a bit of research - that is, chatting with knitting mothers - we determined that the optional length should be the height of the wearer. 

But a very sensible knitting mother also pointed out that the cords are likely to stretch. Knit them tight to keep the stretch to a minimum. If knitting mitts for someone still growing, a bit of stretch isn't a bad thing. For adults, however, you need to keep them as close to their intended length as possible. Use the cast-on and cast off tails of the i-cord to sew the to the inside of the mitten cuff, but leave the cast-off tail accessible so that when the cords stretch you can remove the mitt, shorten the cord and then reattach it.  (The very sensible Fiona Ellis suggests making knots in the cord to take up the slack, too.)

I have discovered that there are many benefits to having mitts on a string: you can't lose them, they make an excellent extra pocket - great for holding my TTC tokens and transfers - and perhaps best of all, they make people smile. 

Saturday, December 14, 2013

Free Pattern: The Fingering Weight Fingerless Mitten Pattern


I was banging on about these so much recently, I though I might share the pattern.

They are worked top-down, so they're ideal for using up leftovers - and the thumb gusset is created by decreasing rather than increasing - I think it's a bit more elegant that way! If you are working from leftover yarn, divide it into two balls, and just work until you've run out of yarn.

A single mitt takes about 15gm-20gm of fingering weight yarn.

This is a slightly modified version of the pattern from the book, shorter in both hand and cuff for better use as layering mitts - and to help you use up leftovers!

If you've never made mitts before, this is a good place to start, as they skip many of the tricker bits of mitten-knitting. As long as you know how to knit in the round, you're good.

SIZES AND FINISHED MEASUREMENTS
Size XS (S, M, L, XL)
To Fit Teen/Women’s XS (Women’s S, Women’s M, Women’s L/Men’s S, Men’s L)
Hand Circumference 7(7.5,  8,  8.5,  9) inches
Full Length (adjustable) 6-7 inches

MATERIALS
Approximately 120 (130, 140, 160, 180) yds Fingering weight yarn.
1 set US 2.5/3mm needles for working in the round– DPNs, two circulars or a long circular as you prefer
Stitch markers

GAUGE
28 sts and 40 rounds over 4 inches/10 cm square in stockinette stitch in the round
Note: stitch gauge is very important, round gauge less so.

METHOD
Top
Cast on 42 (46, 50, 52, 56) sts. Distribute sts across needles as you prefer and join for working in the round, being careful not to twist. Note or mark beginning of round.

Ribbing round: (K1, p1) around.
Work ribbing as set for 1 inch.
Next round: Knit.
Work as set until piece measures desired length to thumb. I work mine so that they're 2 to 2.5 inches long so that they just cover my knuckles. Add an inch ro an inch and a half to cover more of your fingers.

Create thumbhole
Next round: Bind off 6 (6, 6, 6, 8) sts, k to end of round.
Following round: Using either the cable or backwards loop method, cast on 12 (12, 12, 14, 16sts, knit to end of round. 48 (52, 56, 60, 64) sts.

Note: You’ll probably find it easier to keep the new cast-on sts on the end-of-round needle as you work the first few rounds of the next section. If you do, place a marker before the cast on sts so you don’t lose track of the start of the round.

Knit 4 (2, 2, 2, 4) rounds. If you need to, rearrange sts at this point so that start of round is at the start of a needle, and place a second marker after the 12 (12, 12, 14, 16) cast on sts.

1st size only:
Decrease round: K1, SSK, k to 3 sts before marker, k2tog, k to end of round.
Knit 3 rounds.
Repeat the last 4 rounds 2 (-, -, -, -) more times, and work decrease round once more. 40 (-, -, -, -) sts.

2nd, 3rd, 4th and 5th sizes only:
Decrease round: K1, SSK, k to 3 sts before marker, k2tog, k to end of round.
Knit 5 rounds.
Repeat these last 6 rounds - (2, 2, 3, 3) more times and work Decrease round once more. - (44, 48, 50, 54) sts.

The thumb markers can be removed at this point.

Final decrease round: Knit, decreasing 6 (8, 10, 10, 10) sts evenly around. 34 (36, 38, 40, 44) sts. (See below for help with this.)
The final decrease round: Ultimately, it doesn’t really matter how you get to the final stitch count, but if you’re not sure how to do it, use these instructions.
1st size: (K5, k2tog, k4, k2tog, k5, k2tog) twice. 34 sts.
2nd size: (K4, k2tog, k3, k2tog) 4 times. 36 sts.
3rd size: (K3, k2tog) 8 times, (k2, k2tog) twice. 38 sts.
4th size: (K3, k2tog) 10 times. 40 sts.
5th size: (K3, k2tog, k4, k2tog) 4 times, (k3, k2tog) twice. 44 sts.
Cuff
Ribbing round: (K1, p1) around.
Work ribbing as set until cuff measures about 3 inches.
Note: This distance is the length of the cuff, worked down from the wrist. You can lengthen or shorten this as you wish. (Just remember, if you do make them longer, you might need more yarn!)

Bind off as follows:
K2, *insert tip of left needle into the fronts of these two sts (as if to ssk), and knit them together; k1. Rep from * until all sts are bound off. Cut yarn and pull through final st to secure.

Finishing
Block (by giving then a wash, no special treatment needed) and weave in ends.

Thursday, December 12, 2013

Thrumming?

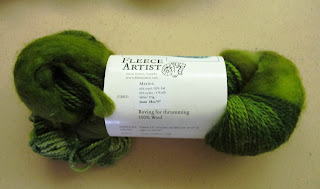
Many sensible knitters have suggested I try thrummed mittens for warmth. I've got a Fleece Artist kit for a pair of thrummed socks - I'm sure I could make a pair of mittens out of it:


I tried making a thrummed sock once, years ago, but fell down due to poor instructions. I didn't really know how to make the thrum - how much roving to use, how to secure it to the stitch. The resulting socks weren't nearly insulted or insulating enough.

Can you point me to any good instructions for thrumming?  Thanks!

Wednesday, December 11, 2013

Cold Hands: On Hand-Knit Mittens & Strategies for Staying Warm All Winter Long

I've written about this before: I suffer from a medical problem called Raynaud's Phenomenon. I have poor circulation, and in the cold, the blood flow to my hands and feet is "excessively reduced". This means that that I'm quicker to feel the cold in my extremities than many others, and I have to be careful to protect them, as I'm at risk of frostbite or other injuries. My fingers go numb, and it can take a while for them to return to normal when I come indoors on a winter day.

This means that I need warm handcoverings earlier in the winter -- and later into the spring -- than most.

And when the weather really turns bad, I have to get serious about my handcoverings.  I have consulted a knitting rheumatologist (hello Dr. N, if you're reading!) about this, and she made a number of key recommendations.
  • Mittens are always warmer than gloves - it's better to have air circulating, and if your fingers are together they can share the warmth. 
  • It's best if the mitten is a bit loose, to encourage that circulation.  
  • Layering is good. Two layers of mittens will trap warm air between them.
Hand-knit fabrics aren't really all that warm, as cold air blows through the holes in the fabric. No matter how densely you knit, there are little holes between the stitches, that air can sneak through.

Over the years, I've developed a few solutions.

As the evenings get chilly in September and October, I start wearing a pair of small fingerless mitts when I'm outside. These provide some basic coverage for cooler days, but are small and fitted, leaving enough movement that I can do whatever I need to -- type, knit, make coffee -- without having to take them off.


These are my fingerless mitt pattern from my Knit Accessories book, worked in fingering weight. The book has a worsted and a fingering-weight version. They're worked top-down so they are great for using up leftovers. Being small-footed, I can usually get a pair of these mitts and a pair of socks out of 100gm of sock yarn.

By mid-November, the fingerless mitts stay on pretty much all day, even in the house. I live in a big old drafty loft with high ceilings, and it can be pretty chilly at home. And I layer a pair of wool mittens on top. At first, they're a pair of light single-layer mittens - I like these 100% merino Icebreaker ones because they're very small and light, lined with a wooly fleece.


And then another few degrees cooler, and the other pair becomes a pair of thicker hand-knit mittens.

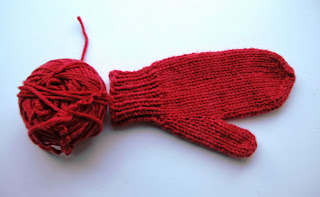
I'm very fond of these red ones, worked from my Basic Mittens pattern in my Knit Accessories book. As with all the patterns in that book, there's multiple gauges available - there's a worsted weight and a chunky weight pattern, which can also be worked with double-stranded worsted weight. The red pair are Cascade 220, the orange pair is Classic Elite mohair.


Or in a chunky/bulky weight, like this pair-to-be, in Sweet Georgia Superwash Chunky.


Warmer still are stranded colourwork mittens, as the floats on the wrong side of the work create a lining.

These are the Morse Code mittens, as published in Knitty.


And then as it gets colder, I change up to these: they're stranded colourwork mitts, felted to get rid of those pesky little holes in the fabric. For extra warmth I've lined them with a 'Thinsulate' fleece liner that I harvested from a pair of inexpensive acrylic mittens. Pattern recklessly improvised, using Briggs & Little Heritage yarn.


But when the weather truly turns foul, I grudgingly turn to a more modern solution: technical fabrics. I have a pair of Arctic-rated mittens like these from Mountain Equipment Co-op (the Canadian equivalent of REI), but still always with my fingerless mitts underneath - that way, if I need to take my hands out of my mitts, to answer my phone, when popping into the coffee shop, to grab a plastic bag for dog-related stuff - then I've still got some protection.

So yes, chances are, if you see me between the middle of September and the middle of April, I'll be wearing my fingerless mitts, even indoors. I actually have several pairs so I can wash them every couple of days. I figure that between coffee dribbles and the general wear-and-tear of everyday use, they need a wash. One of the reason sock yarn is so good for them - I can throw them in for a wash with a load of socks.

I even have a Christmas pair, made with yarn leftover from last year's Christmas socks.


Monday, December 02, 2013

I Heart NY; I also Heart You and Have a Present for You

New York City is one of my favourite places in the world to be.

We were just there last weekend, grabbing a mini vacation to celebrate Thanksgivukkahmas.

Although the air was brisk, it was sunny on Sunday, and we took a leisurely walk along the High Line. It's an old elevated railway track that's been turned into an urban park. The views are fantastic, and the whole thing is unexpected and wonderful.

I am going to be back there in January teaching at Vogue Knitting Live, the weekend of 17-19th.

I've got a full slate of socky classes
  • Top Down Socks 101: Ideal for knitters who know how to work in the round, and want to try top down socks.
  • Top Up Socks 101: Ideal for knitters who know how to work in the round, and want to try toe down socks.
If you've not knit socks of any kind before, I recommend starting with Top Down (it's a little easier to get started); if you've tried one type, I definitely encourage you to try the other!
  • Soxpertise: A focused session addressing FAQs and issues in sock knitting, including a discussion of the pros and cons of both methods, how to convert patterns, gusset holes, fit, pattern adjustments, etc. Bring your sock knitting questions!
  • You Spin Me Right Round: Magic Loop, DPNs and 2 Circulars:A hands-on workshop on the whys and wherefores of these different ways of working in the round.
  • Heels and Toes: An overview of different types of heels and toes, focused on fit and how to choose the right one for your particular fit needs and knitting interests. We'll talk about how to apply your own choices to an existing sock pattern.
  • Socks for Absolute Beginners: An intro for sock knitters for the very very new. You don't need to know how to work in the round, even! (SOLD OUT, SORRY!)
As a Thanksgivukkahmas special, we're offering a little bonus to you when you register for classes. Use the code "NYTEACHER14" when you check out, for a free gift! Click here to choose classes and register.


I hope to see you there!