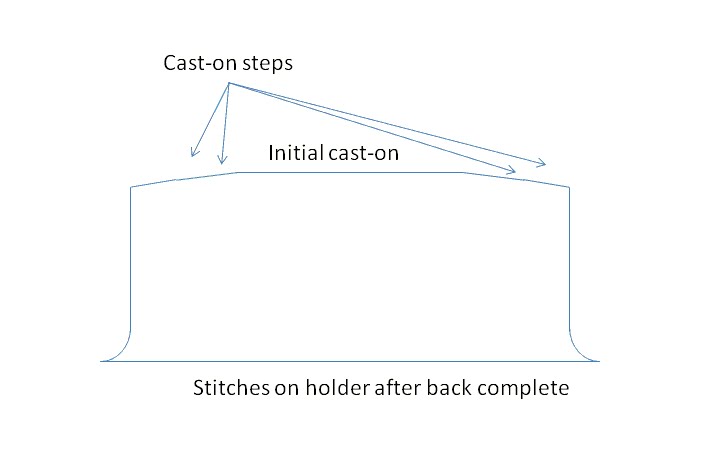
You've got the upper back worked at this point, and it looks roughly like this...
 The next pieces to be worked are the upper fronts. There are two ways this can be done: you can start them as separate pieces or you can pick up the starting stitches along the cast-on edge at the top of the back.
It's a little simpler to do them as separate pieces, so I'll discuss that.
The front shoulders match the back shoulders - that is, the cast-on steps. The first step is 5 sts, the second is 6, and you need to end up with 11 sts.
For the left front: Cast on 5 sts, purl to end (RS). Cast on 6 sts, purl to end (RS), then knit across all 11 sts. RS is now facing and we've got our full 11 shoulder stitches. We know that we don't need to do anything about the armholes until the piece is 5 inches long, so we just need to worry about the neck shaping.
Going from the bottom up, the neckline shaping starts 3.5 inches up from the start of the armhole shaping. And it takes place over 8 rows: the initial cast off, and then 3 reps of a decrease every RS row.
Work first 14 (15, 16, 17) stitches. Attach second ball of yarn and cast off centre 14 stitches. Work to end. Continuing in pattern, decrease 1 stitch at neck edge next 3 (3, 4, 4) right side rows. 11 (12, 12, 13) stitches remain on each side.
So if I'm going from the top down, I need to finish the neckline shaping 3.5 inches from the end of the armhole shaping. And remember that I finish the armhole shaping 6 inches from the top - see the earlier post for this - so I need to finish the neckline shaping 2.5 inches from the start. (That is, 6 inches minus 3.5 inches.)
What's my row gauge? 4 rows per inch, and 2.5 inches is 10 rows, and I've got 8 rows of neckline shaping, so I need to start the neckline shaping 2 rows down from the end of the shoulder shaping. I've just finished the shoulder shaping, so I work 2 rows even, and then start neckline shaping.
To do the neckline shaping, I need to increase 1 st at neck edge on the following 3 RS rows. Easy. Do make sure you work the final WS row, so you're in the right place for the next step.
And then I'm done the left front. Those stitches go on hold, and you can cut the yarn.
For the right front, it's the same, but with shapings reversed... The cast on goes as follows: Cast on 5 sts, knit to end (WS). Cast on 6 sts, knit to end (WS). RS is now facing and we've got our full 11 shoulder stitches. Again, work those two even rows, and then start the neckline shaping: increase 1 sts at neck edge on the following 3 RS rows, and work the WS row to make sure you're in the right spot.
So now you've got two pieces ready to be joined... With the yarn that is attached to the right front piece, purl across those sts, cast on 14, and then purl across the left front stitches. Knit all sts back for the WS. You can now continue even on these joined sts until it's 5 inches long, just as you did for the back. And work the armhole shaping just as for the back.
Next up: joining the body.


No comments:
Post a Comment